This article is currently in the process of being translated into Hebrew (~59% done).
הפקד TextBlock - עיצוב פנימי
במאמר האחרון ראינו את הפונקציונליות הבסיסית של הפקד TextBlock: הצגת טקסט פשוט ומעבר שורות אם נדרש. אפילו השתמשנו בצבע אחר מברירת המחדל כדי לרנדר את הטקסט, אבל מה אם אנחנו רוצים לעשות יותר מלהגדיר צבע סטטי לכל הטקסט ב-TextBlock?
למרבה המזל, פקד TextBlock תומך באלמנטים מוטבעים. המבנים הקטנים דמויי הפקד יורשים כולם מהמחלקה Inline, מה שאומר שניתן לעבד אותם בשורה, כחלק מטקסט גדול יותר. נכון לכתיבת שורות אלו, האלמנטים הנתמכים כוללים AnchoredBlock, Bold, Hyperlink, InlineUIContainer, Italic, LineBreak, Run, Span ו-Underline. בדוגמאות הבאות, נסתכל על רובן.
Bold, Italic and Underline
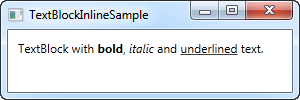
אלו הם כנראה הסוגים הפשוטים ביותר של אלמנטים מוטבעים. השמות שלהם אמורים לגלות לכם הרבה על מה שהם עושים, אבל עדיין ניתן לכם דוגמה מהירה על איך להשתמש בהם:
<Window x:Class="WpfTutorialSamples.Basic_controls.TextBlockInlineSample"
        xmlns="http://schemas.microsoft.com/winfx/2006/xaml/presentation"
        xmlns:x="http://schemas.microsoft.com/winfx/2006/xaml"
        Title="TextBlockInlineSample" Height="100" Width="300">
    <Grid>
		<TextBlock Margin="10" TextWrapping="Wrap">
			TextBlock with <Bold>bold</Bold>, <Italic>italic</Italic> and <Underline>underlined</Underline> text.
		</TextBlock>
    </Grid>
</Window>
בדומה ל-HTML, אתה רק מקיף את הטקסט שלך בתגית Bold כדי לקבל טקסט מודגש וכן הלאה. זה הופך את זה לקל מאוד ליצור ולהציג טקסט מגוון ביישומים שלכם.
שלושת התגיות האלה הן פשוט תת מחלקות של האלמנט Span, שכל אחת מהן מגדירה תכונה מסוימת על האלמנט Span כדי ליצור את האפקט הרצוי. לדוגמה, תגית Bold פשוט מגדירה את תכונת FontWeight על האלמנט Span הבסיסי, האלמנט Italic מגדיר את תכונת FontStyle וכן הלאה.
LineBreak - מעבר שורה
פשוט מוסיף מעבר שורה לטקסט. אנא עיין בפרק הקודם לקבלת דוגמה שבה אנו משתמשים באלמנט LineBreak.
Hyperlink - היפר קישור
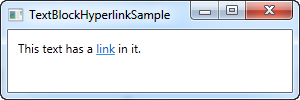
רכיב ההיפר-קישור מאפשר לך לקבל קישורים בטקסט שלך. הוא מוצג בסגנון שמתאים לערכת הנושא הנוכחית של Windows, שבדרך כלל יהיה טקסט כחול עם קו תחתון עם אפקט ריחוף אדום וסמן עכבר ביד. אתה יכול להשתמש במאפיין NavigateUri כדי להגדיר את כתובת האתר שאליה ברצונך לנווט. הנה דוגמה:
<Window x:Class="WpfTutorialSamples.Basic_controls.TextBlockHyperlinkSample"
        xmlns="http://schemas.microsoft.com/winfx/2006/xaml/presentation"
        xmlns:x="http://schemas.microsoft.com/winfx/2006/xaml"
        Title="TextBlockHyperlinkSample" Height="100" Width="300">
	<Grid>
		<TextBlock Margin="10" TextWrapping="Wrap">
			This text has a <Hyperlink RequestNavigate="Hyperlink_RequestNavigate" NavigateUri="https://www.google.com">link</Hyperlink> in it.
		</TextBlock>
	</Grid>
</Window>
ההיפר-קישור משמש גם בתוך דפי WPF, שם ניתן להשתמש בו כדי לנווט בין דפים. במקרה כזה, לא תצטרכו לטפל ספציפית באירוע RequestNavigate, כמו שאנחנו עושים בדוגמה, אבל כדי להפעיל כתובות URL חיצוניות מיישום WPF רגיל, אנחנו צריכים קצת עזרה מהאירוע הזה ומהמחלקה Process. אנו נרשמים לאירוע RequestNavigate, המאפשר לנו להפעיל את כתובת האתר המקושרת בדפדפן ברירת המחדל של המשתמשים עם אירוע פשוט כמו זה בקוד שמאחורי הקובץ:
private void Hyperlink_RequestNavigate(object sender, System.Windows.Navigation.RequestNavigateEventArgs e)
{
	System.Diagnostics.Process.Start(e.Uri.AbsoluteUri);
}
Run - הרצה
האלמנט Run מאפשר לך לעצב מחרוזת תוך שימוש בכל התכונות הזמינות של האלמנט Span, אך בעוד שאלמנט Span יכול להכיל אלמנטים מוטבעים אחרים, האלמנט Run יכול להכיל רק טקסט פשוט. זה הופך את האלמנט Span ליותר גמיש ולכן הבחירה ההגיונית ברוב המקרים.
Span
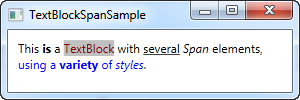
The Span element doesn't have any specific rendering by default, but allows you to set almost any kind of specific rendering, including font size, style and weight, background and foreground colors and so on. The great thing about the Span element is that it allows for other inline elements inside of it, making it easy to do even advanced combinations of text and style. In the following example, I have used many Span elements to show you some of the many possibilities when using inline Span elements:
<Window x:Class="WpfTutorialSamples.Basic_controls.TextBlockSpanSample"
        xmlns="http://schemas.microsoft.com/winfx/2006/xaml/presentation"
        xmlns:x="http://schemas.microsoft.com/winfx/2006/xaml"
        Title="TextBlockSpanSample" Height="100" Width="300">
    <Grid>
		<TextBlock Margin="10" TextWrapping="Wrap">
			This <Span FontWeight="Bold">is</Span> a
			<Span Background="Silver" Foreground="Maroon">TextBlock</Span>
			with <Span TextDecorations="Underline">several</Span>
			<Span FontStyle="Italic">Span</Span> elements,
			<Span Foreground="Blue">
				using a <Bold>variety</Bold> of <Italic>styles</Italic>
			</Span>.
		</TextBlock>
	</Grid>
</Window>
So as you can see, if none of the other elements make sense in your situation or if you just want a blank canvas when starting to format your text, the Span element is a great choice.
Formatting text from C#/Code-Behind
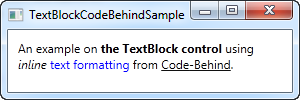
As you can see, formatting text through XAML is very easy, but in some cases, you might prefer or even need to do it from your C#/Code-Behind file. This is a bit more cumbersome, but here's an example on how you may do it:
<Window x:Class="WpfTutorialSamples.Basic_controls.TextBlockCodeBehindSample"
        xmlns="http://schemas.microsoft.com/winfx/2006/xaml/presentation"
        xmlns:x="http://schemas.microsoft.com/winfx/2006/xaml"
        Title="TextBlockCodeBehindSample" Height="100" Width="300">
    <Grid></Grid>
</Window>
using System;
using System.Windows;
using System.Windows.Controls;
using System.Windows.Documents;
using System.Windows.Media;
namespace WpfTutorialSamples.Basic_controls
{
public partial class TextBlockCodeBehindSample : Window
{
public TextBlockCodeBehindSample()
{
InitializeComponent();
TextBlock tb = new TextBlock();
tb.TextWrapping = TextWrapping.Wrap;
tb.Margin = new Thickness(10);
tb.Inlines.Add("An example on ");
tb.Inlines.Add(new Run("the TextBlock control ") { FontWeight = FontWeights.Bold });
tb.Inlines.Add("using ");
tb.Inlines.Add(new Run("inline ") { FontStyle = FontStyles.Italic });
tb.Inlines.Add(new Run("text formatting ") { Foreground = Brushes.Blue });
tb.Inlines.Add("from ");
tb.Inlines.Add(new Run("Code-Behind") { TextDecorations = TextDecorations.Underline });
tb.Inlines.Add(".");
this.Content = tb;
}
}
}
It's great to have the possibility, and it can be necessary to do it like this in some cases, but this example will probably make you appreciate XAML even more.