This article is currently in the process of being translated into Hebrew (~53% done).
פקד לוח העגינה (DockPanel)
לוח העגינה DockPanel מקל על קיבוע תוכן בכל ארבעת הכיוונים (מעלה, מטה, שמאל וימין). לכן הוא בחירה מצויינת בסיטואציות רבות, כשתרצו לחלק את החלון לאזורים מסויימים, במיוחד מאחר ובברירת המחדל, האלמנט האחרון בלוח העגינה, אלא אם כן התכונה הזו בוטלה באופן מפורש, יותאם באופן אוטומטי לשאר השטח (באמצע).
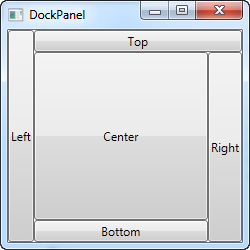
כפי שראינו בהרבה מהלוחות האחרים של WPF, ניתן להנות מהייתרונות של האפשרויות של הלוח על ידי שימוש בתכונה מצורפת שלו, במקרה הזה התכונה DockPanel.Dock, שקובעת לאיזה כיוון לעגון את הפקדים-הבנים שלו. אם לא תשתמשו בה, הפקד הראשון (או הפקדים הראשונים) יקובעו לשמאל, כשהאחרון תופס את המקום שנשאר. הנה דוגמה שמראה איך להשתמש בכך:
<Window x:Class="WpfTutorialSamples.Panels.DockPanel"
        xmlns="http://schemas.microsoft.com/winfx/2006/xaml/presentation"
        xmlns:x="http://schemas.microsoft.com/winfx/2006/xaml"
        Title="DockPanel" Height="250" Width="250">
	<DockPanel>
		<Button DockPanel.Dock="Left">Left</Button>
		<Button DockPanel.Dock="Top">Top</Button>
		<Button DockPanel.Dock="Right">Right</Button>
		<Button DockPanel.Dock="Bottom">Bottom</Button>
		<Button>Center</Button>
	</DockPanel>
</Window>
As already mentioned, we don't assign a dock position for the last child, because it automatically centers the control, allowing it to fill the remaining space. You will also notice that the controls around the center only takes up the amount of space that they need - everything else is left for the center position. That is also why you will see the Right button take up a bit more space than the Left button - the extra character in the text simply requires more pixels.
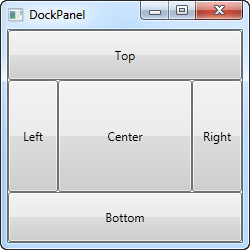
The last thing that you will likely notice, is how the space is divided. For instance, the Top button doesn't get all of the top space, because the Left button takes a part of it. The DockPanel decides which control to favor by looking at their position in the markup. In this case, the Left button gets precedence because it's placed first in the markup. Fortunately, this also means that it's very easy to change, as we'll see in the next example, where we have also evened out the space a bit by assigning widths/heights to the child controls:
<Window x:Class="WpfTutorialSamples.Panels.DockPanel"
        xmlns="http://schemas.microsoft.com/winfx/2006/xaml/presentation"
        xmlns:x="http://schemas.microsoft.com/winfx/2006/xaml"
        Title="DockPanel" Height="250" Width="250">
	<DockPanel>
		<Button DockPanel.Dock="Top" Height="50">Top</Button>
		<Button DockPanel.Dock="Bottom" Height="50">Bottom</Button>
		<Button DockPanel.Dock="Left" Width="50">Left</Button>
		<Button DockPanel.Dock="Right" Width="50">Right</Button>
		<Button>Center</Button>
	</DockPanel>
</Window>
הפקדים העליון והתחתון מקבלים עדיפות על הפקדים הימני והשמאלי, וכולים לוקחים 50 פיקסלים או לגובה או לרוחב. אם תגדילו או תקטינו את החלון, תראו שגם הרוחב או הגובה הסטטיים נשארים אותו הדבר לא משנה מה קורה - רק השטח במרכז גדל או קטן כשמשנים את גודל החלון.
LastChildFill
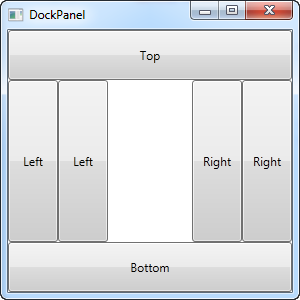
כפי שנאמר, התנהגות ברירת המחדל היא שהפקד-הבן האחרון של לוח העגינה ימלא את כל המקום שנשאר, אבל ניתן לנטרל זאת על ידי שימוש ב LastChildFill. הנה דוגמה בה ההתנהגות הזו מבוטלת, ובאותו זמן נראה את היכולת לעגון יותר מפקד אחד באותו צד:
<Window x:Class="WpfTutorialSamples.Panels.DockPanel"
        xmlns="http://schemas.microsoft.com/winfx/2006/xaml/presentation"
        xmlns:x="http://schemas.microsoft.com/winfx/2006/xaml"
        Title="DockPanel" Height="300" Width="300">
	<DockPanel LastChildFill="False">
		<Button DockPanel.Dock="Top" Height="50">Top</Button>
		<Button DockPanel.Dock="Bottom" Height="50">Bottom</Button>
		<Button DockPanel.Dock="Left" Width="50">Left</Button>
		<Button DockPanel.Dock="Left" Width="50">Left</Button>
		<Button DockPanel.Dock="Right" Width="50">Right</Button>
		<Button DockPanel.Dock="Right" Width="50">Right</Button>
	</DockPanel>
</Window>
בדוגמה הזו, אנחנו מקבעים שני פקדים לשמאל ושני פקדים לימין, ובאותו הזמן מכבים את התכונה LastChildFill. כך נשארים עם מקום ריק באמצע, מצב שנעדיף במקרים מסויימים.