This article is currently in the process of being translated into Korean (~97% done).
CheckBox 컨트롤
CheckBox 컨트롤은 옵션을 선택하거나 해제할때 사용하고, 코드에서는 보통 bool 값으로 표현됩니다. 다음의 예제를 보면 쉽게 이해할 수 있습니다.
<Window x:Class="WpfTutorialSamples.Basic_controls.CheckBoxSample"
        xmlns="http://schemas.microsoft.com/winfx/2006/xaml/presentation"
        xmlns:x="http://schemas.microsoft.com/winfx/2006/xaml"
        Title="CheckBoxSample" Height="140" Width="250">
    <StackPanel Margin="10">
		<Label FontWeight="Bold">Application Options</Label>
		<CheckBox>Enable feature ABC</CheckBox>
		<CheckBox IsChecked="True">Enable feature XYZ</CheckBox>
		<CheckBox>Enable feature WWW</CheckBox>
	</StackPanel>
</Window>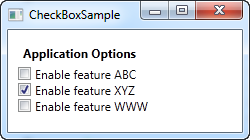
위의 예제에서 보듯이 CheckBox 는 사용법이 매우 간단합니다. 두번째 CheckBox 에서 IsChecked 라는 속성을 사용해서 기본을 선택된 상태로 시작하게 하였는데, 이것 말고는 CheckBox 를 사용하기 위해서 따로 필요한 것은 없습니다. IsChecked 속성은 코드에서도 CheckBox 가 선택되었는지 여부를 확인할 때 사용을 합니다.
사용자변경 content
CheckBox 는 ContentControl 클래스에서 상속을 받기 때문에 표시 내용을 자유롭게 구성할 수 있습니다. 위의 예제처럼 표시 내용이 단순하게 텍스트만 주어지면 WPF 는 자동으로 TextBlock 을 안에 넣어서 텍스트를 표시하는데 이것은 프로그램의 편의를 위한 것일 뿐입니다. 사실 CheckBox 안에는 모든 종류의 컨트롤을 넣을 수 있습니다. 다음의 예제에서 그것을 보여 줄 것입니다.
<Window x:Class="WpfTutorialSamples.Basic_controls.CheckBoxSample"
        xmlns="http://schemas.microsoft.com/winfx/2006/xaml/presentation"
        xmlns:x="http://schemas.microsoft.com/winfx/2006/xaml"
        Title="CheckBoxSample" Height="140" Width="250">
    <StackPanel Margin="10">
		<Label FontWeight="Bold">Application Options</Label>
		<CheckBox>
			<TextBlock>
				Enable feature <Run Foreground="Green" FontWeight="Bold">ABC</Run>
			</TextBlock>
		</CheckBox>
		<CheckBox IsChecked="True">
			<WrapPanel>
				<TextBlock>
					Enable feature <Run FontWeight="Bold">XYZ</Run>
				</TextBlock>
				<Image Source="/WpfTutorialSamples;component/Images/question.png" Width="16" Height="16" Margin="5,0" />
			</WrapPanel>
		</CheckBox>
		<CheckBox>
			<TextBlock>
				Enable feature <Run Foreground="Blue" TextDecorations="Underline" FontWeight="Bold">WWW</Run>
			</TextBlock>
		</CheckBox>
	</StackPanel>
</Window>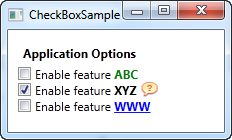
예제에서 볼 수 있듯이 콘텐츠로 모든 작업을 할 수 있습니다. 세 개의 체크 상자 모두가 각각 텍스트를 다르게 처리할 수 있고, 심지어 Image 컨트롤을 넣을 수도 있습니다. 텍스트 대신 콘트롤을 콘텐트로 지정함으로써 우리는 모양을 훨씬 더 자유롭게 표현할 수 있습니다. 훌륭한 점은 콘텐트의 어느 부분을 클릭하든 CheckBox를 켜거나 끌 수 있다는 것입니다 .
IsThreeState 속성
앞서 언급했듯이 CheckBox는 일반적으로 bool 값을 가집니다. 즉, true 또는 false (on 또는 off)의 두 가지 상태가 있습니다. 그러나 bool 타입이 null이 될 수 있게 되면서, 세 번째 옵션 (true, false 또는 null)을 CheckBox 컨트롤도 null을 지원하는 것이 효과적이게 되었습니다. IsThreeState 속성을 true로 설정하면 CheckBox에 "indeterminate state"라는 세 번째 옵션을 사용할 수 있습니다.
이것의 일반적인 사용법은, 하위 CheckBox 세트를 제어하고, 하위 CheckBox들의 상태를 표시 할 수있는 "모두 사용 (Enable all)" CheckBox를 갖는 것입니다. 상단의 "모두 사용 (Enable all)"체크 박스를 사용하여, 하위에 켜고 끌 수있는 기능 목록을 만드는 예제를 아래에서 살펴봅시다.
<Window x:Class="WpfTutorialSamples.Basic_controls.CheckBoxThreeStateSample"
        xmlns="http://schemas.microsoft.com/winfx/2006/xaml/presentation"
        xmlns:x="http://schemas.microsoft.com/winfx/2006/xaml"
        Title="CheckBoxThreeStateSample" Height="170" Width="300">
	<StackPanel Margin="10">
		<Label FontWeight="Bold">Application Options</Label>
		<StackPanel Margin="10,5">
			<CheckBox IsThreeState="True" Name="cbAllFeatures" Checked="cbAllFeatures_CheckedChanged" Unchecked="cbAllFeatures_CheckedChanged">Enable all</CheckBox>
			<StackPanel Margin="20,5">
				<CheckBox Name="cbFeatureAbc" Checked="cbFeature_CheckedChanged" Unchecked="cbFeature_CheckedChanged">Enable feature ABC</CheckBox>
				<CheckBox Name="cbFeatureXyz" IsChecked="True" Checked="cbFeature_CheckedChanged" Unchecked="cbFeature_CheckedChanged">Enable feature XYZ</CheckBox>
				<CheckBox Name="cbFeatureWww" Checked="cbFeature_CheckedChanged" Unchecked="cbFeature_CheckedChanged">Enable feature WWW</CheckBox>
			</StackPanel>
		</StackPanel>
	</StackPanel>
</Window>
using System;
using System.Windows;
namespace WpfTutorialSamples.Basic_controls
{
public partial class CheckBoxThreeStateSample : Window
{
public CheckBoxThreeStateSample()
{
InitializeComponent();
}
private void cbAllFeatures_CheckedChanged(object sender, RoutedEventArgs e)
{
bool newVal = (cbAllFeatures.IsChecked == true);
cbFeatureAbc.IsChecked = newVal;
cbFeatureXyz.IsChecked = newVal;
cbFeatureWww.IsChecked = newVal;
}
private void cbFeature_CheckedChanged(object sender, RoutedEventArgs e)
{
cbAllFeatures.IsChecked = null;
if((cbFeatureAbc.IsChecked == true) && (cbFeatureXyz.IsChecked == true) && (cbFeatureWww.IsChecked == true))
cbAllFeatures.IsChecked = true;
if((cbFeatureAbc.IsChecked == false) && (cbFeatureXyz.IsChecked == false) && (cbFeatureWww.IsChecked == false))
cbAllFeatures.IsChecked = false;
}
}
}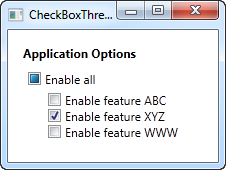
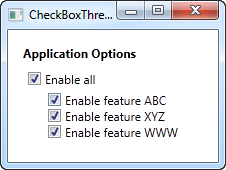
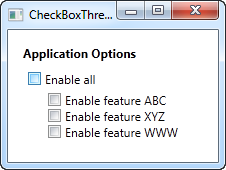
이 예제는 두 가지 관점에서 작동합니다. "Enable all" CheckBox를 선택하거나 취소하면 하위 CheckBox의 모든 박스가 선택되거나 취소됩니다. 하위 CheckBox를 체크하거나 해제하면 "Enable all" CheckBox 상태에 영향을 미칩니다. 체크 박스가 모두 체크되거나 모두 해제되면 상위의 "Enable all" CheckBox는 체크되거나 해제가 되지만, 하위 체크박스들의 값이 일치하지 않으면 "Enable all" CheckBox는 불확정 상태인 null이 됩니다.
위의 스크린 샷에서 이 모든 동작들을 확인할 수 있으며, CheckBox 컨트롤의 Checked나 Unchecked 이벤트를 핸들링 함으로써 구현됩니다. 실제 사용에서는 값을 바인딩 할 수 있지만, 이 예에서는 기본적인 IsThreeState 속성을 사용한 "Toggle all" 효과를 보여줍니다.