This article has been localized into Korean by the community.
StackPanel 컨트롤
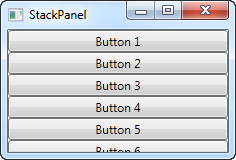
StackPanel은 WrapPanel과 매우 비슷하지만, 중요한 차이점이 최소한 한개는 있습니다. StackPanel은 컨텐츠를 래핑하지 않습니다. 대신 내용을 한쪽 방향으로 늘려 항목을 다른 항목 위에 쌓을 수 있습니다. WrapPanel에서 했던 것처럼 아주 간단한 예제를 보겠습니다.
<Window x:Class="WpfTutorialSamples.Panels.StackPanel"
        xmlns="http://schemas.microsoft.com/winfx/2006/xaml/presentation"
        xmlns:x="http://schemas.microsoft.com/winfx/2006/xaml"
        Title="StackPanel" Height="160" Width="300">
	<StackPanel>
		<Button>Button 1</Button>
		<Button>Button 2</Button>
		<Button>Button 3</Button>
		<Button>Button 4</Button>
		<Button>Button 5</Button>
		<Button>Button 6</Button>
	</StackPanel>
</Window>
제일 먼저 주목해야 할 것은 StackPanel이 콘텐츠를 배치할 충분한 공간이 있는지를 신경 쓰지 않는다는 것입니다. 컨텐츠을 어떤 방식으로든 래핑하지 않고, 스크롤 기능을 자동으로 제공하지는 않습니다. (나중에 ScrollViewer 컨트롤을 사용할 수 있습니다 - 자세한 내용은 이후 장 참조)
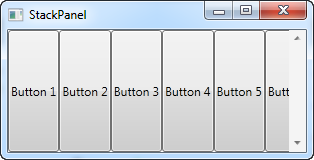
또한 WrapPanel은 기본 방향이 가로 방향인 것과는 달리 StackPanel의 기본 방향은 세로임을 알 수 있습니다. 그러나 WrapPanel과 마찬가지로 Orientation 속성을 사용하면 쉽게 변경할 수 있습니다.
<StackPanel Orientation="Horizontal">
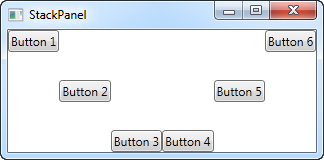
또 한가지 주의해야 할 점은 StackPanel은 기본적으로 자식 컨트롤을 확장한다는 것입니다. 첫 번째 예제에서와 같이 세로로 정렬된 StackPanel에서 모든 자식 컨트롤은 가로로 늘어납니다. 가로(horizontal)로 정렬된 StackPanel에서 위에 표시된 것처럼 모든 하위 컨트롤이 세로로 늘어납니다. StackPanel은 자식 컨트롤의 HorizontalAlignment 또는 VerticalAlignment 속성을 Stretch로 설정하여 이 작업을 수행하지만 원하는 경우 쉽게 재정의 할 수 있습니다. 앞의 예제에서와 같은 마크업을 사용하는 다음 예제를 살펴 보겠습니다. 이 예제에서는 모든 하위 컨트롤의 VerticalAlignment 속성에 값을 할당합니다.
<Window x:Class="WpfTutorialSamples.Panels.StackPanel"
        xmlns="http://schemas.microsoft.com/winfx/2006/xaml/presentation"
        xmlns:x="http://schemas.microsoft.com/winfx/2006/xaml"
        Title="StackPanel" Height="160" Width="300">
	<StackPanel Orientation="Horizontal">
		<Button VerticalAlignment="Top">Button 1</Button>
		<Button VerticalAlignment="Center">Button 2</Button>
		<Button VerticalAlignment="Bottom">Button 3</Button>
		<Button VerticalAlignment="Bottom">Button 4</Button>
		<Button VerticalAlignment="Center">Button 5</Button>
		<Button VerticalAlignment="Top">Button 6</Button>
	</StackPanel>
</Window>
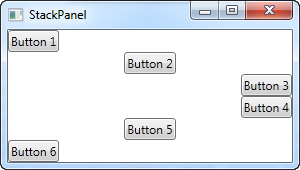
Top, Center 및 Bottom 값을 사용하여 버튼을 멋진 패턴으로 배치합니다. 물론 자식 컨트롤에서 HorizontalAlignment를 사용할 수 있는 Vertical로 정렬된 StackPanel에서도 동일한 작업을 수행 할 수 있습니다.
<Window x:Class="WpfTutorialSamples.Panels.StackPanel"
        xmlns="http://schemas.microsoft.com/winfx/2006/xaml/presentation"
        xmlns:x="http://schemas.microsoft.com/winfx/2006/xaml"
        Title="StackPanel" Height="160" Width="300">
	<StackPanel Orientation="Vertical">
		<Button HorizontalAlignment="Left">Button 1</Button>
		<Button HorizontalAlignment="Center">Button 2</Button>
		<Button HorizontalAlignment="Right">Button 3</Button>
		<Button HorizontalAlignment="Right">Button 4</Button>
		<Button HorizontalAlignment="Center">Button 5</Button>
		<Button HorizontalAlignment="Left">Button 6</Button>
	</StackPanel>
</Window>
보시다시피 컨트롤은 여전히 위에서 아래로 배치되지만 동일한 너비를 갖는 대신 각 컨트롤이 Left, Right 또는 Center에 정렬됩니다.