This article is currently in the process of being translated into Ukrainian (~42% done).
Елемент керування меню WPF
Однією з найпоширеніших частин програми Windows є меню, яке іноді називають головним меню, оскільки в програмі зазвичай існує лише одне програмі зазвичай існує лише одне. Меню є практичним, оскільки воно пропонує багато варіантів, займаючи дуже мало місця, і хоча Microsoft просуває стрічку як заміну старому доброму меню, панелі інструментів, безумовно, мають своє місце в інструментарії кожного хорошого розробника.
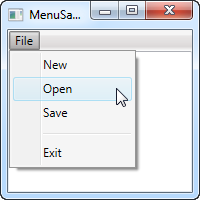
WPF постачається зі зручним елементом керування для створення меню під назвою... Menu. Додавати до нього елементи дуже просто — ви просто додаєте до нього елементи MenuItem, і кожен MenuItem може мати дочірні MenuItem, що дозволяє створювати ієрархічні меню, які ви знаєте з багатьох додатків Windows. Давайте одразу перейдемо до прикладу, де ми використовуємо Menu:
<Window x:Class="WpfTutorialSamples.Common_interface_controls.MenuSample"
        xmlns="http://schemas.microsoft.com/winfx/2006/xaml/presentation"
        xmlns:x="http://schemas.microsoft.com/winfx/2006/xaml"
        Title="MenuSample" Height="200" Width="200">
    <DockPanel>
        <Menu DockPanel.Dock="Top">
            <MenuItem Header="_File">
                <MenuItem Header="_New" />
                <MenuItem Header="_Open" />
                <MenuItem Header="_Save" />
                <Separator />
                <MenuItem Header="_Exit" />
            </MenuItem>
        </Menu>
        <TextBox AcceptsReturn="True" />
    </DockPanel>
</Window>
Як і в більшості додатків Windows, моє меню розміщено у верхній частині вікна, але, зважаючи на величезну гнучкість WPF, ви фактично можете розмістити елемент керування «Меню» де завгодно, будь-якої ширини чи висоти.
Я визначив один елемент верхнього рівня з 4 дочірніми елементами та роздільником. Я використовую властивість Header для визначення заголовка елемента, і зверніть увагу на символ підкреслення перед першим символом кожного заголовка. Це вказує WPF використовувати цей символ як клавішу прискорення, що означає, що користувач може натиснути клавішу Alt з наступним символом, щоб активувати пункт меню. Це працює на всьому шляху від пункту верхнього рівня і вниз по ієрархії ієрархії, тож у цьому прикладі я можу натиснути Alt, потім F , а потім N, щоб активувати пункт меню New.
Іконки та прапорці
Дві загальні характеристики пункту меню - це піктограма, яка використовується для того, щоб легше ідентифікувати пункт меню і те, що він робить, і можливість мати пункти меню з прапорцями, які можуть увімкнути або вимкнути певну функцію. Елемент меню WPF MenuItem підтримує обидві функції, і він дуже простий у використанні:
<Window x:Class="WpfTutorialSamples.Common_interface_controls.MenuIconCheckableSample"
        xmlns="http://schemas.microsoft.com/winfx/2006/xaml/presentation"
        xmlns:x="http://schemas.microsoft.com/winfx/2006/xaml"
        Title="MenuIconCheckableSample" Height="150" Width="300">
    <DockPanel>
        <Menu DockPanel.Dock="Top">
            <MenuItem Header="_File">
                <MenuItem Header="_Exit" />
            </MenuItem>
            <MenuItem Header="_Tools">
                <MenuItem Header="_Manage users">
                    <MenuItem.Icon>
                        <Image Source="/WpfTutorialSamples;component/Images/user.png" />
                    </MenuItem.Icon>
                </MenuItem>
                <MenuItem Header="_Show groups" IsCheckable="True" IsChecked="True" />
            </MenuItem>
        </Menu>
        <TextBox AcceptsReturn="True" />
    </DockPanel>
</Window>
Для цього прикладу я створив вторинний елемент верхнього рівня, до якого додав два елементи: Один з піктограмою, визначеною за допомогою властивості Icon зі стандартним елементом управління Image всередині нього, і один, де ми використовуємо властивість IsCheckable , щоб дозволити користувачеві встановлювати і знімати прапорець з елемента. Я навіть використав властивість IsChecked, щоб за замовчуванням вона була позначена. З коду, це та сама властивість, яку ви можете прочитати, щоб дізнатися, чи позначений даний пункт меню, чи ні.
Handling clicks
When the user clicks on a menu item, you will usually want something to happen. The easiest way is to simply add a click event handler to the MenuItem, like this:
<MenuItem Header="_New" Click="mnuNew_Click" />In Code-behind you will then need to implement the mnuNew_Click method, like this:
private void mnuNew_Click(object sender, RoutedEventArgs e)
{
	MessageBox.Show("New");
}
This will suffice for the more simple applications, or when prototyping something, but the WPF way is to use a Command for this.
Keyboard shortcuts and Commands
You can easily handle the Click event of a menu item like we did above, but the more common approach is to use WPF commands. There's a lot of theory on using and creating commands, so they have their own category of articles here on the site, but for now, I can tell you that they have a couple of advantages when used in WPF, especially in combination with a Menu or a Toolbar.
First of all, they ensure that you can have the same action on a toolbar, a menu and even a context menu, without having to implement the same code in multiple places. They also make the handling of keyboard shortcuts a whole lot easier, because unlike with WinForms, WPF is not listening for keyboard shortcuts automatically if you assign them to e.g. a menu item - you will have to do that manually.
However, when using commands, WPF is all ears and will respond to keyboard shortcuts automatically. The text (Header) of the menu item is also set automatically (although you can overwrite it if needed), and so is the InputGestureText, which shows the user which keyboard shortcut can be used to invoke the specific menu item. Let's jump straight to an example of combining the Menu with WPF commands:
<Window x:Class="WpfTutorialSamples.Common_interface_controls.MenuWithCommandsSample"
        xmlns="http://schemas.microsoft.com/winfx/2006/xaml/presentation"
        xmlns:x="http://schemas.microsoft.com/winfx/2006/xaml"
        Title="MenuWithCommandsSample" Height="200" Width="300">
    <Window.CommandBindings>
        <CommandBinding Command="New" CanExecute="NewCommand_CanExecute" Executed="NewCommand_Executed" />
    </Window.CommandBindings>
    <DockPanel>
        <Menu DockPanel.Dock="Top">
            <MenuItem Header="_File">
                <MenuItem Command="New" />
                <Separator />
                <MenuItem Header="_Exit" />
            </MenuItem>
            <MenuItem Header="_Edit">
                <MenuItem Command="Cut" />
                <MenuItem Command="Copy" />
                <MenuItem Command="Paste" />
            </MenuItem>
        </Menu>

        <TextBox AcceptsReturn="True" Name="txtEditor" />
    </DockPanel>
</Window>using System;
using System.Windows;
using System.Windows.Input;
namespace WpfTutorialSamples.Common_interface_controls
{
public partial class MenuWithCommandsSample : Window
{
public MenuWithCommandsSample()
{
InitializeComponent();
}
private void NewCommand_CanExecute(object sender, CanExecuteRoutedEventArgs e)
{
e.CanExecute = true;
}
private void NewCommand_Executed(object sender, ExecutedRoutedEventArgs e)
{
txtEditor.Text = "";
}
}
}
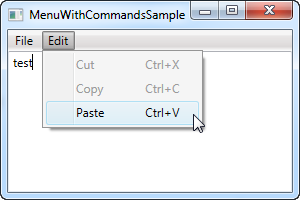
It might not be completely obvious, but by using commands, we just got a whole bunch of things for free: Keyboard shortcuts, text and InputGestureText on the items and WPF automatically enables/disables the items depending on the active control and its state. In this case, Cut and Copy are disabled because no text is selected, but Paste is enabled, because my clipboard is not empty!
And because WPF knows how to handle certain commands in combination with certain controls, in this case the Cut/Copy/Paste commands in combination with a text input control, we don't even have to handle their Execute events - they work right out of the box! We do have to handle it for theNew command though, since WPF has no way of guessing what we want it to do when the user activates it. This is done with the CommandBindings of the Window, all explained in detail in the chapter on commands.
Summary
Working with the WPF Menu control is both easy and fast, making it simple to create even complex menu hierarchies, and when combining it with WPF commands, you get so much functionality for free.