This article is currently in the process of being translated into Japanese (~92% done).
Control ToolTips
ツールチップ、インフォチップ、ヒントーいろいろな名前がありますが、概念は共通しています:マウスが指している特定のコントロールやリンクについて、追加の情報を得る機能です。WPFもこの概念をサポートしています。それはWPFのほとんどののクラスから継承されているFrameworkElement クラスの ToolTip プロパティを使います。
コントロールにツールチップを適用することは、最初の大変基本的な例を見ればわかるように、大変簡単です。
<Window x:Class="WpfTutorialSamples.Control_concepts.ToolTipsSimpleSample"
        xmlns="http://schemas.microsoft.com/winfx/2006/xaml/presentation"
        xmlns:x="http://schemas.microsoft.com/winfx/2006/xaml"
        Title="ToolTipsSimpleSample" Height="150" Width="400">
    <Grid VerticalAlignment="Center" HorizontalAlignment="Center">

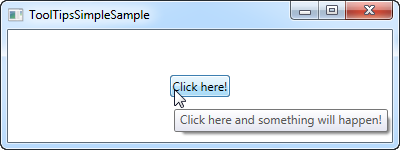
        <Button ToolTip="Click here and something will happen!">Click here!</Button>

    </Grid>
</Window>
スクリーンショットからわかるように、この例はで、一度マウスポインタをボタンの上に乗せると、設定した文字列のボックスが現れます。これが、多くのUIフレームワークがサポートするもので、表示は文字列だけです。
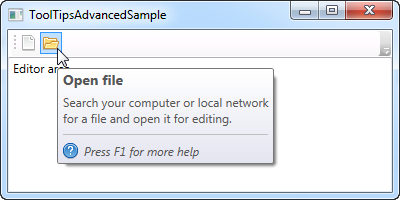
しかし、WPFでは ToolTip プロパティは実質的に文字列タイプではなくオブジェクトタイプです。これは、ツールチップに何でも設定できることを意味します。これはとても素晴らしい可能性を開け、ユーザーにリッチでより助けになるツールチップを提供できます。例えば、次の例をよく見て、最初の例と比べてみて下さい。
<Window x:Class="WpfTutorialSamples.Control_concepts.ToolTipsAdvancedSample"
        xmlns="http://schemas.microsoft.com/winfx/2006/xaml/presentation"
        xmlns:x="http://schemas.microsoft.com/winfx/2006/xaml"
        Title="ToolTipsAdvancedSample" Height="200" Width="400" UseLayoutRounding="True">
    <DockPanel>
        <ToolBar DockPanel.Dock="Top">
            <Button ToolTip="Create a new file">
                <Button.Content>
                    <Image Source="/WpfTutorialSamples;component/Images/page_white.png" Width="16" Height="16" />
                </Button.Content>
            </Button>
            <Button>
                <Button.Content>
                    <Image Source="/WpfTutorialSamples;component/Images/folder.png" Width="16" Height="16" />
                </Button.Content>
                <Button.ToolTip>
                    <StackPanel>
                        <TextBlock FontWeight="Bold" FontSize="14" Margin="0,0,0,5">Open file</TextBlock>
                        <TextBlock>
                        Search your computer or local network
                        <LineBreak />
                        for a file and open it for editing.
                        </TextBlock>
                        <Border BorderBrush="Silver" BorderThickness="0,1,0,0" Margin="0,8" />
                        <WrapPanel>
                            <Image Source="/WpfTutorialSamples;component/Images/help.png" Margin="0,0,5,0" />
                            <TextBlock FontStyle="Italic">Press F1 for more help</TextBlock>
                        </WrapPanel>
                    </StackPanel>
                </Button.ToolTip>
            </Button>
        </ToolBar>

        <TextBox>
            Editor area...
        </TextBox>
    </DockPanel>
</Window>
最初のボタンには単純な文字列のツールチップを使い、二番目のボタンにはより高度なツールチップを使っています。高度なツールチップはルートコントロールにpanelを使い、満足できるだけのコントロールを自由に加えています。これによって、ヘッダーと説明文とヘルプアイコンを含んだF1でヘルプが開くというヒントを持った、すごくイカしたツールチップになります。
高度なオプション
ToolTipServiceクラスにはツールチップの動作に影響する多くの興味深いプロパティがあります。それらを直接設定すると、例えば次のように ShowDuration プロパティを使ってツールチップの表示時間を延長できます(ここでは5000ミリセカンド、すなわち5秒)。
<Button ToolTip="Create a new file" ToolTipService.ShowDuration="5000" Content="Open" />また、HasDropShadow を使ってポップアップに影をつけるかどうか制御できますし、ShowOnDisabled プロパティで無効なコントロールにツールチップを表示するか制御できます。他にもいくつもの興味深いプロパティがあります。完全なリストは次のドキュメントを参照して下さい: http://msdn.microsoft.com/en-us/library/system.windows.controls.tooltipservice.aspx
まとめ
ToolTipはユーザーにとって大変助けになり、そしてWPFではこれらは簡単に使えて極めてフレキシブルです。アプリケーションのインラインヘルプをよりユーザーフレンドリにするため、ToolTipService クラスの完全なデザインの制御と、ツールチップのコンテンツを組み合わせて下さい。