This article has been localized into Korean by the community.
DockPanel 컨트롤
DockPanel은 네 가지 방향(위, 아래, 왼쪽 및 오른쪽)으로 콘텐츠를 쉽게 연결할 수 있습니다. 특히, 기본적으로 DockPanel의 마지막 컨텐츠는 이 기능을 특별히 비활성화하지 않는 한 자동으로 나머지 공간 (가운데)을 채 웁니다. 이 기능을 사용하면 창을 특정 영역으로 나눌 수 있습니다.
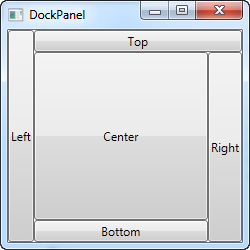
WPF의 다른 여러 패널에서 보았듯이 내부 속성, DockPanel의 경우엔 Dock 속성을 사용하여 패널의 기능을 사용합니다. 이 속성은 하위 컨트롤의 원하는 방향을 결정합니다. 이를 설정하지 않으면 첫 번째 컨트롤이 왼쪽에 도킹되고 마지막 컨트롤은 나머지 공간을 차지합니다. 다음에 예제가 있습니다.
<Window x:Class="WpfTutorialSamples.Panels.DockPanel"
        xmlns="http://schemas.microsoft.com/winfx/2006/xaml/presentation"
        xmlns:x="http://schemas.microsoft.com/winfx/2006/xaml"
        Title="DockPanel" Height="250" Width="250">
	<DockPanel>
		<Button DockPanel.Dock="Left">Left</Button>
		<Button DockPanel.Dock="Top">Top</Button>
		<Button DockPanel.Dock="Right">Right</Button>
		<Button DockPanel.Dock="Bottom">Bottom</Button>
		<Button>Center</Button>
	</DockPanel>
</Window>
이미 말했듯이, 우리는 마지막 컨트롤이 자동으로 중앙에 배치되어 남은 공간을 채울 것이기 때문에 마지막 자식 컨트롤에는 도킹 위치를 지정하지 않습니다. 센터 주변의 컨트롤은 지정된 위치에 필요한 공간을 차지하고 있음을 알 수 있습니다. 나머지는 센터 위치로 남습니다. Right 버튼이 Left 버튼보다 글자가 좀더 많기 때문에 조금 더 많은 픽셀을 필요로 하고, 더 많은 공간을 차지하게 됩니다.
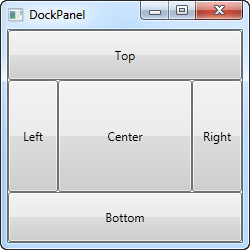
마지막으로 공간이 어떻게 분할되어 눈치채셨나요? 예를 들어, 버튼이 왼쪽 일부를 차지하고 있기 때문에 상단의 버튼은 맨 위 공간을 모두 차지하지 못했습니다. DockPanel은 마크 업에서 자신의 위치를 보고 어떤 컨트롤에 우선순위를 둘지 결정합니다. 이 경우 왼쪽 버튼은 마크 업에서 첫 번째로 배치되기 때문에 우선 순위가 가장 높습니다. 다행스럽게도 매우 쉽게 우선순위를 변경할 수 있습니다. 다음 예제에서는 하위 컨트롤에 width/height를 할당하여 공간을 조금 더 균등하게 만들었습니다.
<Window x:Class="WpfTutorialSamples.Panels.DockPanel"
        xmlns="http://schemas.microsoft.com/winfx/2006/xaml/presentation"
        xmlns:x="http://schemas.microsoft.com/winfx/2006/xaml"
        Title="DockPanel" Height="250" Width="250">
	<DockPanel>
		<Button DockPanel.Dock="Top" Height="50">Top</Button>
		<Button DockPanel.Dock="Bottom" Height="50">Bottom</Button>
		<Button DockPanel.Dock="Left" Width="50">Left</Button>
		<Button DockPanel.Dock="Right" Width="50">Right</Button>
		<Button>Center</Button>
	</DockPanel>
</Window>
위쪽과 아래쪽 컨트롤이 이제 왼쪽, 오른쪽 컨트롤보다 우선순위가 높으며, 모두 높이 또는 너비가 50 픽셀입니다. 윈도우를 더 크고 작게 조정할 때 가운데 영역만 크기가 증가하거나 감소하고 이 정적 width/height가 동일하게 유지됩니다.
LastChildFill
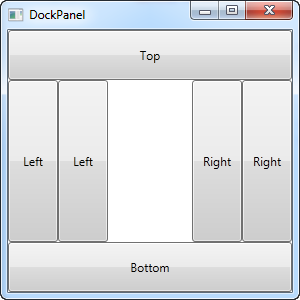
이미 말했듯이, DockPanel의 마지막 자식이 나머지 공간을 차지하는 것이 기본이지만, LastChildFill 속성을 사용하여 이 기능을 비활성화 시킬 수 있습니다. 다음은 그 예제입니다. 동시에 여러 컨트롤을 같은면에 도킹할 수있는 기능을 보여줍니다.
<Window x:Class="WpfTutorialSamples.Panels.DockPanel"
        xmlns="http://schemas.microsoft.com/winfx/2006/xaml/presentation"
        xmlns:x="http://schemas.microsoft.com/winfx/2006/xaml"
        Title="DockPanel" Height="300" Width="300">
	<DockPanel LastChildFill="False">
		<Button DockPanel.Dock="Top" Height="50">Top</Button>
		<Button DockPanel.Dock="Bottom" Height="50">Bottom</Button>
		<Button DockPanel.Dock="Left" Width="50">Left</Button>
		<Button DockPanel.Dock="Left" Width="50">Left</Button>
		<Button DockPanel.Dock="Right" Width="50">Right</Button>
		<Button DockPanel.Dock="Right" Width="50">Right</Button>
	</DockPanel>
</Window>
이 예제에서는 두 개의 컨트롤을 왼쪽에, 다른 두개의 컨트롤을 오른쪽에 도킹하는 동시에, LastChildFill 속성을 해제합니다. 이로 인해 센터에 빈 공간이 생기는데, 어떤 경우엔 이런 레이아웃이 필요할 수도 있습니다.