The community is working on translating this tutorial into Bosnian, but it seems that no one has started the translation process for this article yet. If you can help us, then please click "More info".
ListView sorting
In the last chapter we saw how we could group items in the WPF ListView by accessing the View instance of the ListView and then adding a group description. Applying sorting to a ListView is just as easy, and most of the process is exactly the same. Let's try a simple example where we sort the user objects by their age:
<Window x:Class="WpfTutorialSamples.ListView_control.ListViewSortingSample"
        xmlns="http://schemas.microsoft.com/winfx/2006/xaml/presentation"
        xmlns:x="http://schemas.microsoft.com/winfx/2006/xaml"
        Title="ListViewSortingSample" Height="200" Width="300">
    <Grid Margin="10">
        <ListView Name="lvUsers">
            <ListView.View>
                <GridView>
                    <GridViewColumn Header="Name" Width="120" DisplayMemberBinding="{Binding Name}" />
                    <GridViewColumn Header="Age" Width="50" DisplayMemberBinding="{Binding Age}" />
                </GridView>
            </ListView.View>
        </ListView>
    </Grid>
</Window>
using System;
using System.Collections.Generic;
using System.ComponentModel;
using System.Windows;
using System.Windows.Data;
namespace WpfTutorialSamples.ListView_control
{
public partial class ListViewSortingSample : Window
{
public ListViewSortingSample()
{
InitializeComponent();
List<User> items = new List<User>();
items.Add(new User() { Name = "John Doe", Age = 42 });
items.Add(new User() { Name = "Jane Doe", Age = 39 });
items.Add(new User() { Name = "Sammy Doe", Age = 13 });
items.Add(new User() { Name = "Donna Doe", Age = 13 });
lvUsers.ItemsSource = items;
CollectionView view = (CollectionView)CollectionViewSource.GetDefaultView(lvUsers.ItemsSource);
view.SortDescriptions.Add(new SortDescription("Age", ListSortDirection.Ascending));
}
}
public class User
{
public string Name { get; set; }
public int Age { get; set; }
}
}
The XAML looks just like a previous example, where we simply have a couple of columns for displaying information about the user - nothing new here.
In the Code-behind, we once again create a list of User objects, which we then assign as the ItemsSource of the ListView. Once we've done that, we use the ItemsSource property to get the CollectionView instance that the ListView automatically creates for us and which we can use to manipulate how the ListView shows our objects.
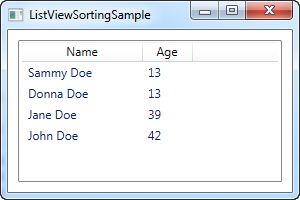
With the view object in our hand, we add a new SortDescription to it, specifying that we want our list sorted by the Age property, in ascending order. As you can see from the screenshot, this works perfectly well - the list is sorted by age, instead of being in the same order as the items were added.
Multiple sort criteria
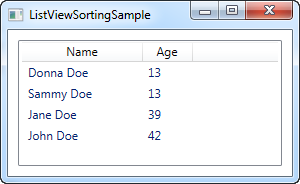
As shown in the first example, sorting is very easy, but on the screenshot you'll see that Sammy comes before Donna. They have the same age, so in this case, WPF will just use the order in which they were added. Fortunately, WPF lets us specify as many sort criteria as we want. In the example above, try changing the view-related code into something like this:
CollectionView view = (CollectionView)CollectionViewSource.GetDefaultView(lvUsers.ItemsSource);
view.SortDescriptions.Add(new SortDescription("Age", ListSortDirection.Ascending));
view.SortDescriptions.Add(new SortDescription("Name", ListSortDirection.Ascending));
Now the view will be sorted using age first, and when two identical values are found, the name will be used as a secondary sorting parameter.
Summary
It's very easy to sort the contents of a ListView, as seen in the above examples, but so far, all the sorting is decided by the programmer and not the end-user. In the next article I'll give you a how-to article showing you how to let the user decide the sorting by clicking on the columns, as seen in Windows.