This article is currently in the process of being translated into Persian (~28% done).
The Grid Control
گرید یا شبکه توری مانند، شاید یکی از پیچیده ترین نوع پانل ها باشد. گرید می تواند شامل سطر و ستون های متعددی باشد. برای هریک از سطرها و ستون ها به ترتیب ارتفاع و عرض برحسب مقدار مطلق پیکسل یا درصدی از فضای در دسترس و یا بصورت اتوماتیک که در آن سطر و ستون متناسب با محتوی بصورت اتوماتیک تنظیم می گردد تعریف میکنیم. هنگامی به سراغ گرید می رویم که دیگر پانل ها کار مورد نظر را انجام ندهند مثلاً مواقعی که به تعداد زیادی ستون نیاز است و دیگر پانل ها هم حضور دارند.
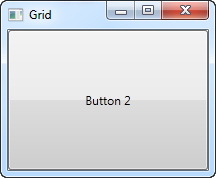
در ابتداییترین شکل، گرید تنها همه کنترلهای که در آن قرار میگیرد را گرفته، ضمن استفاده از حداکثر فضای در دسترس آنها را جمع و جور کرده و آنرا در راس دیگران جا میدهد.
<Window x:Class="WpfTutorialSamples.Panels.Grid"
        xmlns="http://schemas.microsoft.com/winfx/2006/xaml/presentation"
        xmlns:x="http://schemas.microsoft.com/winfx/2006/xaml"
        Title="Grid" Height="300" Width="300">
    <Grid>
		<Button>Button 1</Button>
		<Button>Button 2</Button>
	</Grid>
</Window>
As you can see, the last control gets the top position, which in this case means that you can't even see the first button. Not terribly useful for most situations though, so let's try dividing the space, which is what the grid does so well. We do that by using ColumnDefinitions and RowDefinitions. In the first example, we'll stick to columns:
<Window x:Class="WpfTutorialSamples.Panels.Grid"
        xmlns="http://schemas.microsoft.com/winfx/2006/xaml/presentation"
        xmlns:x="http://schemas.microsoft.com/winfx/2006/xaml"
        Title="Grid" Height="300" Width="300">
    <Grid>
		<Grid.ColumnDefinitions>
			<ColumnDefinition Width="*" />
			<ColumnDefinition Width="*" />
		</Grid.ColumnDefinitions>
		<Button>Button 1</Button>
		<Button Grid.Column="1">Button 2</Button>
	</Grid>
</Window>
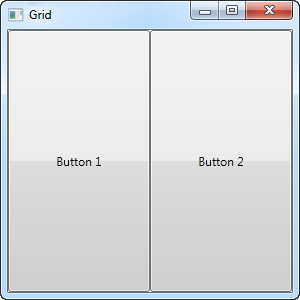
In this example, we have simply divided the available space into two columns, which will share the space equally, using a "star width" (this will be explained later). On the second button, I use a so-called Attached property to place the button in the second column (0 is the first column, 1 is the second and so on). I could have used this property on the first button as well, but it automatically gets assigned to the first column and the first row, which is exactly what we want here.
As you can see, the controls take up all the available space, which is the default behavior when the grid arranges its child controls. It does this by setting the HorizontalAlignment and VerticalAlignment on its child controls to Stretch.
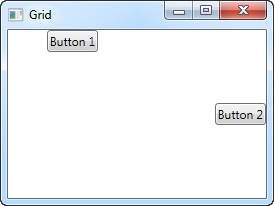
In some situations you may want them to only take up the space they need though and/or control how they are placed in the Grid. The easiest way to do this is to set the HorizontalAlignment and VerticalAlignment directly on the controls you wish to manipulate. Here's a modified version of the above example:
<Window x:Class="WpfTutorialSamples.Panels.Grid"
        xmlns="http://schemas.microsoft.com/winfx/2006/xaml/presentation"
        xmlns:x="http://schemas.microsoft.com/winfx/2006/xaml"
        Title="Grid" Height="300" Width="300">
    <Grid>
		<Grid.ColumnDefinitions>
			<ColumnDefinition Width="*" />
			<ColumnDefinition Width="*" />
		</Grid.ColumnDefinitions>
		<Button VerticalAlignment="Top" HorizontalAlignment="Center">Button 1</Button>
		<Button Grid.Column="1" VerticalAlignment="Center" HorizontalAlignment="Right">Button 2</Button>
	</Grid>
</Window>
As you can see from the resulting screenshot, the first button is now placed in the top and centered. The second button is placed in the middle, aligned to the right.
Summary
The Grid is a very versatile panel, with many more possibilities than we saw in this article. We'll dig into the rest of them in the next several articles.