The community is working on translating this tutorial into Georgian, but it seems that no one has started the translation process for this article yet. If you can help us, then please click "More info".
Creating a custom input dialog
In the last couple of articles, we've looked at using the built-in dialogs of WPF, but creating your own is almost just as easy. In fact, you really just need to create a Window, place the required controls in it and then show it.
However, there are a few things that you should remember when creating dialogs, to ensure that your application acts like other Windows applications. In this article, we'll create a very simple dialog to ask the user a question and then return the answer, while discussing the various good practices that you should follow.
Designing the dialog
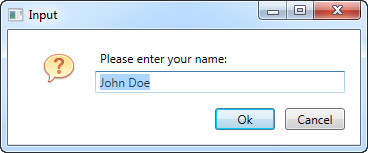
For this particular dialog, I just wanted a Label telling the user which information we need from him/her, a TextBox for entering the answer, and then the usual Ok and Cancel buttons. I decided to add an icon to the dialog as well, for good looks. Here's the end result:

And here's the code for the dialog:
<Window x:Class="WpfTutorialSamples.Dialogs.InputDialogSample"
        xmlns="http://schemas.microsoft.com/winfx/2006/xaml/presentation"
        xmlns:x="http://schemas.microsoft.com/winfx/2006/xaml"
        Title="Input" SizeToContent="WidthAndHeight" WindowStartupLocation="CenterScreen"
        ContentRendered="Window_ContentRendered">
    <Grid Margin="15">
        <Grid.ColumnDefinitions>
            <ColumnDefinition Width="Auto" />
            <ColumnDefinition Width="*" />
        </Grid.ColumnDefinitions>
        <Grid.RowDefinitions>
            <RowDefinition Height="Auto" />
            <RowDefinition Height="Auto" />
            <RowDefinition Height="Auto" />
        </Grid.RowDefinitions>

        <Image Source="/WpfTutorialSamples;component/Images/question32.png" Width="32" Height="32" Grid.RowSpan="2" Margin="20,0" />

        <Label Name="lblQuestion" Grid.Column="1">Question:</Label>
        <TextBox Name="txtAnswer" Grid.Column="1" Grid.Row="1" MinWidth="250">Answer</TextBox>

        <WrapPanel Grid.Row="2" Grid.ColumnSpan="2" HorizontalAlignment="Right" Margin="0,15,0,0">
            <Button IsDefault="True" Name="btnDialogOk" Click="btnDialogOk_Click" MinWidth="60" Margin="0,0,10,0">_Ok</Button>
            <Button IsCancel="True" MinWidth="60">_Cancel</Button>
        </WrapPanel>
    </Grid>
</Window>
using System;
using System.Windows;
namespace WpfTutorialSamples.Dialogs
{
public partial class InputDialogSample : Window
{
public InputDialogSample(string question, string defaultAnswer = "")
{
InitializeComponent();
lblQuestion.Content = question;
txtAnswer.Text = defaultAnswer;
}
private void btnDialogOk_Click(object sender, RoutedEventArgs e)
{
this.DialogResult = true;
}
private void Window_ContentRendered(object sender, EventArgs e)
{
txtAnswer.SelectAll();
txtAnswer.Focus();
}
public string Answer
{
get { return txtAnswer.Text; }
}
}
}The code is pretty simple, but here are the things that you should pay special attention to:
XAML
In the XAML part, I've used a Grid for layout of the controls - nothing fancy here. I've removed the Width and Height properties of the Window and instead set it to automatically resize to match the content - this makes sense in a dialog, so you don't have to fine tune the size to make everything look alright. Instead, use margins and minimum sizes to ensure that things look the way you want them to, while still allowing the user to resize the dialog.
Another property which I've changed on the Window is the WindowStartupLocation property. For a dialog like this, and probably for most other non-main windows, you should change this value to CenterScreen or CenterOwner, to change the default behavior where your window will appear in a position decided by Windows, unless you manually specify Top and Left properties for it.
Also pay special attention to the two properties I've used on the dialog buttons: IsCancel and IsDefault. IsCancel tells WPF that if the user clicks this button, the DialogResult of the Window should be set to false which will also close the window. This also ensures that the user can press the Esc key on their keyboard to close the window, something that should always be possible in a Windows dialog.
The IsDefault property gives focus to the Ok button and also ensures that if the user presses the Enter key on their keyboard, this button is activated. An event handler is needed to set the DialogResult for this though, as described later.
Code-behind
In Code-behind, I changed the constructor to take two parameters, with one being optional. This allows us to place the question and the default answer, if provided, into the designated UI controls.
The Ok button has an event handler which ensures that the special DialogResult property of the Window is set to true when clicked, to signal to the initiator of the dialog that the user accepted the entered value. We don't have one for the Cancel button, because WPF handles this for us when we set the IsCancel property to true, as described above.
To give focus to the TextBox upon showing the dialog, I've subscribed to the ContentRendered event, where I select all the text in the control and then give focus. If I just wanted to give focus, I could have use the FocusManager.FocusedElement attached property on the Window, but in this case, I also want to select the text, to allow the user to instantly overwrite the answer provided by default (if any).
A last detail is the Answer property which I've implemented. It simply gives access to the entered value of the TextBox control, but it's good practice to provide a property with the return value(s) of the dialog, instead of directly accessing controls from outside the window. This also allows you to influence the return value before returning it, if needed.
Using the dialog
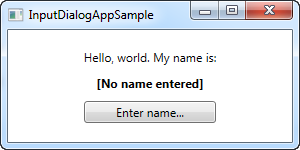
With all the above in place, we're now ready to actually use our dialog. It's a very simple task, so I've created a small application for testing it. Here's the code:
<Window x:Class="WpfTutorialSamples.Dialogs.InputDialogAppSample"
        xmlns="http://schemas.microsoft.com/winfx/2006/xaml/presentation"
        xmlns:x="http://schemas.microsoft.com/winfx/2006/xaml"
        Title="InputDialogAppSample" Height="150" Width="300">
    <StackPanel HorizontalAlignment="Center" VerticalAlignment="Center">
        <TextBlock>Hello, world. My name is:</TextBlock>
        <TextBlock Name="lblName" Margin="0,10" TextAlignment="Center" FontWeight="Bold">[No name entered]</TextBlock>
        <Button Name="btnEnterName" Click="btnEnterName_Click">Enter name...</Button>
    </StackPanel>
</Window>
using System;
using System.Windows;
namespace WpfTutorialSamples.Dialogs
{
public partial class InputDialogAppSample : Window
{
public InputDialogAppSample()
{
InitializeComponent();
}
private void btnEnterName_Click(object sender, RoutedEventArgs e)
{
InputDialogSample inputDialog = new InputDialogSample("Please enter your name:", "John Doe");
if(inputDialog.ShowDialog() == true)
lblName.Text = inputDialog.Answer;
}
}
}
There's nothing special to it - just a couple of TextBlock controls and a Button for invoking the dialog. In the Click event handler, we instantiate the InputDialogSample window, providing a question and a default answer, and then we use the ShowDialog() method to show it - you should always use ShowDialog() method and not just Show() for a modal dialog like this.
If the result of the dialog is true, meaning that the user has activated the Ok button either by clicking it or pressing Enter, the result is assigned to the name Label. That's all there is to it!