The community is working on translating this tutorial into Georgian, but it seems that no one has started the translation process for this article yet. If you can help us, then please click "More info".
The FlowDocumentPageViewer control
In the previous article, we discussed the FlowDocumentScrollViewer, along with some more general FlowDocument related techniques. In this article, we'll focus on the FlowDocumentPageViewer which, instead of just offering a scroll text when the text gets longer than the available space, divides the entire document up into pages. This allows you to navigate from page to page, giving a more book-like reading experience.
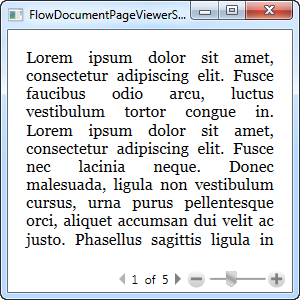
We'll start off with a simple example, where we can see how the FlowDocumentPageViewer control handles our Lorem Ipsum test text:
<Window x:Class="WpfTutorialSamples.Rich_text_controls.FlowDocumentPageViewerSample"
        xmlns="http://schemas.microsoft.com/winfx/2006/xaml/presentation"
        xmlns:x="http://schemas.microsoft.com/winfx/2006/xaml"
        Title="FlowDocumentPageViewerSample" Height="300" Width="300">
    <Grid>
        <FlowDocumentPageViewer>
            <FlowDocument>
                <Paragraph>Lorem ipsum dolor sit amet, consectetur adipiscing elit. Fusce faucibus odio arcu, luctus vestibulum tortor congue in. Lorem ipsum dolor sit amet, consectetur adipiscing elit. Fusce nec lacinia neque. Donec malesuada, ligula non vestibulum cursus, urna purus pellentesque orci, aliquet accumsan dui velit ac justo. Phasellus sagittis ligula in leo dapibus, vel vestibulum felis mattis. Fusce vitae auctor nibh. Ut sit amet fringilla turpis. Aenean tincidunt feugiat sapien, quis scelerisque enim pretium commodo. Mauris fermentum posuere nulla, vitae fermentum quam malesuada in. Cras ultrices bibendum nulla eu mollis. Sed accumsan pretium magna, non sodales velit viverra id. Sed eu elit sit amet sem ullamcorper rhoncus.</Paragraph>
                <Paragraph>Nulla vitae suscipit tellus. Nunc sit amet tortor fermentum, sollicitudin enim cursus, sagittis lacus. Pellentesque tincidunt massa nisl, nec tempor nulla consequat a. Proin pharetra neque vel dolor congue, at condimentum arcu varius. Sed vel luctus enim. Curabitur eleifend dui et arcu faucibus, sit amet vulputate libero suscipit. Vestibulum ultrices nisi id metus ultrices, eu ultricies ligula rutrum. Phasellus rhoncus aliquam pretium. Quisque in nunc erat. Etiam mollis turpis cursus, sagittis felis vel, dignissim risus. Ut at est nec tellus lobortis venenatis. Fusce elit mi, gravida sed tortor at, faucibus interdum felis. Phasellus porttitor dolor in nunc pellentesque, eu hendrerit nulla porta. Vestibulum cursus placerat elit. Nullam malesuada dictum venenatis. Interdum et malesuada fames ac ante ipsum primis in faucibus.</Paragraph>
            </FlowDocument>
        </FlowDocumentPageViewer>
    </Grid>
</Window>
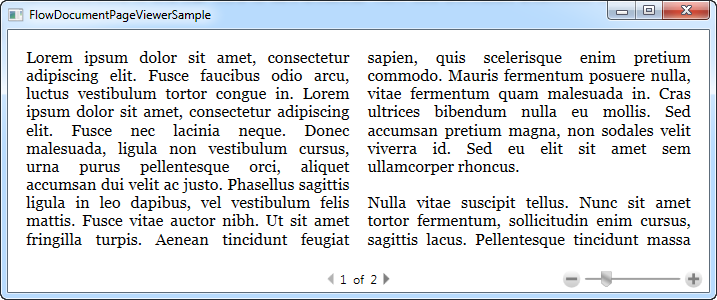
Notice how the long text is cut off, and in the bottom, you can navigate between pages. This is not all that the FlowDocumentPageViewer will do for you though - just look what happens when we make the window wider:

Instead of just stretching the text indefinitely, the FlowDocumentPageViewer now divides your text up into columns, to prevent lines from becoming too long. Besides looking good, this also increases the readability, as texts with very long lines are harder to read. The page count is of course automatically adjusted, bringing the amount of pages down from 5 to 2.
The FlowDocument class has a range of properties that will allow you to control how and when they are used. Using them is simple, but a complete example goes beyond the scope of this tutorial. Instead, have a look at this MSDN article, where several properties are used in a nice example: How to: Use FlowDocument Column-Separating Attributes.
Searching
As you're about to see in the next chapter, the FlowDocumentReader wrapper supports searching right out of the box, with search controls in the toolbar and everything. However, all of the three read-only FlowDocument wrappers which will be discussed in this tutorial does in fact support searching, it just has to be manually invoked for the first two (FlowDocumentScrollViewer and FlowDocumentPageViewer).
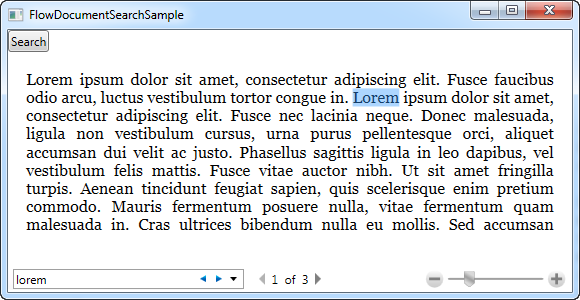
All three viewers support the Ctrl+F keyboard shortcut for initiating a search, but if you want this to be accessible from e.g. a button as well, you just have to call the Find() method. Here's an example:
<Window x:Class="WpfTutorialSamples.Rich_text_controls.FlowDocumentSearchSample"
        xmlns="http://schemas.microsoft.com/winfx/2006/xaml/presentation"
        xmlns:x="http://schemas.microsoft.com/winfx/2006/xaml"
        Title="FlowDocumentSearchSample" Height="300" Width="580">
    <DockPanel>
        <WrapPanel DockPanel.Dock="Top">
            <Button Name="btnSearch" Click="btnSearch_Click">Search</Button>
        </WrapPanel>
        <FlowDocumentPageViewer Name="fdViewer">
            <FlowDocument>
                <Paragraph>Lorem ipsum dolor sit amet, consectetur adipiscing elit. Fusce faucibus odio arcu, luctus vestibulum tortor congue in. Lorem ipsum dolor sit amet, consectetur adipiscing elit. Fusce nec lacinia neque. Donec malesuada, ligula non vestibulum cursus, urna purus pellentesque orci, aliquet accumsan dui velit ac justo. Phasellus sagittis ligula in leo dapibus, vel vestibulum felis mattis. Fusce vitae auctor nibh. Ut sit amet fringilla turpis. Aenean tincidunt feugiat sapien, quis scelerisque enim pretium commodo. Mauris fermentum posuere nulla, vitae fermentum quam malesuada in. Cras ultrices bibendum nulla eu mollis. Sed accumsan pretium magna, non sodales velit viverra id. Sed eu elit sit amet sem ullamcorper rhoncus.</Paragraph>
                <Paragraph>Nulla vitae suscipit tellus. Nunc sit amet tortor fermentum, sollicitudin enim cursus, sagittis lacus. Pellentesque tincidunt massa nisl, nec tempor nulla consequat a. Proin pharetra neque vel dolor congue, at condimentum arcu varius. Sed vel luctus enim. Curabitur eleifend dui et arcu faucibus, sit amet vulputate libero suscipit. Vestibulum ultrices nisi id metus ultrices, eu ultricies ligula rutrum. Phasellus rhoncus aliquam pretium. Quisque in nunc erat. Etiam mollis turpis cursus, sagittis felis vel, dignissim risus. Ut at est nec tellus lobortis venenatis. Fusce elit mi, gravida sed tortor at, faucibus interdum felis. Phasellus porttitor dolor in nunc pellentesque, eu hendrerit nulla porta. Vestibulum cursus placerat elit. Nullam malesuada dictum venenatis. Interdum et malesuada fames ac ante ipsum primis in faucibus.</Paragraph>
            </FlowDocument>
        </FlowDocumentPageViewer>
    </DockPanel>
</Window>
using System;
using System.Windows;
namespace WpfTutorialSamples.Rich_text_controls
{
public partial class FlowDocumentSearchSample : Window
{
public FlowDocumentSearchSample()
{
InitializeComponent();
}
private void btnSearch_Click(object sender, RoutedEventArgs e)
{
fdViewer.Find();
}
}
}
Simply press our dedicated Search button or the keyboard shortcut (Ctrl+F) and you have search functionality in the FlowDocumentPageViewer. As mentioned, this works for both FlowDocumentScrollViewer and FlowDocumentPageViewer (FlowDocumentPageReader has a search button by default), but make sure that the search box has enough horizontal room on the toolbar - otherwise you won't see it when you invoke the Find() command!