The community is working on translating this tutorial into Malayalam, but it seems that no one has started the translation process for this article yet. If you can help us, then please click "More info".
Speech recognition (making WPF listen)
In the previous article we discussed how we could transform text into spoken words, using the SpeechSynthesizer class. In this article we'll go the other way around, by turning spoken words into text. To do that, we'll be using the SpeechRecognition class, which resides in the System.Speech assembly. This assembly is not a part of your solutions by default, but we can easily add it. Depending on which version of Visual Studio you use, the process looks something like this:
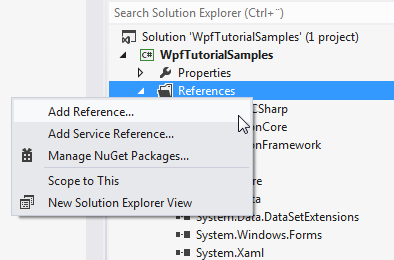
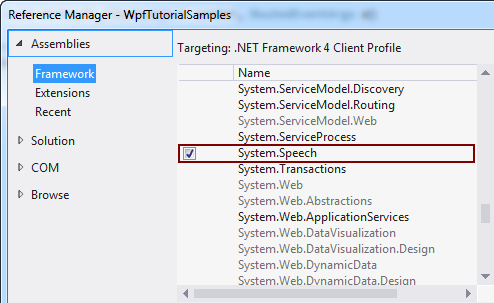
With that taken care of, let's start out with an extremely simple speech recognition example:
<Window x:Class="WpfTutorialSamples.Audio_and_Video.SpeechRecognitionTextSample"
        xmlns="http://schemas.microsoft.com/winfx/2006/xaml/presentation"
        xmlns:x="http://schemas.microsoft.com/winfx/2006/xaml"
        Title="SpeechRecognitionTextSample" Height="200" Width="300">
    <DockPanel Margin="10">
        <TextBox Margin="0,10" Name="txtSpeech" AcceptsReturn="True" />
    </DockPanel>
</Window>
using System;
using System.Speech.Recognition;
using System.Windows;
namespace WpfTutorialSamples.Audio_and_Video
{
public partial class SpeechRecognitionTextSample : Window
{
public SpeechRecognitionTextSample()
{
InitializeComponent();
SpeechRecognizer speechRecognizer = new SpeechRecognizer();
}
}
}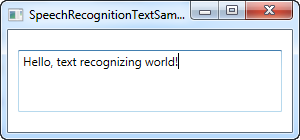
This is actually all you need - the text in the screenshot above was dictated through my headset and then inserted into the TextBox control as text, through the use of speech recognition.
As soon as you initialize a SpeechRecognizer object, Windows starts up its speech recognition application, which will do all the hard work and then send the result to the active application, in this case ours. It looks like this:

If you haven't used speech recognition on your computer before, then Windows will take you through a guide which will help you get started and make some necessary adjustments.
This first example will allow you to dictate text to your application, which is great, but what about commands? Windows and WPF will actually work together here and turn your buttons into commands, reachable through speech, without any extra work. Here's an example:
<Window x:Class="WpfTutorialSamples.Audio_and_Video.SpeechRecognitionTextCommandsSample"
        xmlns="http://schemas.microsoft.com/winfx/2006/xaml/presentation"
        xmlns:x="http://schemas.microsoft.com/winfx/2006/xaml"
        Title="SpeechRecognitionTextCommandsSample" Height="200" Width="300">
    <DockPanel Margin="10">
        <WrapPanel DockPanel.Dock="Top">
            <Button Name="btnNew" Click="btnNew_Click">New</Button>
            <Button Name="btnOpen" Click="btnOpen_Click">Open</Button>
            <Button Name="btnSave" Click="btnSave_Click">Save</Button>
        </WrapPanel>
        <TextBox Margin="0,10" Name="txtSpeech" AcceptsReturn="True" TextWrapping="Wrap" />
    </DockPanel>
</Window>
using System;
using System.Speech.Recognition;
using System.Windows;
namespace WpfTutorialSamples.Audio_and_Video
{
public partial class SpeechRecognitionTextCommandsSample : Window
{
public SpeechRecognitionTextCommandsSample()
{
InitializeComponent();
SpeechRecognizer recognizer = new SpeechRecognizer();
}
private void btnNew_Click(object sender, RoutedEventArgs e)
{
txtSpeech.Text = "";
}
private void btnOpen_Click(object sender, RoutedEventArgs e)
{
MessageBox.Show("Command invoked: Open");
}
private void btnSave_Click(object sender, RoutedEventArgs e)
{
MessageBox.Show("Command invoked: Save");
}
}
}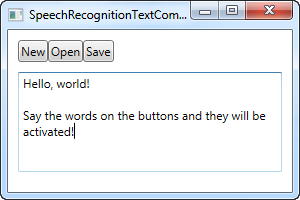
You can try running the example and then speaking out one of the commands, e.g. "New" or "Open". This actually allows you to dictate text to the TextBox, while at the same time invoking commands from the user interface - pretty cool indeed!
Specific commands
In the above example, Windows will automatically go into dictation mode as soon as focus is given to a text box. Windows will then try to distinguish between dictation and commands, but this can of course be difficult in certain situations.
So while the above examples have been focusing on dictation and interaction with UI elements, this next example will focus on the ability to listen for and interpret specific commands only. This also means that dictation will be ignored completely, even though text input fields have focus.
For this purpose, we will use the SpeechRecognitionEngine class instead of the SpeechRecognizer class. A huge difference between the two is that the SpeechRecognitionEngine class doesn't require the Windows speech recognition to be running and won't take you through the voice recognition guide. Instead, it will use basic voice recognition and listen only for grammar which you feed into the class.
In the next example, we'll feed a set of commands into the recognition engine. The idea is that it should listen for two words: A command/property and a value, which in this case will be used to change the color, size and weight of the text in a Label control, solely based on your voice commands. Before I show you the entire code sample, I want to focus on the way we add the commands to the engine. Here's the code:
GrammarBuilder grammarBuilder = new GrammarBuilder();
Choices commandChoices = new Choices("weight", "color", "size");
grammarBuilder.Append(commandChoices);

Choices valueChoices = new Choices();
valueChoices.Add("normal", "bold");
valueChoices.Add("red", "green", "blue");
valueChoices.Add("small", "medium", "large");
grammarBuilder.Append(valueChoices);

speechRecognizer.LoadGrammar(new Grammar(grammarBuilder));
We use a GrammarBuilder to build a set of grammar rules which we can load into the SpeechRecognitionEngine. It has several append methods, with the simplest one being Append(). This method takes a list of choices. We create a Choices instance, with the first part of the instruction - the command/property which we want to access. These choices are added to the builder with the Append() method.
Now, each time you call an append method on the GrammarBuilder, you instruct it to listen for a word. In our case, we want it to listen for two words, so we create a secondary set of choices, which will hold the value for the designated command/property. We add a range of values for each of the possible commands - one set of values for the weight command, one set of values for the color command and one set of values for the size command. They're all added to the same Choices instance and then appended to the builder.
In the end, we load it into the SpeechRecognitionEngine instance by calling the LoadGrammer() method, which takes a Grammar instance as parameter - in this case based on our GrammarBuilder instance.
So, with that explained, let's take a look at the entire example:
<Window x:Class="WpfTutorialSamples.Audio_and_Video.SpeechRecognitionCommandsSample"
        xmlns="http://schemas.microsoft.com/winfx/2006/xaml/presentation"
        xmlns:x="http://schemas.microsoft.com/winfx/2006/xaml"
        Title="SpeechRecognitionCommandsSample" Height="200" Width="325"
        Closing="Window_Closing">
    <DockPanel>
        <WrapPanel DockPanel.Dock="Bottom" HorizontalAlignment="Center" Margin="0,10">
            <ToggleButton Name="btnToggleListening" Click="btnToggleListening_Click">Listen</ToggleButton>
        </WrapPanel>
        <Label Name="lblDemo" HorizontalAlignment="Center" VerticalAlignment="Center" FontSize="48">Hello, world!</Label>
    </DockPanel>
</Window>
using System;
using System.Globalization;
using System.Speech.Recognition;
using System.Windows;
using System.Windows.Media;
namespace WpfTutorialSamples.Audio_and_Video
{
public partial class SpeechRecognitionCommandsSample : Window
{
private SpeechRecognitionEngine speechRecognizer = new SpeechRecognitionEngine();
public SpeechRecognitionCommandsSample()
{
InitializeComponent();
speechRecognizer.SpeechRecognized += speechRecognizer_SpeechRecognized;
GrammarBuilder grammarBuilder = new GrammarBuilder();
Choices commandChoices = new Choices("weight", "color", "size");
grammarBuilder.Append(commandChoices);
Choices valueChoices = new Choices();
valueChoices.Add("normal", "bold");
valueChoices.Add("red", "green", "blue");
valueChoices.Add("small", "medium", "large");
grammarBuilder.Append(valueChoices);
speechRecognizer.LoadGrammar(new Grammar(grammarBuilder));
speechRecognizer.SetInputToDefaultAudioDevice();
}
private void btnToggleListening_Click(object sender, RoutedEventArgs e)
{
if(btnToggleListening.IsChecked == true)
speechRecognizer.RecognizeAsync(RecognizeMode.Multiple);
else
speechRecognizer.RecognizeAsyncStop();
}
private void speechRecognizer_SpeechRecognized(object sender, SpeechRecognizedEventArgs e)
{
lblDemo.Content = e.Result.Text;
if(e.Result.Words.Count == 2)
{
string command = e.Result.Words[0].Text.ToLower();
string value = e.Result.Words[1].Text.ToLower();
switch(command)
{
case "weight":
FontWeightConverter weightConverter = new FontWeightConverter();
lblDemo.FontWeight = (FontWeight)weightConverter.ConvertFromString(value);
break;
case "color":
lblDemo.Foreground = new SolidColorBrush((Color)ColorConverter.ConvertFromString(value));
break;
case "size":
switch(value)
{
case "small":
lblDemo.FontSize = 12;
break;
case "medium":
lblDemo.FontSize = 24;
break;
case "large":
lblDemo.FontSize = 48;
break;
}
break;
}
}
}
private void Window_Closing(object sender, System.ComponentModel.CancelEventArgs e)
{
speechRecognizer.Dispose();
}
}
}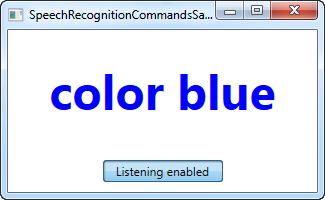
On the screenshot, you see the resulting application, after I've used the voice commands "weight bold" and "color blue" - pretty cool, right?
The grammar aspects of the example has already been explained and the interface is very simple, so let's focus on the rest of the Code-behind.
We use a ToggleButton to enable or disable listening, using the RecognizeAsync() and RecognizeAsyncStop() methods. The RecognizeAsync() takes a parameter which informs the recognition engine if it should do a single recognition or multiple recognitions. For our example, we want to give several commands, so Multiple is used. So, to enable listening, just click the button, and to disable it, just click it again. The state is visually represented by the button, which will be "down" when enabled and normal when disabled.
Now, besides building the Grammar, the most interesting part is where we interpret the command. This is done in the SpeechRecognized event, which we hook up to in the constructor. We use the fully recognized text to update the demo label, to show the latest command, and then we use the Words property to dig deeper into the actual command.
First off, we check that it has exactly two words - a command/property and a value. If that is the case, we check the command part first, and for each possible command, we handle the value accordingly.
For the weight and color commands, we can convert the value into something the label can understand automatically, using a converter, but for the sizes, we interpret the given values manually, since the values I've chosen for this example can't be converted automatically. Please be aware that you should handle exceptions in all cases, since a command like "weight blue" will try to assign the value blue to the FontWeight, which will naturally result in an exception.
Summary
As you can hopefully see, speech recognition with WPF is both easy and very powerful - especially the last example should give you a good idea just how powerful! With the ability to use dictation and/or specific voice commands, you can really provide excellent means for alternative input in your applications.