The community is working on translating this tutorial into Malayalam, but it seems that no one has started the translation process for this article yet. If you can help us, then please click "More info".
Hello, bound world!
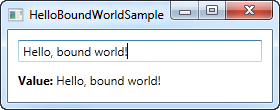
Just like we started this tutorial with the classic "Hello, world!" example, we'll show you how easy it is to use data binding in WPF with a "Hello, bound world!" example. Let's jump straight into it and then I'll explain it afterwards:
<Window x:Class="WpfTutorialSamples.DataBinding.HelloBoundWorldSample"
        xmlns="http://schemas.microsoft.com/winfx/2006/xaml/presentation"
        xmlns:x="http://schemas.microsoft.com/winfx/2006/xaml"
        Title="HelloBoundWorldSample" Height="110" Width="280">
    <StackPanel Margin="10">
		<TextBox Name="txtValue" />
		<WrapPanel Margin="0,10">
			<TextBlock Text="Value: " FontWeight="Bold" />
			<TextBlock Text="{Binding Path=Text, ElementName=txtValue}" />
		</WrapPanel>
	</StackPanel>
</Window>
This simple example shows how we bind the value of the TextBlock to match the Text property of the TextBox. As you can see from the screenshot, the TextBlock is automatically updated when you enter text into the TextBox. In a non-bound world, this would require us to listen to an event on the TextBox and then update the TextBlock each time the text changes, but with data binding, this connection can be established just by using markup.
The syntax of a Binding
All the magic happens between the curly braces, which in XAML encapsulates a Markup Extension. For data binding, we use the Binding extension, which allows us to describe the binding relationship for the Text property. In its most simple form, a binding can look like this:
{Binding}
This simply returns the current data context (more about that later). This can definitely be useful, but in the most common situations, you would want to bind a property to another property on the data context. A binding like that would look like this:
{Binding Path=NameOfProperty}
The Path notes the property that you want to bind to, however, since Path is the default property of a binding, you may leave it out if you want to, like this:
{Binding NameOfProperty}
You will see many different examples, some of them where Path is explicitly defined and some where it's left out. In the end it's really up to you though.
A binding has many other properties though, one of them being the ElementName which we use in our example. This allows us to connect directly to another UI element as the source. Each property that we set in the binding is separated by a comma:
{Binding Path=Text, ElementName=txtValue}
Summary
This was just a glimpse of all the binding possibilities of WPF. In the next chapters, we'll discover more of them, to show you just how powerful data binding is.