The community is working on translating this tutorial into Malayalam, but it seems that no one has started the translation process for this article yet. If you can help us, then please click "More info".
Responding to changes
So far in this tutorial, we have mostly created bindings between UI elements and existing classes, but in real life applications, you will obviously be binding to your own data objects. This is just as easy, but once you start doing it, you might discover something that disappoints you: Changes are not automatically reflected, like they were in previous examples. As you will learn in this article, you need just a bit of extra work for this to happen, but fortunately, WPF makes this pretty easy.
Responding to data source changes
There are two different scenarios that you may or may not want to handle when dealing with data source changes: Changes to the list of items and changes in the bound properties in each of the data objects. How to handle them may vary, depending on what you're doing and what you're looking to accomplish, but WPF comes with two very easy solutions that you can use: The ObservableCollection and the INotifyPropertyChanged interface.
The following example will show you why we need these two things:
<Window x:Class="WpfTutorialSamples.DataBinding.ChangeNotificationSample"
        xmlns="http://schemas.microsoft.com/winfx/2006/xaml/presentation"
        xmlns:x="http://schemas.microsoft.com/winfx/2006/xaml"
        Title="ChangeNotificationSample" Height="150" Width="300">
	<DockPanel Margin="10">
		<StackPanel DockPanel.Dock="Right" Margin="10,0,0,0">
			<Button Name="btnAddUser" Click="btnAddUser_Click">Add user</Button>
			<Button Name="btnChangeUser" Click="btnChangeUser_Click" Margin="0,5">Change user</Button>
			<Button Name="btnDeleteUser" Click="btnDeleteUser_Click">Delete user</Button>
		</StackPanel>
		<ListBox Name="lbUsers" DisplayMemberPath="Name"></ListBox>
	</DockPanel>
</Window>
using System;
using System.Collections.Generic;
using System.Windows;
namespace WpfTutorialSamples.DataBinding
{
public partial class ChangeNotificationSample : Window
{
private List<User> users = new List<User>();
public ChangeNotificationSample()
{
InitializeComponent();
users.Add(new User() { Name = "John Doe" });
users.Add(new User() { Name = "Jane Doe" });
lbUsers.ItemsSource = users;
}
private void btnAddUser_Click(object sender, RoutedEventArgs e)
{
users.Add(new User() { Name = "New user" });
}
private void btnChangeUser_Click(object sender, RoutedEventArgs e)
{
if(lbUsers.SelectedItem != null)
(lbUsers.SelectedItem as User).Name = "Random Name";
}
private void btnDeleteUser_Click(object sender, RoutedEventArgs e)
{
if(lbUsers.SelectedItem != null)
users.Remove(lbUsers.SelectedItem as User);
}
}
public class User
{
public string Name { get; set; }
}
}
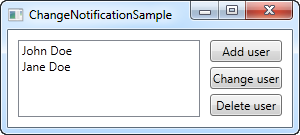
Try running it for yourself and watch how even though you add something to the list or change the name of one of the users, nothing in the UI is updated. The example is pretty simple, with a User class that will keep the name of the user, a ListBox to show them in and some buttons to manipulate both the list and its contents. The ItemsSource of the list is assigned to a quick list of a couple of users that we create in the window constructor. The problem is that none of the buttons seems to work. Let's fix that, in two easy steps.
Reflecting changes in the list data source
The first step is to get the UI to respond to changes in the list source (ItemsSource), like when we add or delete a user. What we need is a list that notifies any destinations of changes to its content, and fortunately, WPF provides a type of list that will do just that. It's called ObservableCollection, and you use it much like a regular List<T>, with only a few differences.
In the final example, which you will find below, we have simply replaced the List<User> with an ObservableCollection<User> - that's all it takes! This will make the Add and Delete button work, but it won't do anything for the "Change name" button, because the change will happen on the bound data object itself and not the source list - the second step will handle that scenario though.
Reflecting changes in the data objects
The second step is to let our custom User class implement the INotifyPropertyChanged interface. By doing that, our User objects are capable of alerting the UI layer of changes to its properties. This is a bit more cumbersome than just changing the list type, like we did above, but it's still one of the simplest way to accomplish these automatic updates.
The final and working example
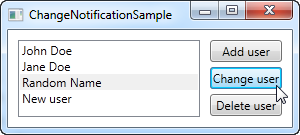
With the two changes described above, we now have an example that WILL reflect changes in the data source. It looks like this:
<Window x:Class="WpfTutorialSamples.DataBinding.ChangeNotificationSample"
        xmlns="http://schemas.microsoft.com/winfx/2006/xaml/presentation"
        xmlns:x="http://schemas.microsoft.com/winfx/2006/xaml"
        Title="ChangeNotificationSample" Height="135" Width="300">
	<DockPanel Margin="10">
		<StackPanel DockPanel.Dock="Right" Margin="10,0,0,0">
			<Button Name="btnAddUser" Click="btnAddUser_Click">Add user</Button>
			<Button Name="btnChangeUser" Click="btnChangeUser_Click" Margin="0,5">Change user</Button>
			<Button Name="btnDeleteUser" Click="btnDeleteUser_Click">Delete user</Button>
		</StackPanel>
		<ListBox Name="lbUsers" DisplayMemberPath="Name"></ListBox>
	</DockPanel>
</Window>
using System;
using System.Collections.Generic;
using System.Windows;
using System.ComponentModel;
using System.Collections.ObjectModel;
namespace WpfTutorialSamples.DataBinding
{
public partial class ChangeNotificationSample : Window
{
private ObservableCollection<User> users = new ObservableCollection<User>();
public ChangeNotificationSample()
{
InitializeComponent();
users.Add(new User() { Name = "John Doe" });
users.Add(new User() { Name = "Jane Doe" });
lbUsers.ItemsSource = users;
}
private void btnAddUser_Click(object sender, RoutedEventArgs e)
{
users.Add(new User() { Name = "New user" });
}
private void btnChangeUser_Click(object sender, RoutedEventArgs e)
{
if(lbUsers.SelectedItem != null)
(lbUsers.SelectedItem as User).Name = "Random Name";
}
private void btnDeleteUser_Click(object sender, RoutedEventArgs e)
{
if(lbUsers.SelectedItem != null)
users.Remove(lbUsers.SelectedItem as User);
}
}
public class User : INotifyPropertyChanged
{
private string name;
public string Name {
get { return this.name; }
set
{
if(this.name != value)
{
this.name = value;
this.NotifyPropertyChanged("Name");
}
}
}
public event PropertyChangedEventHandler PropertyChanged;
public void NotifyPropertyChanged(string propName)
{
if(this.PropertyChanged != null)
this.PropertyChanged(this, new PropertyChangedEventArgs(propName));
}
}
}
Summary
As you can see, implementing INotifyPropertyChanged is pretty easy, but it does create a bit of extra code on your classes, and adds a bit of extra logic to your properties. This is the price you will have to pay if you want to bind to your own classes and have the changes reflected in the UI immediately. Obviously you only have to call NotifyPropertyChanged in the setter's of the properties that you bind to - the rest can remain the way they are.
The ObservableCollection on the other hand is very easy to deal with - it simply requires you to use this specific list type in those situations where you want changes to the source list reflected in a binding destination.