The community is working on translating this tutorial into Malayalam, but it seems that no one has started the translation process for this article yet. If you can help us, then please click "More info".
Multi-threading with the BackgroundWorker

By default, each time your application executes a piece of code, this code is run on the same thread as the application itself. This means that while this code is running, nothing else happens inside of your application, including the updating of your UI.
This is quite a surprise to people who are new to Windows programming, when they first do something that takes more than a second and realize that their application actually hangs while doing so. The result is a lot of frustrated forum posts from people who are trying to run a lengthy process while updating a progress bar, only to realize that the progress bar is not updated until the process is done running.
The solution to all of this is the use of multiple threads, and while C# makes this quite easy to do, multi-threading comes with a LOT of pitfalls, and for a lot of people, they are just not that comprehensible. This is where the BackgroundWorker comes into play - it makes it simple, easy and fast to work with an extra thread in your application.
How the BackgroundWorker works
The most difficult concept about multi-threading in a Windows application is the fact that you are not allowed to make changes to the UI from another thread - if you do, the application will immediately crash. Instead, you have to invoke a method on the UI (main) thread which then makes the desired changes. This is all a bit cumbersome, but not when you use the BackgroundWorker.
When performing a task on a different thread, you usually have to communicate with the rest of the application in two situations: When you want to update it to show how far you are in the process, and then of course when the task is done and you want to show the result. The BackgroundWorker is built around this idea, and therefore comes with the two events ProgressChanged and RunWorkerCompleted.
The third event is called DoWork and the general rule is that you can't touch anything in the UI from this event. Instead, you call the ReportProgress() method, which in turn raises the ProgressChanged event, from where you can update the UI. Once you're done, you assign a result to the worker and then the RunWorkerCompleted event is raised.
So, to sum up, the DoWork event takes care of all the hard work. All of the code in there is executed on a different thread and for that reason you are not allowed to touch the UI from it. Instead, you bring data (from the UI or elsewhere) into the event by using the argument on the RunWorkerAsync() method, and the resulting data out of it by assigning it to the e.Result property.
The ProgressChanged and RunWorkerCompleted events, on the other hand, are executed on the same thread as the BackgroundWorker is created on, which will usually be the main/UI thread and therefore you are allowed to update the UI from them. Therefore, the only communication that can be performed between your running background task and the UI is through the ReportProgress() method.
That was a lot of theory, but even though the BackgroundWorker is easy to use, it's important to understand how and what it does, so you don't accidentally do something wrong - as already stated, errors in multi-threading can lead to some nasty problems.
A BackgroundWorker example
Enough with the theory - let's see what it's all about. In this first example, we want a pretty simply but time consuming job performed. Each number between 0 and 10.000 gets tested to see if it's divisible with the number 7. This is actually a piece of cake for today's fast computers, so to make it more time consuming and thereby easier to prove our point, I've added a one millisecond delay in each of the iterations.
Our sample application has two buttons: One that will perform the task synchronously (on the same thread) and one that will perform the task with a BackgroundWorker and thereby on a different thread. This should make it very easy to see the need for an extra thread when doing time consuming tasks. The code looks like this:
<Window x:Class="WpfTutorialSamples.Misc.BackgroundWorkerSample"
        xmlns="http://schemas.microsoft.com/winfx/2006/xaml/presentation"
        xmlns:x="http://schemas.microsoft.com/winfx/2006/xaml"
        Title="BackgroundWorkerSample" Height="300" Width="375">
    <DockPanel Margin="10">
        <DockPanel DockPanel.Dock="Top">
            <Button Name="btnDoSynchronousCalculation" Click="btnDoSynchronousCalculation_Click" DockPanel.Dock="Left" HorizontalAlignment="Left">Synchronous (same thread)</Button>
            <Button Name="btnDoAsynchronousCalculation" Click="btnDoAsynchronousCalculation_Click" DockPanel.Dock="Right" HorizontalAlignment="Right">Asynchronous (worker thread)</Button>
        </DockPanel>
        <ProgressBar DockPanel.Dock="Bottom" Height="18" Name="pbCalculationProgress" />

        <ListBox Name="lbResults" Margin="0,10" />

    </DockPanel>
</Window>
using System;
using System.ComponentModel;
using System.Windows;
namespace WpfTutorialSamples.Misc
{
public partial class BackgroundWorkerSample : Window
{
public BackgroundWorkerSample()
{
InitializeComponent();
}
private void btnDoSynchronousCalculation_Click(object sender, RoutedEventArgs e)
{
int max = 10000;
pbCalculationProgress.Value = 0;
lbResults.Items.Clear();
int result = 0;
for(int i = 0; i < max; i++)
{
if(i % 42 == 0)
{
lbResults.Items.Add(i);
result++;
}
System.Threading.Thread.Sleep(1);
pbCalculationProgress.Value = Convert.ToInt32(((double)i / max) * 100);
}
MessageBox.Show("Numbers between 0 and 10000 divisible by 7: " + result);
}
private void btnDoAsynchronousCalculation_Click(object sender, RoutedEventArgs e)
{
pbCalculationProgress.Value = 0;
lbResults.Items.Clear();
BackgroundWorker worker = new BackgroundWorker();
worker.WorkerReportsProgress = true;
worker.DoWork += worker_DoWork;
worker.ProgressChanged += worker_ProgressChanged;
worker.RunWorkerCompleted += worker_RunWorkerCompleted;
worker.RunWorkerAsync(10000);
}
void worker_DoWork(object sender, DoWorkEventArgs e)
{
int max = (int)e.Argument;
int result = 0;
for(int i = 0; i < max; i++)
{
int progressPercentage = Convert.ToInt32(((double)i / max) * 100);
if(i % 42 == 0)
{
result++;
(sender as BackgroundWorker).ReportProgress(progressPercentage, i);
}
else
(sender as BackgroundWorker).ReportProgress(progressPercentage);
System.Threading.Thread.Sleep(1);
}
e.Result = result;
}
void worker_ProgressChanged(object sender, ProgressChangedEventArgs e)
{
pbCalculationProgress.Value = e.ProgressPercentage;
if(e.UserState != null)
lbResults.Items.Add(e.UserState);
}
void worker_RunWorkerCompleted(object sender, RunWorkerCompletedEventArgs e)
{
MessageBox.Show("Numbers between 0 and 10000 divisible by 7: " + e.Result);
}
}
}The XAML part consists of a couple of buttons, one for running the process synchronously (on the UI thread) and one for running it asynchronously (on a background thread), a ListBox control for showing all the calculated numbers and then a ProgressBar control in the bottom of the window to show... well, the progress!
In Code-behind, we start off with the synchronous event handler. As mentioned, it loops from 0 to 10.000 with a small delay in each iteration, and if the number is divisible with the number 7, then we add it to the list. In each iteration we also update the ProgressBar, and once we're all done, we show a message to the user about how many numbers were found.
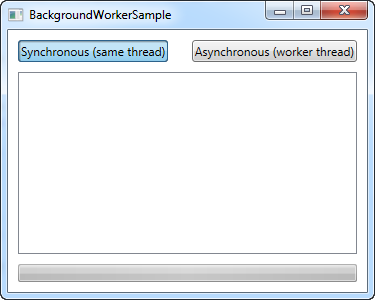
If you run the application and press the first button, it will look like this, no matter how far you are in the process:

No items on the list and, no progress on the ProgressBar, and the button hasn't even been released, which proves that there hasn't been a single update to the UI ever since the mouse was pressed down over the button.
Pressing the second button instead will use the BackgroundWorker approach. As you can see from the code, we do pretty much the same, but in a slightly different way. All the hard work is now placed in the DoWork event, which the worker calls after you run the RunWorkerAsync() method. This method takes input from your application which can be used by the worker, as we'll talk about later.
As already mentioned, we're not allowed to update the UI from the DoWork event. Instead, we call the ReportProgress method on the worker. If the current number is divisible with 7, we include it to be added on the list - otherwise we only report the current progress percentage, so that the ProgressBar may be updated.
Once all the numbers have been tested, we assign the result to the e.Result property. This will then be carried to the RunWorkerCompleted event, where we show it to the user. This might seem a bit cumbersome, instead of just showing it to the user as soon as the work is done, but once again, it ensures that we don't communicate with the UI from the DoWork event, which is not allowed.
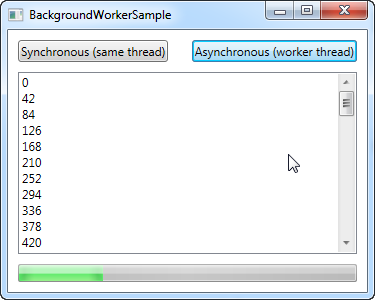
The result is, as you can see, much more user friendly:

The window no longer hangs, the button is clicked but not suppressed, the list of possible numbers is updated on the fly and the ProgressBar is going steadily up - the interface just got a whole lot more responsive.
Input and output
Notice that both the input, in form of the argument passed to the RunWorkerAsync() method,as well as the output, in form of the value assigned to the e.Result property of the DoWork event, are of the object type. This means that you can assign any kind of value to them. Our example was basic, since both input and output could be contained in a single integer value, but it's normal to have more complex input and output.
This is accomplished by using a more complex type, in many cases a struct or even a class which you create yourself and pass along. By doing this, the possibilities are pretty much endless and you can transport as much and complex data as you want between your BackgroundWorker and your application/UI.
The same is actually true for the ReportProgress method. Its secondary argument is called userState and is an object type, meaning that you can pass whatever you want to the ProgressChanged method.
Summary
The BackgroundWorker is an excellent tool when you want multi-threading in your application, mainly because it's so easy to use. In this chapter we looked at one of the things made very easy by the BackgroundWorker, which is progress reporting, but support for cancelling the running task is very handy as well. We'll look into that in the next chapter.