The community is working on translating this tutorial into Marathi, but it seems that no one has started the translation process for this article yet. If you can help us, then please click "More info".
The WebBrowser control
WPF comes with a ready to use WebBrowser control, which allows you to host a complete web browser within your application. The WebBrowser control is really just a shell around an ActiveX version of Internet Explorer, but since this is an integrated part of Windows, your application should work on all Windows machines without requiring the installation of additional components.
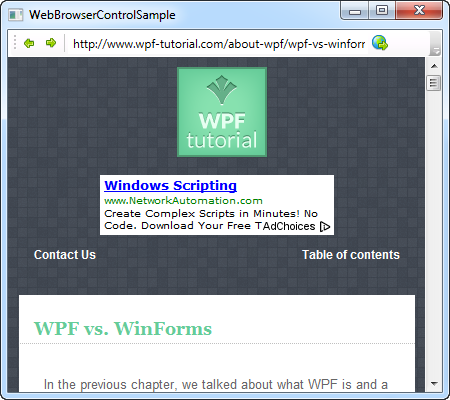
I've done things a bit differently in this article: Instead of starting off with a very limited example and then adding to it, I've create just one but more complex example. It illustrates how easy you can get a small web browser up and running. It's very basic in its functionality, but you can easily extend it if you want to. Here's how it looks:

So let's have a look at the code:
<Window x:Class="WpfTutorialSamples.Misc_controls.WebBrowserControlSample"
        xmlns="http://schemas.microsoft.com/winfx/2006/xaml/presentation"
        xmlns:x="http://schemas.microsoft.com/winfx/2006/xaml"
        Title="WebBrowserControlSample" Height="300" Width="450">
    <Window.CommandBindings>
        <CommandBinding Command="NavigationCommands.BrowseBack" CanExecute="BrowseBack_CanExecute" Executed="BrowseBack_Executed" />
        <CommandBinding Command="NavigationCommands.BrowseForward" CanExecute="BrowseForward_CanExecute" Executed="BrowseForward_Executed" />
        <CommandBinding Command="NavigationCommands.GoToPage" CanExecute="GoToPage_CanExecute" Executed="GoToPage_Executed" />
    </Window.CommandBindings>
    <DockPanel>
        <ToolBar DockPanel.Dock="Top">
            <Button Command="NavigationCommands.BrowseBack">
                <Image Source="/WpfTutorialSamples;component/Images/arrow_left.png" Width="16" Height="16" />
            </Button>
            <Button Command="NavigationCommands.BrowseForward">
                <Image Source="/WpfTutorialSamples;component/Images/arrow_right.png" Width="16" Height="16" />
            </Button>
            <Separator />
            <TextBox Name="txtUrl" Width="300" KeyUp="txtUrl_KeyUp" />
            <Button Command="NavigationCommands.GoToPage">
                <Image Source="/WpfTutorialSamples;component/Images/world_go.png" Width="16" Height="16" />
            </Button>
        </ToolBar>
        <WebBrowser Name="wbSample" Navigating="wbSample_Navigating"></WebBrowser>
    </DockPanel>
</Window>
using System;
using System.Windows;
using System.Windows.Input;
namespace WpfTutorialSamples.Misc_controls
{
public partial class WebBrowserControlSample : Window
{
public WebBrowserControlSample()
{
InitializeComponent();
wbSample.Navigate("http://www.wpf-tutorial.com");
}
private void txtUrl_KeyUp(object sender, KeyEventArgs e)
{
if(e.Key == Key.Enter)
wbSample.Navigate(txtUrl.Text);
}
private void wbSample_Navigating(object sender, System.Windows.Navigation.NavigatingCancelEventArgs e)
{
txtUrl.Text = e.Uri.OriginalString;
}
private void BrowseBack_CanExecute(object sender, CanExecuteRoutedEventArgs e)
{
e.CanExecute = ((wbSample != null) && (wbSample.CanGoBack));
}
private void BrowseBack_Executed(object sender, ExecutedRoutedEventArgs e)
{
wbSample.GoBack();
}
private void BrowseForward_CanExecute(object sender, CanExecuteRoutedEventArgs e)
{
e.CanExecute = ((wbSample != null) && (wbSample.CanGoForward));
}
private void BrowseForward_Executed(object sender, ExecutedRoutedEventArgs e)
{
wbSample.GoForward();
}
private void GoToPage_CanExecute(object sender, CanExecuteRoutedEventArgs e)
{
e.CanExecute = true;
}
private void GoToPage_Executed(object sender, ExecutedRoutedEventArgs e)
{
wbSample.Navigate(txtUrl.Text);
}
}
}The code might seem a bit overwhelming at first, but if you take a second look, you'll realize that there's a lot of repetition in it.
Let's start off by talking about the XAML part. Notice that I'm using several concepts discussed elsewhere in this tutorial, including the ToolBar control and WPF commands. The ToolBar is used to host a couple of buttons for going backward and forward. After that, we have an address bar for entering and showing the current URL, along with a button for navigating to the entered URL.
Below the toolbar, we have the actual WebBrowser control. As you can see, using it only requires a single line of XAML - in this case we subscribe to the Navigating event, which occurs as soon as the WebBrowser starts navigating to a URL.
In Code-behind, we start off by navigating to a URL already in the constructor of the Window, to have something to show immediately instead of a blank control. We then have the txtUrl_KeyUp event, in which we check to see if the user has hit Enter inside of the address bar - if so, we start navigating to the entered URL.
The wbSample_Navigating event makes sure that the address bar is updated each time a new navigation starts. This is important because we want it to show the current URL no matter if the user initiated the navigation by entering a new URL or by clicking a link on the webpage.
The last part of the Code-behind is simple handling of our commands: Two for the back and forward buttons, where we use the CanGoBack and CanGoForward to decide whether they can execute, and the GoBack and GoForward methods to do the actual work. This is very standard when dealing with WPF commands, as described in the commands section of this tutorial.
For the last command, we allow it to always execute and when it does, we use the Navigate() method once again.
Summary
As you can see, hosting and using a complete webbrowser inside of your application becomes very easy with the WebBrowser control. However, you should be aware that the WPF version of WebBrowser is a bit limited when compared to the WinForms version, but for basic usage and navigation, it works fine.
If you wish to use the WinForms version instead, you may do so using the WindowsFormsHost, which is explained elsewhere in this tutorial.