The community is working on translating this tutorial into Marathi, but it seems that no one has started the translation process for this article yet. If you can help us, then please click "More info".
How-to: ListView with left aligned column names
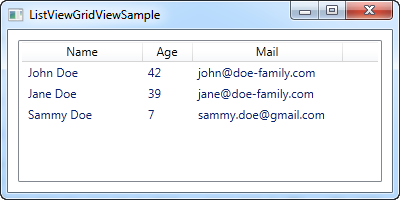
In a normal ListView, the column names are left aligned, but for some reason, Microsoft decided to center the names by default in the WPF ListView. In many cases this will make your application look out-of-style compared to other Windows applications. This is how the ListView will look in WPF by default:

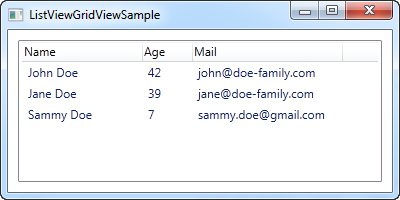
Let's try changing that to left aligned column names. Unfortunately, there are no direct properties on the GridViewColumn to control this, but fortunately that doesn't mean that it can't be changed.
Using a Style, targeted at the GridViewColumHeader, which is the element used to show the header of a GridViewColumn, we can change the HorizontalAlignment property. In this case it defaults to Center, but we can change it to Left, to accomplish what we want:
<Window x:Class="WpfTutorialSamples.ListView_control.ListViewGridViewSample"
        xmlns="http://schemas.microsoft.com/winfx/2006/xaml/presentation"
        xmlns:x="http://schemas.microsoft.com/winfx/2006/xaml"
        Title="ListViewGridViewSample" Height="200" Width="400">
    <Grid>
		<ListView Margin="10" Name="lvUsers">
			<ListView.Resources>
				<Style TargetType="{x:Type GridViewColumnHeader}">
					<Setter Property="HorizontalContentAlignment" Value="Left" />
				</Style>
			</ListView.Resources>
			<ListView.View>
				<GridView>
					<GridViewColumn Header="Name" Width="120" DisplayMemberBinding="{Binding Name}" />
					<GridViewColumn Header="Age" Width="50" DisplayMemberBinding="{Binding Age}" />
					<GridViewColumn Header="Mail" Width="150" DisplayMemberBinding="{Binding Mail}" />
				</GridView>
			</ListView.View>
		</ListView>
	</Grid>
</Window>
The part that does all the work for us, is the Style defined in the Resources of the ListView:
<Style TargetType="{x:Type GridViewColumnHeader}">
					<Setter Property="HorizontalContentAlignment" Value="Left" />
</Style>
Local or global style
By defining the Style within the control itself, it only applies to this particular ListView. In many cases you might like to make it apply to all the ListViews within the same Window/Page or perhaps even globally across the application. You can do this by either copying the style to the Window resources or the Application resources. Here's the same example, where we have applied the style to the entire Window instead of just the particular ListView:
<Window x:Class="WpfTutorialSamples.ListView_control.ListViewGridViewSample"
        xmlns="http://schemas.microsoft.com/winfx/2006/xaml/presentation"
        xmlns:x="http://schemas.microsoft.com/winfx/2006/xaml"
        Title="ListViewGridViewSample" Height="200" Width="400">
	<Window.Resources>
		<Style TargetType="{x:Type GridViewColumnHeader}">
			<Setter Property="HorizontalContentAlignment" Value="Left" />
		</Style>
	</Window.Resources>
	<Grid>
		<ListView Margin="10" Name="lvUsers">
			<ListView.View>
				<GridView>
					<GridViewColumn Header="Name" Width="120" DisplayMemberBinding="{Binding Name}" />
					<GridViewColumn Header="Age" Width="50" DisplayMemberBinding="{Binding Age}" />
					<GridViewColumn Header="Mail" Width="150" DisplayMemberBinding="{Binding Mail}" />
				</GridView>
			</ListView.View>
		</ListView>
	</Grid>
</Window>
In case you want another alignment, e.g. right alignment, you just change the value of the style like this:
<Setter Property="HorizontalContentAlignment" Value="Right" />