The community is working on translating this tutorial into Marathi, but it seems that no one has started the translation process for this article yet. If you can help us, then please click "More info".
Lazy loading TreeView items
The usual process when using the TreeView is to bind to a collection of items or to manually add each level at the same time. However, in some situations, you want to delay the loading of a nodes child items until they are actually needed. This is especially useful if you have a very deep tree, with lots of levels and child nodes and a great example of this, is the folder structure of your Windows computer.
Each drive on your Windows computer has a range of child folders, and each of those child folders have child folders beneath them and so on. Looping through each drive and each drives child folders could become extremely time consuming and your TreeView would soon consist of a lot of nodes, with a high percentage of them never being needed. This is the perfect task for a lazy-loaded TreeView, where child folders are only loaded on demand.
To achieve this, we simply add a dummy folder to each drive or child folder, and then when the user expands it, we remove the dummy folder and replace it with the actual values. This is how our application looks when it starts - by that time, we have only obtained a list of available drives on the computer:

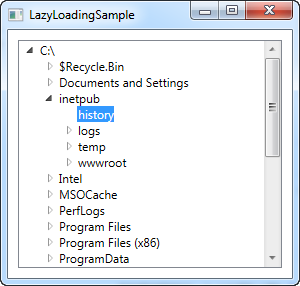
You can now start expanding the nodes, and the application will automatically load the sub folders. If a folder is empty, it will be shown as empty once you try to expand it, as it can be seen on the next screenshot:

So how is it accomplished? Let's have a look at the code:
<Window x:Class="WpfTutorialSamples.TreeView_control.LazyLoadingSample"
        xmlns="http://schemas.microsoft.com/winfx/2006/xaml/presentation"
        xmlns:x="http://schemas.microsoft.com/winfx/2006/xaml"
        Title="LazyLoadingSample" Height="300" Width="300">
    <Grid>
        <TreeView Name="trvStructure" TreeViewItem.Expanded="TreeViewItem_Expanded" Margin="10" />
    </Grid>
</Window>
using System;
using System.IO;
using System.Windows;
using System.Windows.Controls;
namespace WpfTutorialSamples.TreeView_control
{
public partial class LazyLoadingSample : Window
{
public LazyLoadingSample()
{
InitializeComponent();
DriveInfo[] drives = DriveInfo.GetDrives();
foreach(DriveInfo driveInfo in drives)
trvStructure.Items.Add(CreateTreeItem(driveInfo));
}
public void TreeViewItem_Expanded(object sender, RoutedEventArgs e)
{
TreeViewItem item = e.Source as TreeViewItem;
if((item.Items.Count == 1) && (item.Items[0] is string))
{
item.Items.Clear();
DirectoryInfo expandedDir = null;
if(item.Tag is DriveInfo)
expandedDir = (item.Tag as DriveInfo).RootDirectory;
if(item.Tag is DirectoryInfo)
expandedDir = (item.Tag as DirectoryInfo);
try
{
foreach(DirectoryInfo subDir in expandedDir.GetDirectories())
item.Items.Add(CreateTreeItem(subDir));
}
catch { }
}
}
private TreeViewItem CreateTreeItem(object o)
{
TreeViewItem item = new TreeViewItem();
item.Header = o.ToString();
item.Tag = o;
item.Items.Add("Loading...");
return item;
}
}
}The XAML is very simple and only one interesting detail is present: The way we subscribe to the Expanded event of TreeViewItem's. Notice that this is indeed the TreeViewItem and not the TreeView itself, but because the event bubbles up, we are able to just capture it in one place for the entire TreeView, instead of having to subscribe to it for each item we add to the tree. This event gets called each time an item is expanded, which we need to be aware of to load its child items on demand.
In Code-behind, we start by adding each drive found on the computer to the TreeView control. We assign the DriveInfo instance to the Tag property, so that we can later retrieve it. Notice that we use a custom method to create the TreeViewItem, called CreateTreeItem(), since we can use the exact same method when we want to dynamically add a child folder later on. Notice in this method how we add a child item to the Items collection, in the form of a string with the text "Loading...".
Next up is the TreeViewItem_Expanded event. As already mentioned, this event is raised each time a TreeView item is expanded, so the first thing we do is to check whether this item has already been loaded, by checking if the child items currently consists of only one item, which is a string - if so, we have found the "Loading..." child item, which means that we should now load the actual contents and replace the placeholder item with it.
We now use the items Tag property to get a reference to the DriveInfo or DirectoryInfo instance that the current item represents, and then we get a list of child directories, which we add to the clicked item, once again using the CreateTreeItem() method. Notice that the loop where we add each child folder is in a try..catch block - this is important, because some paths might not be accessible, usually for security reasons. You could grab the exception and use it to reflect this in the interface in one way or another.
Summary
By subscribing to the Expanded event, we can easily create a lazy-loaded TreeView, which can be a much better solution than a statically created one in several situations.