The community is working on translating this tutorial into Burmese, but it seems that no one has started the translation process for this article yet. If you can help us, then please click "More info".
ListView filtering
We've already done several different things with the ListView, like grouping and sorting, but another very useful ability is filtering. Obviously, you could just limit the items you add to the ListView in the first place, but often you would need to filter the ListView dynamically, in runtime, usually based on a user entered filter string. Luckily for us, the view mechanisms of the ListView also make it easy to do just that, like we saw it with sorting and grouping.
Filtering is actually quite easy to do, so let's jump straight into an example, and then we'll discuss it afterwards:
<Window x:Class="WpfTutorialSamples.ListView_control.FilteringSample"
        xmlns="http://schemas.microsoft.com/winfx/2006/xaml/presentation"
        xmlns:x="http://schemas.microsoft.com/winfx/2006/xaml"
        Title="FilteringSample" Height="200" Width="300">
    <DockPanel Margin="10">
        <TextBox DockPanel.Dock="Top" Margin="0,0,0,10" Name="txtFilter" TextChanged="txtFilter_TextChanged" />
        <ListView Name="lvUsers">
            <ListView.View>
                <GridView>
                    <GridViewColumn Header="Name" Width="120" DisplayMemberBinding="{Binding Name}" />
                    <GridViewColumn Header="Age" Width="50" DisplayMemberBinding="{Binding Age}" />
                </GridView>
            </ListView.View>
        </ListView>
    </DockPanel>
</Window>
using System;
using System.Collections.Generic;
using System.Windows;
using System.Windows.Data;
namespace WpfTutorialSamples.ListView_control
{
public partial class FilteringSample : Window
{
public FilteringSample()
{
InitializeComponent();
List<User> items = new List<User>();
items.Add(new User() { Name = "John Doe", Age = 42 });
items.Add(new User() { Name = "Jane Doe", Age = 39 });
items.Add(new User() { Name = "Sammy Doe", Age = 13 });
items.Add(new User() { Name = "Donna Doe", Age = 13 });
lvUsers.ItemsSource = items;
CollectionView view = (CollectionView)CollectionViewSource.GetDefaultView(lvUsers.ItemsSource);
view.Filter = UserFilter;
}
private bool UserFilter(object item)
{
if(String.IsNullOrEmpty(txtFilter.Text))
return true;
else
return ((item as User).Name.IndexOf(txtFilter.Text, StringComparison.OrdinalIgnoreCase) >= 0);
}
private void txtFilter_TextChanged(object sender, System.Windows.Controls.TextChangedEventArgs e)
{
CollectionViewSource.GetDefaultView(lvUsers.ItemsSource).Refresh();
}
}
public enum SexType { Male, Female };
public class User
{
public string Name { get; set; }
public int Age { get; set; }
public string Mail { get; set; }
public SexType Sex { get; set; }
}
}
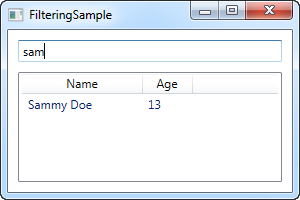
The XAML part is pretty simple: We have a TextBox, where the user can enter a search string, and then a ListView to show the result in.
In Code-behind, we start off by adding some User objects to the ListView, just like we did in previous examples. The interesting part happens in the last two lines of the constructor, where we obtain a reference to the CollectionView instance for the ListView and then assign a delegate to the Filter property. This delegate points to the function called UserFilter, which we have implemented just below. It takes each item as the first (and only) parameter and then returns a boolean value that indicates whether or not the given item should be visible on the list.
In the UserFilter() method, we take a look at the TextBox control (txtFilter), to see if it contains any text - if it does, we use it to check whether or not the name of the User (which is the property we have decided to filter on) contains the entered string, and then return true or false depending on that. If the TextBox is empty, we return true, because in that case we want all the items to be visible.
The txtFilter_TextChanged event is also important. Each time the text changes, we get a reference to the View object of the ListView and then call the Refresh() method on it. This ensures that the Filter delegate is called each time the user changes the value of the search/filter string text box.
Summary
This was a pretty simple implementation, but since you get access to each item, in this case of the User class, you can do any sort of custom filtering that you like, since you have access to all of the data about each of the items in the list. For instance, the above example could easily be changed to filter on age, by looking at the Age property instead of the Name property, or you could modify it to look at more than one property, e.g. to filter out users with an age below X AND a name that doesn't contain "Y".