This article is currently in the process of being translated into Arabic (~64% done).
The Image control
الWPF Image control سوف يمكنك من عرض الصور بداخل تطبيقك. انها أداة متعددة الاستخدامات بشكل كبير, بحيث فيها الكثير من الخيارات والاساليب ,كما سنتعلم في هذه المقالة ,لكن أولا ,دعونا نرى مثالا عن تضمين الصورة في النافذة
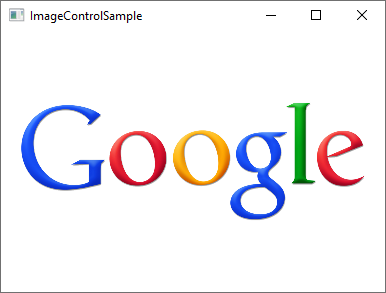
<Image Source="https://upload.wikimedia.org/wikipedia/commons/3/30/Googlelogo.png" />الناتج سيكون كما هو ظاهر

ان خاصية Source ,التي استعملناها في هذا المثال هي لتحديد الصورة التي يجب عرضها وهي على الأرجح أهم خاصية من عناصر التحكم, لذا دعونا نتعمق في هذا الموضع لنبدأ.
خاصية المصدر أو ال Source
كما رأينا بمثالنا السابق ان خاصية ال Source سوف تبسط من عملية تحديد الصورة الواجب عرضها داخل صندوق الصورة - في هذا المثال المحدد , لقد أستعملنا صورة بعيدة , التي سيجلبها عنصر التحكم بشكل تلقائي ويعرضها حالما تصبح مرئية ,هذا مثال جيد عن تعددية استخدام صندوق الصورة , لكن في كثير من الحالات , انت من المحتمل ان تحزم الصورة مع التطبيق الخاص بك , عوضا عن تحميلها من مكان بعيد . وهذا يمكن تحقيقه بسهولة !
كما قد تعرف , يمكنك اضافة ملفات مصادر الى مشروعك - يمكن أن توجد داخل مشروع Visual Studio الحالي الخاص بك ويمكن رؤيتها في (مستكشف الحلول او Solution Explorer) تمامًا مثل أي ملف آخر متعلق بـ (Windows, User Controls etc.). المثال الذوصلة الذي سنطرق له هو هو صورة ,حيث يمكننك ببساطة نسخ الصورة الى مجلد بداخل مشروعك ,لتصبح مضمنة .وبعد ذلك سيتم تجميعها في تطبيقك (الا اذا كنت تطلب بالتحديد من visual studio عدم القيام بذلك)ويمكن بعد ذلك الوصول إليها باستخدام تنسيق URL للموارد.اذا, اذا كنت تملك صورة بعنوان "google.png" بداخل مجلد يدعى "Images" , الكود سيكون على الشكل الأتي
<Image Source="/WpfTutorialSamples;component/Images/google.png" />هذو الuri's,غالبا يشار لها ب "Pack URI's", هو موضوع ثقيل فيه الكثير من التفاصيل, لكن في الوقت الحالي ، لاحظ فقط أنه يتكون من جزأين
- الجزء الأول (/WpfTutorialSamples;component), حيث أسم التجميع (WpfTutorialSamples في تطبيقي) مجموع مع كلمة مكون
- الجزء الثاني ,حيث يتم تحديد المسار المرتبط بالمورد /Images/google.png
بهذا الكود , يمكنك بسهولة الرجوع بالمصادر المحتواة ضمن التطبيق . لتسهيل الأمور the WPF framework will also accept a simple, relative URL اي منصة WPF تقبل ايضا ال url القريب بسهولة - ذلك سيفي بالغرض في معظم الحالات , الا اذا كنت تقوم بشيء اكثر تعقيدا ببرنامجك , فيما يتعلق بالموارد استعمال ال URL القريب , سوف يبدو هكذا :
<Image Source="/Images/google.png" />تحميل الصور بشكل ديناميكي (التعليمات البرمجية الخفية)
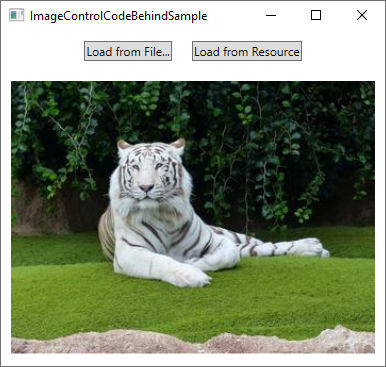
تحديد مصدر الصورة بشكل مباشر في ال XAML سوف يعمل في القليل من الحالات , لكن في بعض الحالات تحتاج لتحميل الصورةبشكل ديناميكي , مثالا عنها .بناء على اختيار المستخدم. وهذا يمكن عمله باستخدام التعليمات البرمجية الخفية. وهنا يمكنك تحميل صورة موجودة على حاسب المستخدم, بناءا على اختياره من الأداة OpenFileDialog:
private void BtnLoadFromFile_Click(object sender, RoutedEventArgs e)
{
    OpenFileDialog openFileDialog = new OpenFileDialog();
    if(openFileDialog.ShowDialog() == true)
    {
    Uri fileUri = new Uri(openFileDialog.FileName);
    imgDynamic.Source = new BitmapImage(fileUri);
    }
}
لاحظ كيف أقوم بأنشاء BitmapImage بناء على , Uri للكائن الذي أقوم بالتمرير اليه , بناء على العنصر المختاء من المحتوى . يمكننا استخدام نفس التقنية بالضبط لتحميل صورة مضمنة في التطبيق كمورد:
private void BtnLoadFromResource_Click(object sender, RoutedEventArgs e)
{
    Uri resourceUri = new Uri("/Images/white_bengal_tiger.jpg", UriKind.Relative);
    imgDynamic.Source = new BitmapImage(resourceUri);
}
نحن نستعمل نفس المسار القريب الذي أستعملناه في المثال السابق - فقط تأكد من مرور UriKind.Relative قيمة عند انشاء نموذج Uri ,اذا سيعرف ان المسار المزود ليس مسارا مطلقا . هنا مصدر XAML ,وبالاضافة الى لقطة شاشة ,من نموذج التعليمات البرمجية الخاصة بنا :
<Window x:Class="WpfTutorialSamples.Basic_controls.ImageControlCodeBehindSample"
    xmlns="http://schemas.microsoft.com/winfx/2006/xaml/presentation"
    xmlns:x="http://schemas.microsoft.com/winfx/2006/xaml"
    xmlns:d="http://schemas.microsoft.com/expression/blend/2008"
    xmlns:mc="http://schemas.openxmlformats.org/markup-compatibility/2006"
    xmlns:local="clr-namespace:WpfTutorialSamples.Basic_controls"
    mc:Ignorable="d"
    Title="ImageControlCodeBehindSample" Height="300" Width="400">
    <StackPanel>
    <WrapPanel Margin="10" HorizontalAlignment="Center">
        <Button Name="btnLoadFromFile" Margin="0,0,20,0" Click="BtnLoadFromFile_Click">Load from File...</Button>
        <Button Name="btnLoadFromResource" Click="BtnLoadFromResource_Click">Load from Resource</Button>
    </WrapPanel>
    <Image Name="imgDynamic" Margin="10"  />
    </StackPanel>
</Window>
خصائص الامتداد
After the Source property, which is important for obvious reasons, I think the second most interesting property of the Image control might be the Stretch property. It controls what happens when the dimensions of the image loaded doesn't completely match the dimensions of the Image control. This will happen all the time, since the size of your Windows can be controlled by the user and unless your layout is very static, this means that the size of the Image control(s) will also change.
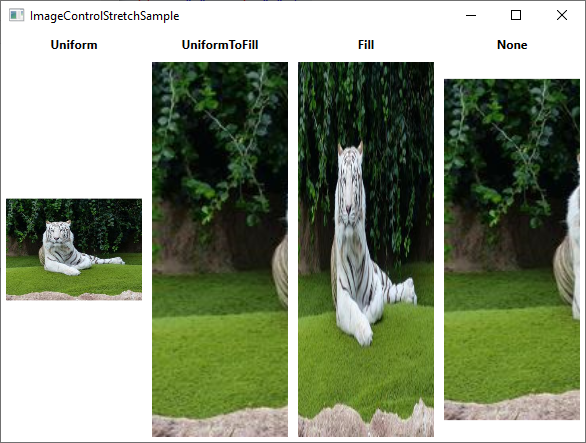
As you can see from this next example, the Stretch property can make quite a bit of difference in how an image is displayed:

<Window x:Class="WpfTutorialSamples.Basic_controls.ImageControlStretchSample"
    xmlns="http://schemas.microsoft.com/winfx/2006/xaml/presentation"
    xmlns:x="http://schemas.microsoft.com/winfx/2006/xaml"
    xmlns:d="http://schemas.microsoft.com/expression/blend/2008"
    xmlns:mc="http://schemas.openxmlformats.org/markup-compatibility/2006"
    xmlns:local="clr-namespace:WpfTutorialSamples.Basic_controls"
    mc:Ignorable="d"
    Title="ImageControlStretchSample" Height="450" Width="600">
    <Grid>
    <Grid.ColumnDefinitions>
        <ColumnDefinition Width="*" />
        <ColumnDefinition Width="*" />
        <ColumnDefinition Width="*" />
        <ColumnDefinition Width="*" />
    </Grid.ColumnDefinitions>
    <Grid.RowDefinitions>
        <RowDefinition Height="Auto" />
        <RowDefinition Height="*" />
    </Grid.RowDefinitions>
    <Label Grid.Column="0" HorizontalAlignment="Center" FontWeight="Bold">Uniform</Label>
    <Label Grid.Column="1" HorizontalAlignment="Center" FontWeight="Bold">UniformToFill</Label>
    <Label Grid.Column="2" HorizontalAlignment="Center" FontWeight="Bold">Fill</Label>
    <Label Grid.Column="3" HorizontalAlignment="Center" FontWeight="Bold">None</Label>
    <Image Source="/Images/white_bengal_tiger.jpg" Stretch="Uniform" Grid.Column="0" Grid.Row="1" Margin="5" />
    <Image Source="/Images/white_bengal_tiger.jpg" Stretch="UniformToFill" Grid.Column="1" Grid.Row="1" Margin="5" />
    <Image Source="/Images/white_bengal_tiger.jpg" Stretch="Fill" Grid.Column="2" Grid.Row="1" Margin="5" />
    <Image Source="/Images/white_bengal_tiger.jpg" Stretch="None" Grid.Column="3" Grid.Row="1" Margin="5" />
    </Grid>
</Window>
It can be a bit hard to tell, but all four Image controls display the same image, but with different values for the Stretch property. Here's how the various modes work:
- Uniform: This is the default mode. The image will be automatically scaled so that it fits within the Image area. The Aspect ratio of the image will be preserved.
- UniformToFill: The image will be scaled so that it completely fills the Image area. The Aspect ratio of the image will be preserved.
- Fill: The image will be scaled to fit the area of the Image control. Aspect ratio might NOT be preserved, because the height and width of the image are scaled independently.
- None: If the image is smaller than the Image control, nothing is done. If it's bigger than the Image control, the image will simply be cropped to fit into the Image control, meaning that only part of it will be visible.
Summary
ال WPF Image control يمكنك بسهولة من اضافة صورة الى تطبيقك , سواء من مصدر بعيد , مصادر مضمنة او من حاسب محلي , كما شرحنا في هذه المقالة