This article is currently in the process of being translated into Arabic (~94% done).
The FlowDocumentScrollViewer control
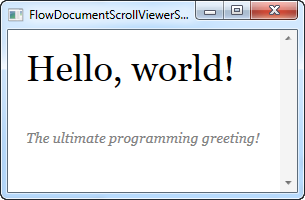
في مجموعة أصناف FlowDocument ، التي تمت مناقشتها في المقدمة ، تعد FlowDocumentScrollViewer هو الأبسط. حيث انها ببساطة تتيح للمستخدمين استعراض المستندات الطويلة باستخدام أشرطة التمرير العادية. بما أننا نتعامل لأول مرة مع FlowDocument المستخدم بأي نموذج ، فسنبدأ بالمثال التقليدي "Hello World! ، إلى جانب استخدام FlowDocumentScrollViewer ، ستغطي هذه المقالة أيضًا العديد من المفاهيم الشائعة بين جميع العناصر . إليك المثال الأول:
<Window x:Class="WpfTutorialSamples.Rich_text_controls.FlowDocumentScrollViewerSample"
        xmlns="http://schemas.microsoft.com/winfx/2006/xaml/presentation"
        xmlns:x="http://schemas.microsoft.com/winfx/2006/xaml"
        Title="FlowDocumentScrollViewerSample" Height="200" Width="300">
    <Grid>
        <FlowDocumentScrollViewer>
            <FlowDocument>
                <Paragraph FontSize="36">Hello, world!</Paragraph>
                <Paragraph FontStyle="Italic" TextAlignment="Left" FontSize="14" Foreground="Gray">The ultimate programming greeting!</Paragraph>
            </FlowDocument>
        </FlowDocumentScrollViewer>
    </Grid>
</Window>
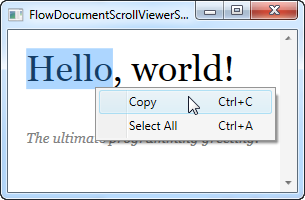
لاحظ مدى سهولة تحديد النص ، باستخدام علامات ترميز بسيطة ، في حالتنا تم استخدام Paragraph . الآن يمكنك أن تقول بأن هذا يمكن تحقيقه باستخدام اثنين من عناصر التحكم TextBlock ، وستكون محقاً في ذلك ، ولكن حتى مع مثال بسيط للغاية مثل هذا ، يمكنك الحصول على قليلا من الوظائف المضافة مجانا: يمكنك تحديد النص ونسخه إلى الذاكرة . و سيبدو هكذا

Zooming and scrollbar visibility
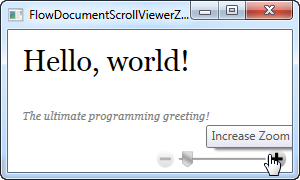
كما ذكرنا سابقًا ، أن كافة عناصر FlowDocument تدعم خصائص التصغير بشكل أساسي. و باستخدام المثال أعلاه ، يمكنك ببساطة الضغط مع الاستمرار على مفتاح Ctrl باستخدام عجلة الماوس للتكبير والتصغير. قد لا يكون هذا واضحًا للمستخدمين ، لذلك يمكنك مساعدتهم عن طريق عرض شريط الأدوات المدمج في FlowDocumentScrollViewer ، والذي يحتوي على عناصر تحكم تسمح لك بتغيير مستوى التكبير / التصغير. ما عليك سوى تعيين خاصية IsToolBarVisible على True في FlowDocumentScrollViewer ، و سيكون كل شيئ على ما يرام ، كما ترى في المثال التالي:
<Window x:Class="WpfTutorialSamples.Rich_text_controls.FlowDocumentScrollViewerZoomSample"
        xmlns="http://schemas.microsoft.com/winfx/2006/xaml/presentation"
        xmlns:x="http://schemas.microsoft.com/winfx/2006/xaml"
        Title="FlowDocumentScrollViewerZoomSample" Height="180" Width="300">
    <Grid>
        <FlowDocumentScrollViewer IsToolBarVisible="True" Zoom="80" ScrollViewer.VerticalScrollBarVisibility="Auto">
            <FlowDocument>
                <Paragraph FontSize="36">Hello, world!</Paragraph>
                <Paragraph FontStyle="Italic" TextAlignment="Left" FontSize="14" Foreground="Gray">The ultimate programming greeting!</Paragraph>
            </FlowDocument>
        </FlowDocumentScrollViewer>
    </Grid>
</Window>
الآن يمكن للمستخدم التحكم في مستوى التكبير / التصغير باستخدام شريط التمرير والأزرار الموجودة في شريط الأدوات أسفل المستند. لاحظ أيضًا أننا قمنا بتغيير مستوى التكبير / التصغير الافتراضي ، باستخدام خاصية Zoom - و التي تحدد مستوى التكبير كنسب مئوية ، لذلك في هذه الحالة ، تم تصغير النص إلى 80٪ بشكل افتراضي.
آخر شيء قمت بتغييره في هذا المثال ، بالمقارنة مع المثال الأول ، هو استخدام خاصية ScrollViewer.VerticalScrollBarVisibility من خلال تعيينها على Auto، ستكون أشرطة التمرير غير مرئية حتى يتجاوز المحتوى المساحة المتاحة بالفعل ، وهذا ما تريده عادةً.
Text alignment
ربما لاحظت أنني استخدمت خاصية TextAlignment على وجه التحديد في الأمثلة أعلاه. هذا لأن النص يتم عرضه (justified ) بشكل افتراضي في WPF FlowDocument ، مما يعني أن كل سطر من النص يتم تمديده لتغطية العرض المتاح بالكامل إذا لزم الأمر. كما ترى ، يمكن تغيير ذلك ، إما في فقرة واحدة أو على مستوى للمستند بأكمله عن طريق تعيين نفس الخاصية على عنصر FlowDocument
ومع ذلك ، في العديد من الحالات ، يكون النص المضبوط سليماً ، ولكن يمكن أن يكون شكله سيئ للغاية ، مع وجود مساحات مفرطة جدًا من المسافات البيضاء على الأسطر. حيث يتم إدراج فاصل قبل الكلمة الطويلة جدًا
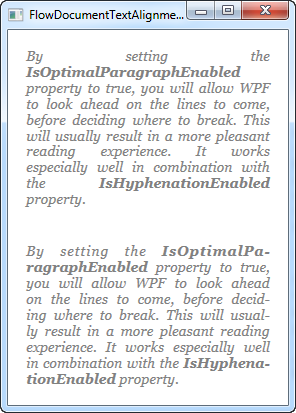
يوضح المثال التالي ذلك ، بالإضافة إلى توفير حل يساعد في حل المشكلة. فباستخدام الخاصية IsOptimalParagraphEnabled مجتمعة مع خاصية IsHyphenationEnabled ،فإن ذلك سيتيح ل WPF فرصة أفضل لوضع النص بأفضل طريقة ممكنة.
تتيح الخاصية IsOptimalParagraphEnabled للـ WPF التقدم إلى الأمام في النص الخاص بك ، لمعرفة ما إذا كان من المنطقي إيقاف النص في المكان الذي لا يوجد فيه مساحة كافية . تسمح الخاصية IsHyphenationEnabled لـ WPF بتقسيم الكلمات باستخدام واصلة ، لإعطاء تصميم طبيعي للنص
في المثال التالي ، قمت بعرض النص نفسه مرتين - أحدهما بدون هذه الخصائص والآخر بها. الفرق واضح تمامًا:
<Window x:Class="WpfTutorialSamples.Rich_text_controls.FlowDocumentTextAlignmentSample"
        xmlns="http://schemas.microsoft.com/winfx/2006/xaml/presentation"
        xmlns:x="http://schemas.microsoft.com/winfx/2006/xaml"
        Title="FlowDocumentTextAlignmentSample" Height="400" Width="330">
    <StackPanel>
        <FlowDocumentScrollViewer ScrollViewer.VerticalScrollBarVisibility="Auto">
            <FlowDocument>
                <Paragraph FontStyle="Italic" FontSize="14" Foreground="Gray">
                    By setting the
                    <Bold>IsOptimalParagraphEnabled</Bold> property to true,
                    you will allow WPF to look ahead on the lines to come, before deciding
                    where to break. This will usually result in a more pleasant reading
                    experience. It works especially well in combination with the
                    <Bold>IsHyphenationEnabled</Bold> property.
                </Paragraph>
            </FlowDocument>
        </FlowDocumentScrollViewer>
        <FlowDocumentScrollViewer ScrollViewer.VerticalScrollBarVisibility="Auto">
            <FlowDocument IsOptimalParagraphEnabled="True" IsHyphenationEnabled="True">
                <Paragraph FontStyle="Italic" FontSize="14" Foreground="Gray">
                    By setting the <Bold>IsOptimalParagraphEnabled</Bold> property to true,
                    you will allow WPF to look ahead on the lines to come, before deciding
                    where to break. This will usually result in a more pleasant reading
                    experience. It works especially well in combination with the
                    <Bold>IsHyphenationEnabled</Bold> property.
                </Paragraph>
            </FlowDocument>
        </FlowDocumentScrollViewer>
    </StackPanel>
</Window>
لا يتم تمكين IsOptimalParagraphEnabled افتراضيًا لأنه يتطلب طاقة أكبر لوحدة المعالجة المركزية عند عرض النص ، خاصة إذا تم تغيير حجم النافذة بشكل متكرر. و هذه ليست مشكلة في معظم الحالات.
إذا كان لديك الكثير من ;كائنات FlowDocument في تطبيقك وتفضل طريقة العرض المثلى هذه ، يمكنك تمكينها في جميع FlowDocumentinstance عن طريق تحديد نمط عام يمكّنها في App.xaml. و إليك مثال على ذلك:
<Application x:Class="WpfTutorialSamples.App"
             xmlns="http://schemas.microsoft.com/winfx/2006/xaml/presentation"
             xmlns:x="http://schemas.microsoft.com/winfx/2006/xaml"
             xmlns:sys="clr-namespace:System;assembly=mscorlib"
             StartupUri="Rich text controls/FlowDocumentTextAlignmentSample.xaml">
    <Application.Resources>
        <Style TargetType="FlowDocument">
            <Setter Property="IsOptimalParagraphEnabled" Value="True" />
            <Setter Property="IsHyphenationEnabled" Value="True" />
        </Style>
    </Application.Resources>
</Application>