The community is working on translating this tutorial into Assamese, but it seems that no one has started the translation process for this article yet. If you can help us, then please click "More info".
Playing video
In the previous article, we used the MediaPlayer class to play an MP3 file, but the cool part about the MediaPlayer class is that it can work with video files as well. However, since a video actually needs to be displayed somewhere in the interface, as opposed to an audio file, we need a wrapper element to visually represent the MediaPlayer instance. This is where the MediaElement comes into play.
The MediaElement
The MediaElement acts as a wrapper around MediaPlayer, so that you can display video content at a given place in your application, and because of that, it can play both audio and video files, although the visual representation doesn't really matter in dealing with audio files.
I want to show you just how easy you can show video content in your WPF application, so here's a bare minimum example:
<Window x:Class="WpfTutorialSamples.Audio_and_Video.MediaPlayerVideoSample"
        xmlns="http://schemas.microsoft.com/winfx/2006/xaml/presentation"
        xmlns:x="http://schemas.microsoft.com/winfx/2006/xaml"
        Title="MediaPlayerVideoSample" Height="300" Width="300">
    <Grid>
        <MediaElement Source="http://hubblesource.stsci.edu/sources/video/clips/details/images/hst_1.mpg" />
    </Grid>
</Window>
And that's it - a single line of XAML inside your window and you're displaying video (this specific video is about the Hubble Space Telescope - more information can be found at this website) in your WPF application.
Dealing with video size
Our examples in this article so far has just used the same size for the MediaElement, not taking the dimensions of the video into consideration. This is possible because the MediaElement can stretch/shrink the content to fit the available width/height and will do so by default. This is caused by the Stretch property, which is set to Uniform by default, meaning that the video will be stretched, while respecting the aspect ratio.
If your window is larger than your video, this might work just fine, but perhaps you don't want any stretching to occur? Or perhaps you want the window to adjust to fit your video's dimensions, instead of the other way around?
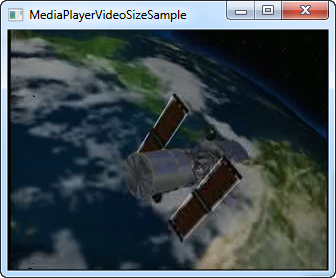
The first thing you need to do is to turn off stretching by setting the Stretch property to None. This will ensure that the video is rendered in its natural size. Now if you want the window to adjust to that, it's actually quite simple - just use the ResizeToContent property on the Window to accomplish this. Here's a full example:
<Window x:Class="WpfTutorialSamples.Audio_and_Video.MediaPlayerVideoSizeSample"
        xmlns="http://schemas.microsoft.com/winfx/2006/xaml/presentation"
        xmlns:x="http://schemas.microsoft.com/winfx/2006/xaml"
        Title="MediaPlayerVideoSizeSample" Height="500" Width="500" SizeToContent="WidthAndHeight">
    <Grid>
        <MediaElement Source="http://hubblesource.stsci.edu/sources/video/clips/details/images/hst_1.mpg" Name="mePlayer" Stretch="None" />
    </Grid>
</Window>
As you can see, despite the initial values of 500 for the Width and Height properties on the Window, the size is adjusted (down, in this case) to match the resolution of the video.
Please notice that this might cause the window to have a size of zero (only the title bar and borders will be visible) during startup, while the video is loaded. To prevent this, you can set the MinWidth and MinHeight properties on the Window to something that suits your needs.
Controlling the MediaElement/MediaPlayer
As you can see if you run our previous examples, the video starts playing as soon as the player has buffered enough data, but you can change this behavior by using the LoadedBehavior property. We'll do that in the next example, where we'll also add a couple of buttons to control the playback:
<Window x:Class="WpfTutorialSamples.Audio_and_Video.MediaPlayerVideoControlSample"
        xmlns="http://schemas.microsoft.com/winfx/2006/xaml/presentation"
        xmlns:x="http://schemas.microsoft.com/winfx/2006/xaml"
        Title="MediaPlayerVideoControlSample" Height="300" Width="300">
    <Grid Margin="10">
        <Grid.RowDefinitions>
            <RowDefinition Height="*" />
            <RowDefinition Height="Auto" />
        </Grid.RowDefinitions>
        <MediaElement Source="http://hubblesource.stsci.edu/sources/video/clips/details/images/hst_1.mpg" LoadedBehavior="Manual" Name="mePlayer" />
        <StackPanel Grid.Row="1">
            <Label Name="lblStatus" Content="Not playing..." HorizontalContentAlignment="Center" Margin="5" />
            <WrapPanel HorizontalAlignment="Center">
                <Button Name="btnPlay" Click="btnPlay_Click">Play</Button>
                <Button Name="btnPause" Margin="5,0" Click="btnPause_Click">Pause</Button>
                <Button Name="btnStop" Click="btnStop_Click">Stop</Button>
            </WrapPanel>
        </StackPanel>
    </Grid>
</Window>
using System;
using System.Windows;
using System.Windows.Threading;
namespace WpfTutorialSamples.Audio_and_Video
{
public partial class MediaPlayerVideoControlSample : Window
{
public MediaPlayerVideoControlSample()
{
InitializeComponent();
DispatcherTimer timer = new DispatcherTimer();
timer.Interval = TimeSpan.FromSeconds(1);
timer.Tick += timer_Tick;
timer.Start();
}
void timer_Tick(object sender, EventArgs e)
{
if(mePlayer.Source != null)
{
if(mePlayer.NaturalDuration.HasTimeSpan)
lblStatus.Content = String.Format("{0} / {1}", mePlayer.Position.ToString(@"mm\:ss"), mePlayer.NaturalDuration.TimeSpan.ToString(@"mm\:ss"));
}
else
lblStatus.Content = "No file selected...";
}
private void btnPlay_Click(object sender, RoutedEventArgs e)
{
mePlayer.Play();
}
private void btnPause_Click(object sender, RoutedEventArgs e)
{
mePlayer.Pause();
}
private void btnStop_Click(object sender, RoutedEventArgs e)
{
mePlayer.Stop();
}
}
}
This example is much like the one we did in the previous article for audio, just for video in this case. We have a bottom area with a set of buttons for controlling the playback, a label for showing the status, and then a MediaElement control in the top area to show the actual video.
Upon application start, we create and start a timer, which ticks every second. We use this event to update the status label, which will show the current progress as well as the entire length of the loaded file, as seen on the screenshot.
The three buttons each simply call a corresponding method on the MediaElement control - Play(), Pause() and Stop().
Summary
Once again it's clear how easy WPF makes even advanced things like playing a video. So far, we've worked with some basic examples, but in the next chapter, I'm going to combine all the stuff we've learned about audio and video playback into a single, media player with a lot more functionality than we've seen so far. Read on!