The community is working on translating this tutorial into Bangla, but it seems that no one has started the translation process for this article yet. If you can help us, then please click "More info".
The RichTextBox control
So far, we've only looked at the read-only wrappers for the FlowDocument, but WPF also includes a control which makes a FlowDocument editable: The RichTextBox control.
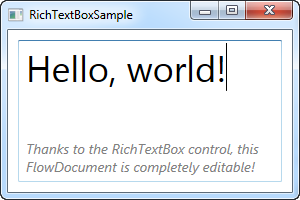
You can add a RichTextBox directly to the window, without any content - in that case, it will automatically create a FlowDocument instance that you will be editing. Alternatively, you can wrap a FlowDocument instance with the RichTextBox and thereby control the initial content. It could look like this:
<Window x:Class="WpfTutorialSamples.Rich_text_controls.RichTextBoxSample"
        xmlns="http://schemas.microsoft.com/winfx/2006/xaml/presentation"
        xmlns:x="http://schemas.microsoft.com/winfx/2006/xaml"
        Title="RichTextBoxSample" Height="200" Width="300">
    <Grid>
        <RichTextBox Margin="10">
            <FlowDocument>
                <Paragraph FontSize="36">Hello, world!</Paragraph>
                <Paragraph FontStyle="Italic" TextAlignment="Left" FontSize="14" Foreground="Gray">Thanks to the RichTextBox control, this FlowDocument is completely editable!</Paragraph>
            </FlowDocument>
        </RichTextBox>
    </Grid>
</Window>
With this example, you can start editing your rich text content straight away. However, now that the content is no longer read-only, it's obviously interesting how you can manipulate the text, as well as work with the selection. We'll look into that right now.
Another interesting aspect is of course working with the various formatting possibilities - we'll look into that in the next article, where we actually implement a small, but fully functional rich text editor.
Working with text and selection
Because the RichTextBox uses a FlowDocument internally, and because the rich text format is obviously more complicated than plain text, working with text and selections are not quite as easy as for the WPF TextBox control.
The next example will provide show off a range of functionality that works with the text and/or selection in the RichTextBox control:
<Window x:Class="WpfTutorialSamples.Rich_text_controls.RichTextBoxTextSelectionSample"
        xmlns="http://schemas.microsoft.com/winfx/2006/xaml/presentation"
        xmlns:x="http://schemas.microsoft.com/winfx/2006/xaml"
        Title="RichTextBoxTextSelectionSample" Height="300" Width="400">
    <DockPanel>
        <WrapPanel DockPanel.Dock="Top">
            <Button Name="btnGetText" Click="btnGetText_Click">Get text</Button>
            <Button Name="btnSetText" Click="btnSetText_Click">Set text</Button>
            <Button Name="btnGetSelectedText" Click="btnGetSelectedText_Click">Get sel. text</Button>
            <Button Name="btnSetSelectedText" Click="btnSetSelectedText_Click">Replace sel. text</Button>
        </WrapPanel>
        <TextBox DockPanel.Dock="Bottom" Name="txtStatus" />
        <RichTextBox Name="rtbEditor" SelectionChanged="rtbEditor_SelectionChanged">
            <FlowDocument>
                <Paragraph FontSize="36">Hello, world!</Paragraph>
                <Paragraph FontStyle="Italic" TextAlignment="Left" FontSize="14" Foreground="Gray">Thanks to the RichTextBox control, this FlowDocument is completely editable!</Paragraph>
            </FlowDocument>
        </RichTextBox>
    </DockPanel>
</Window>
using System;
using System.Windows;
using System.Windows.Controls;
using System.Windows.Documents;
namespace WpfTutorialSamples.Rich_text_controls
{
public partial class RichTextBoxTextSelectionSample : Window
{
public RichTextBoxTextSelectionSample()
{
InitializeComponent();
}
private void btnGetText_Click(object sender, RoutedEventArgs e)
{
TextRange textRange = new TextRange(rtbEditor.Document.ContentStart, rtbEditor.Document.ContentEnd);
MessageBox.Show(textRange.Text);
}
private void btnSetText_Click(object sender, RoutedEventArgs e)
{
TextRange textRange = new TextRange(rtbEditor.Document.ContentStart, rtbEditor.Document.ContentEnd);
textRange.Text = "Another world, another text!";
}
private void btnGetSelectedText_Click(object sender, RoutedEventArgs e)
{
MessageBox.Show(rtbEditor.Selection.Text);
}
private void btnSetSelectedText_Click(object sender, RoutedEventArgs e)
{
rtbEditor.Selection.Text = "[Replaced text]";
}
private void rtbEditor_SelectionChanged(object sender, RoutedEventArgs e)
{
TextRange tempRange = new TextRange(rtbEditor.Document.ContentStart, rtbEditor.Selection.Start);
txtStatus.Text = "Selection starts at character #" + tempRange.Text.Length + Environment.NewLine;
txtStatus.Text += "Selection is " + rtbEditor.Selection.Text.Length + " character(s) long" + Environment.NewLine;
txtStatus.Text += "Selected text: '" + rtbEditor.Selection.Text + "'";
}
}
}
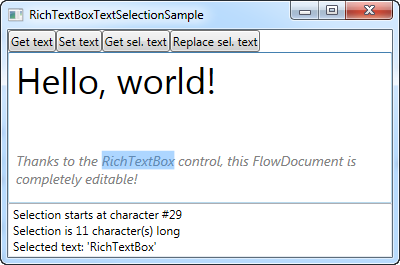
As you can see, the markup consists of a panel of buttons, a RichTextBox and a TextBox in the bottom, to show the current selection status. Each of the four available buttons will work with the RichTextBox by either getting or setting/replacing text, to show you how that's done.
In Code-behind, we handle the four buttons click events, as well as the SelectionChanged event for the RichTextBox, which allows us to show statistics about the current selection.
Pay special attention to the fact that instead of accessing a text property directly on the RichTextBox, as we would do with a regular TextBox, we're using TextRange objects with TextPointer's from the RichTextBox to obtain text from the control or the selection in the control. This is simply how it works with RichTextBox, which, as already mentioned, doesn’t work like a regular TextBox in several aspects.
Paragraph spacing
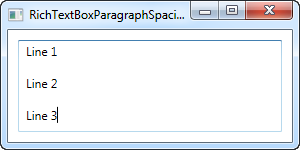
Another thing you may have noticed when working with the RichTextBox, is the fact that when you press Enter to start a new paragraph, this paragraph will leave an empty line between the old and the new paragraph. Allow me to illustrate with a screenshot, where I've entered three lines of text, each just separated by a single Enter key press:

This is normal behavior for a text editor working in paragraphs, but depending on how and where you use the RichTextBox, it might be confusing for your users that a single Enter press results in such a large amount of space between the lines.
Fortunately, it's very easy to fix. The extra spaces comes from the fact that paragraphs have a default margin bigger than zero, so fixing it is as simple as changing this property, which we can do with a style, like this:
<Window x:Class="WpfTutorialSamples.Rich_text_controls.RichTextBoxParagraphSpacingSample"
        xmlns="http://schemas.microsoft.com/winfx/2006/xaml/presentation"
        xmlns:x="http://schemas.microsoft.com/winfx/2006/xaml"
        Title="RichTextBoxParagraphSpacingSample" Height="150" Width="300">
    <Grid>
        <RichTextBox Margin="10">
            <RichTextBox.Resources>
                <Style TargetType="{x:Type Paragraph}">
                    <Setter Property="Margin" Value="0" />
                </Style>
            </RichTextBox.Resources>
        </RichTextBox>
    </Grid>
</Window>
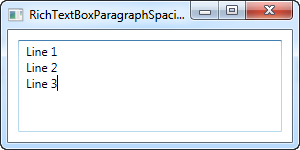
Now the lines don't have extra space around them, and if you want, you can place the style in the window or even in App.xaml, if you want it to work for more than just a single RichTextBox.
Summary
The RichTextBox is easy to use, has lots of features straight out of the box, and can easily be used if you wish to create a fully featured rich text editor. In the next article, we'll have a look at doing just that! This will also get us around important subjects such as loading and saving text from a RichTextBox and how to affect formatting of text in the control.