This article has been localized into Persian by the community.
کنترل Label
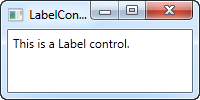
کنترل Label در فرم معمول خود، خیلی شبیه به TextBlock است که در مقاله قبلی استفاده کردیم. هرچند شما سریعا متوجه خواهید شد که به جای Text property، این نوع از کنترل ها دارای Content property هستند. این بداین علت است که Label ها می توانند میزبان همه نوعی کنترل درون خود باشند به جای فقط متن (text). همان طوری که در این مثال خیلی ساده مشاهده می کنید، محتوای Label حتی می تواند یک رشته یا string باشد.
<Window x:Class="WpfTutorialSamples.Basic_controls.LabelControlSample"
        xmlns="http://schemas.microsoft.com/winfx/2006/xaml/presentation"
        xmlns:x="http://schemas.microsoft.com/winfx/2006/xaml"
        Title="LabelControlSample" Height="100" Width="200">
    <Grid>
		<Label Content="This is a Label control." />
	</Grid>
</Window>
نکته دیگری که ممکن است به آن توجه کنید این واقعیت است که Label ، به طور پیش فرض ، دارای کمی حاشیه است، که اجازه می دهد متن چند پیکسل از گوشه بالا و سمت چپ رندر شود. این مورد در کنترل TextBlock نیست و باید حاشیه آن را به صورت دستی مشخص کنید.
در یک مورد ساده مانند این مثال، که محتوا فقط یک رشته است ، Label در واقع یک TextBlock داخلی ایجاد می کند و رشته شما را در آن نشان می دهد.
کنترل Label در مقابل کنترل TextBlock
جواب به اینکه چرا اصلا از Label استفاده می شود؟ این است که چند تفاوت مهم بین Label و TextBlock وجود دارد. TextBlock فقط به شما امکان می دهد یک رشته متن را رندر کنید، در حالی که Label به شما اجازه می دهد که:
- حاشیه مناسبی را مشخص کنید
- از کنترل های دیگر مثل عکس ها استفاده کنید
- از محتوای قالب ( یا چهارچوب دار) از طریق ویژگی ContentTemplate استفاده کنید
- از کلیدهای دسترسی برای تمرکز بر کنترل های مرتبط استفاده کنید
آخرین نکته بالا در واقع یکی از دلایل اصلی برای استفاده از Label در کنار کنترل TextBlock است . زمانی که شما قصد نمایش یک متن ساده را دارید. بهتر است که از کنترل TextBlock استفاده کنید. چون سبک تر است می تواند عملکرد بهتری در بیشتر موارد استفاده داشته باشد.
Label و کلیدهای میانبر
در ویندوز و سایر سیستم عاملها نیز، معمول است که میتوانید با نگه داشتن کلید [Alt] و سپس فشار دادن کاراکتری که مربوط به کنترلی است که میخواهید به آن دسترسی داشته باشید، به کنترلها در یک گفتگو دسترسی داشته باشید. وقتی کلید [Alt] را فشار دهید، نویسه ای که باید فشار دهید برجسته می شود. کنترلهای TextBlock از این قابلیت پشتیبانی نمیکنند، اما Label از این قابلیت پشتیبانی میکند، بنابراین برای برچسبهای کنترل، کنترل Label معمولاً یک انتخاب عالی است. بیایید به نمونه ای از آن در عمل نگاه کنیم:
<Window x:Class="WpfTutorialSamples.Basic_controls.LabelControlSample"
        xmlns="http://schemas.microsoft.com/winfx/2006/xaml/presentation"
        xmlns:x="http://schemas.microsoft.com/winfx/2006/xaml"
        Title="LabelControlSample" Height="180" Width="250">
	<StackPanel Margin="10">
		<Label Content="_Name:" Target="{Binding ElementName=txtName}" />
		<TextBox Name="txtName" />
		<Label Content="_Mail:" Target="{Binding ElementName=txtMail}" />
		<TextBox Name="txtMail" />
	</StackPanel>
</Window>
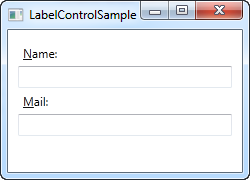
اسکرین شات دیالوگ نمونه ما را همانطور که با فشار دادن کلید Alt به نظر می رسد نشان می دهد. سعی کنید آن را اجرا کنید، کلید [Alt] را نگه دارید و سپس N و M را فشار دهید. خواهید دید که چگونه فوکوس بین دو جعبه متن جابجا می شود.
بنابراین، چندین مفهوم جدید در اینجا وجود دارد. ابتدا کلید دسترسی را با قرار دادن زیرخط (_) قبل از کاراکتر تعریف می کنیم. لازم نیست اولین کاراکتر باشد، می تواند قبل از هر یک از نویسه های محتوای برچسب شما باشد. روش معمول استفاده از اولین کاراکتر است که قبلاً به عنوان کلید دسترسی برای کنترل دیگری استفاده نشده است.
ما از ویژگی Target برای اتصال Label و کنترل تعیین شده استفاده می کنیم. ما برای این کار از یک اتصال استاندارد WPF با استفاده از ویژگی ElementName استفاده می کنیم که همه آنها را بعداً در این آموزش توضیح خواهیم داد. صحافی بر اساس نام کنترل است، بنابراین اگر این نام را تغییر دهید، باید به یاد داشته باشید که صحافی را نیز تغییر دهید.
استفاده از کنترل های دیگر به عنوان محتوای Label
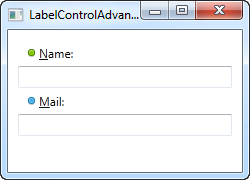
همانطور که قبلا ذکر شد، کنترل Label به شما اجازه می دهد تا کنترل های دیگر را میزبانی کنید، در حالی که مزایای دیگر را حفظ کنید. بیایید مثالی را امتحان کنیم که در آن هم یک تصویر و هم یک قطعه متن در داخل Label داریم، در حالی که برای هر یک از برچسب ها یک کلید دسترسی نیز داریم:
<Window x:Class="WpfTutorialSamples.Basic_controls.LabelControlAdvancedSample"
        xmlns="http://schemas.microsoft.com/winfx/2006/xaml/presentation"
        xmlns:x="http://schemas.microsoft.com/winfx/2006/xaml"
        Title="LabelControlAdvancedSample" Height="180" Width="250">
	<StackPanel Margin="10">
		<Label Target="{Binding ElementName=txtName}">
			<StackPanel Orientation="Horizontal">
				<Image Source="http://cdn1.iconfinder.com/data/icons/fatcow/16/bullet_green.png" />
				<AccessText Text="_Name:" />
			</StackPanel>
		</Label>
		<TextBox Name="txtName" />
		<Label Target="{Binding ElementName=txtMail}">
			<StackPanel Orientation="Horizontal">
				<Image Source="http://cdn1.iconfinder.com/data/icons/fatcow/16/bullet_blue.png" />
				<AccessText Text="_Mail:" />
			</StackPanel>
		</Label>
		<TextBox Name="txtMail" />
	</StackPanel>
</Window>
این فقط یک نسخه توسعه یافته از مثال قبلی است - به جای یک رشته متن ساده، Label ما اکنون میزبان یک تصویر و یک قطعه متن خواهد بود (در داخل کنترل AccessText، که به ما امکان می دهد همچنان از یک کلید دسترسی برای برچسب استفاده کنیم) . هر دو کنترل در داخل یک StackPanel افقی قرار دارند، زیرا Label، درست مانند هر مشتق دیگر ContentControl، فقط میتواند میزبان یک کنترل مستقیم فرزند باشد.
کنترل تصویر، که بعداً در این آموزش توضیح داده خواهد شد، از یک تصویر راه دور استفاده می کند - این فقط برای اهداف نمایشی است و ایده خوبی برای اکثر برنامه های کاربردی زندگی واقعی نیست.
خلاصه
در بیشتر موقعیت ها، کنترل Label دقیقاً همان کاری را انجام می دهد که از نام آن پیداست: به عنوان یک برچسب متنی برای کنترل دیگری عمل می کند. این هدف اولیه آن است. برای اکثر موارد دیگر، احتمالاً باید از یک کنترل TextBlock یا یکی از محفظه های متنی دیگری که WPF ارائه می دهد استفاده کنید.