This article is currently in the process of being translated into Persian (~56% done).
The CheckBox control
کنترل CheckaBox به کاربر نهایی اجازه فعال و غیر فعال کردن یه عمل رو میده, معمولا" روی یه مقدار boolean در کد پشته تاثیر میزاره. بریم سره یه مثال برا اونایی که نمیدونن CheackBox چه شکلیه:
<Window x:Class="WpfTutorialSamples.Basic_controls.CheckBoxSample"
        xmlns="http://schemas.microsoft.com/winfx/2006/xaml/presentation"
        xmlns:x="http://schemas.microsoft.com/winfx/2006/xaml"
        Title="CheckBoxSample" Height="140" Width="250">
    <StackPanel Margin="10">
		<Label FontWeight="Bold">Application Options</Label>
		<CheckBox>Enable feature ABC</CheckBox>
		<CheckBox IsChecked="True">Enable feature XYZ</CheckBox>
		<CheckBox>Enable feature WWW</CheckBox>
	</StackPanel>
</Window>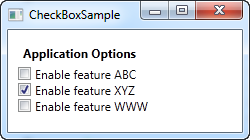
همینطور که میبینید, استفاده از CheackBox خیلی سادست. در CheackBox دومی, از IsCheacked Property استفاده کردم که تیکش رو به صورت پیشفرض زده باشه, ولی به جز همین property هم لازم نیست از چیز دیگه ای استفاده کنیم . از IsCheacked propery میشه در کد پشته هم استفاده کرد اگه بخوایم چک کنیم که CheackBox مورد نظرمون تیک خورده یا نه.
Custom content
کنترل CheackBox از کلاس ContentControl ارث بری میکنه, که از اینجا میشه فهمید که میشه محتویات شخصی سازی شده رو کنارشون نشون داد. اگه شما بیاید فقط یک تکه متن نشون بدید, مثله من که تو مثاله بالا نشون دادم, WPF اون متن رو داخل یک TextBlock میزاره و اونو نشونش میده, ولی این فقط یه میانبره که کاره مارو راحت تر میکنه. در هرصورت شما میتونید مثله مثاله پایین که قراره ببینید هر چیزی داخلش قرار بدید:
<Window x:Class="WpfTutorialSamples.Basic_controls.CheckBoxSample"
        xmlns="http://schemas.microsoft.com/winfx/2006/xaml/presentation"
        xmlns:x="http://schemas.microsoft.com/winfx/2006/xaml"
        Title="CheckBoxSample" Height="140" Width="250">
    <StackPanel Margin="10">
		<Label FontWeight="Bold">Application Options</Label>
		<CheckBox>
			<TextBlock>
				Enable feature <Run Foreground="Green" FontWeight="Bold">ABC</Run>
			</TextBlock>
		</CheckBox>
		<CheckBox IsChecked="True">
			<WrapPanel>
				<TextBlock>
					Enable feature <Run FontWeight="Bold">XYZ</Run>
				</TextBlock>
				<Image Source="/WpfTutorialSamples;component/Images/question.png" Width="16" Height="16" Margin="5,0" />
			</WrapPanel>
		</CheckBox>
		<CheckBox>
			<TextBlock>
				Enable feature <Run Foreground="Blue" TextDecorations="Underline" FontWeight="Bold">WWW</Run>
			</TextBlock>
		</CheckBox>
	</StackPanel>
</Window>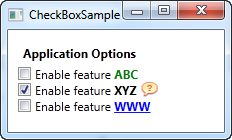
همونطور که از این مثال مشاهده کردید, شما تقریبا میتونید همه کار میتونید با Content بکنید. توی هر سه CheackBox, کارای مختلفی با متنشون کردم, و برای وسطیشون حتی از یک Image Control هم استفاده کردم. با استفاده کردن از یک Control بجای Content, به جای متن, کنترل بیشتری روی ظاهرش داریم, و یه چیز باحال هم اینه که ما هرجایی از Content یک CheackBox رو که روش ضربه بزنیم اون رو فعال و غیر فعال میکنه
The IsThreeState property
همونطور که اشاره شد, CheackBox معمولا به مقدار boolean جواب میده, به این معنیه که فقط دو حالت true و falase رو داره. ولیکن از انجایی که یه تایپ boolean امکان داره null هم باشه یه گزینه سومی هم برای ما بوجود میاد; CheackBox حتی میتونه این موقعیت هم ساپورت کنه. با مساوی قرار دادن IsThreeState propery به true, CheackBox ما به حالت سومش که بهش میگیم "حالت میانی".
A common usage for this is to have a "Enable all" CheckBox, which can control a set of child checkboxes, as well as show their collective state. Our example shows how you may create a list of features that can be toggled on and off, with a common "Enable all" CheckBox in the top:
<Window x:Class="WpfTutorialSamples.Basic_controls.CheckBoxThreeStateSample"
        xmlns="http://schemas.microsoft.com/winfx/2006/xaml/presentation"
        xmlns:x="http://schemas.microsoft.com/winfx/2006/xaml"
        Title="CheckBoxThreeStateSample" Height="170" Width="300">
	<StackPanel Margin="10">
		<Label FontWeight="Bold">Application Options</Label>
		<StackPanel Margin="10,5">
			<CheckBox IsThreeState="True" Name="cbAllFeatures" Checked="cbAllFeatures_CheckedChanged" Unchecked="cbAllFeatures_CheckedChanged">Enable all</CheckBox>
			<StackPanel Margin="20,5">
				<CheckBox Name="cbFeatureAbc" Checked="cbFeature_CheckedChanged" Unchecked="cbFeature_CheckedChanged">Enable feature ABC</CheckBox>
				<CheckBox Name="cbFeatureXyz" IsChecked="True" Checked="cbFeature_CheckedChanged" Unchecked="cbFeature_CheckedChanged">Enable feature XYZ</CheckBox>
				<CheckBox Name="cbFeatureWww" Checked="cbFeature_CheckedChanged" Unchecked="cbFeature_CheckedChanged">Enable feature WWW</CheckBox>
			</StackPanel>
		</StackPanel>
	</StackPanel>
</Window>using System;
using System.Windows;
namespace WpfTutorialSamples.Basic_controls
{
public partial class CheckBoxThreeStateSample : Window
{
public CheckBoxThreeStateSample()
{
InitializeComponent();
}
private void cbAllFeatures_CheckedChanged(object sender, RoutedEventArgs e)
{
bool newVal = (cbAllFeatures.IsChecked == true);
cbFeatureAbc.IsChecked = newVal;
cbFeatureXyz.IsChecked = newVal;
cbFeatureWww.IsChecked = newVal;
}
private void cbFeature_CheckedChanged(object sender, RoutedEventArgs e)
{
cbAllFeatures.IsChecked = null;
if((cbFeatureAbc.IsChecked == true) && (cbFeatureXyz.IsChecked == true) && (cbFeatureWww.IsChecked == true))
cbAllFeatures.IsChecked = true;
if((cbFeatureAbc.IsChecked == false) && (cbFeatureXyz.IsChecked == false) && (cbFeatureWww.IsChecked == false))
cbAllFeatures.IsChecked = false;
}
}
}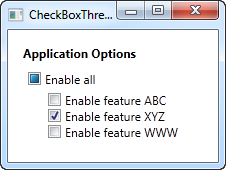
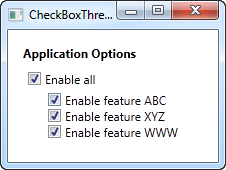
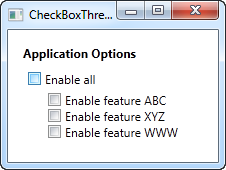
This example works from two different angles: If you check or uncheck the "Enable all" CheckBox, then all of the child check boxes, each representing an application feature in our example, is either checked or unchecked. It also works the other way around though, where checking or unchecking a child CheckBox affects the "Enable all" CheckBox state: If they are all checked or unchecked, then the "Enable all" CheckBox gets the same state - otherwise the value will be left with a null, which forces the CheckBox into the indeterminate state.
All of this behavior can be seen on the screenshots above, and is achieved by subscribing to the Checked and Unchecked events of the CheckBox controls. In a real world example, you would likely bind the values instead, but this example shows the basics of using the IsThreeState property to create a "Toggle all" effect.