This article has been localized into Dutch by the community.
Het selectievakje
Het selectievak bedieningselement stelt de eindgebruiker in staat om een keuze aan of uit te zetten, doorgaans door het terugkaatsen van een Boolean (waar of onwaar) waarde naar de achterliggende code. Laten we gelijk in een voorbeeld duiken, in het geval je niet zeker weet hoe een selectievak eruit ziet:
<Window x:Class="WpfTutorialSamples.Basic_controls.CheckBoxSample"
        xmlns="http://schemas.microsoft.com/winfx/2006/xaml/presentation"
        xmlns:x="http://schemas.microsoft.com/winfx/2006/xaml"
        Title="CheckBoxSample" Height="140" Width="250">
    <StackPanel Margin="10">
		<Label FontWeight="Bold">Application Options</Label>
		<CheckBox>Enable feature ABC</CheckBox>
		<CheckBox IsChecked="True">Enable feature XYZ</CheckBox>
		<CheckBox>Enable feature WWW</CheckBox>
	</StackPanel>
</Window>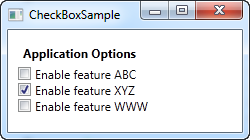
Zoals je kunt zien, is het selectiekeuzevak eenvoudig te gebruiken. Bij het tweede keuzevak gebruik ik de IsAangevinkt eigenschap om het standaard aangekruist te laten zijn, maar buiten dat, zijn er geen eigenschappen nodig om het te gebruiken. De IsAangevinkt eigenschap zou ook gebruikt moeten worden vanuit de achterliggende code als je wilt controleren of een bepaald selectievakje is aangevinkt of niet.
Standaard inhoud
Het Selectievak bedieningselement erft functionaliteit over van de ContentControl klasse. Dit betekent dat het element aangepaste inhoud kan bijhouden en weergeven naast zijn selectievakje. Wanneer je simpelweg een stukje tekst specifieert - zoals ik heb gedaan in het voorbeeld hierboven - zal WPF het zelf in een TekstBlok bedieningselement plaatsen en weergeven, maar dit is enkel om het voor jou makkelijker te maken. Elk type van bedieningselement kan gebruikt worden als inhoud, zoals we kunnen zien in het volgende voorbeeld:
<Window x:Class="WpfTutorialSamples.Basic_controls.CheckBoxSample"
        xmlns="http://schemas.microsoft.com/winfx/2006/xaml/presentation"
        xmlns:x="http://schemas.microsoft.com/winfx/2006/xaml"
        Title="CheckBoxSample" Height="140" Width="250">
    <StackPanel Margin="10">
		<Label FontWeight="Bold">Application Options</Label>
		<CheckBox>
			<TextBlock>
				Enable feature <Run Foreground="Green" FontWeight="Bold">ABC</Run>
			</TextBlock>
		</CheckBox>
		<CheckBox IsChecked="True">
			<WrapPanel>
				<TextBlock>
					Enable feature <Run FontWeight="Bold">XYZ</Run>
				</TextBlock>
				<Image Source="/WpfTutorialSamples;component/Images/question.png" Width="16" Height="16" Margin="5,0" />
			</WrapPanel>
		</CheckBox>
		<CheckBox>
			<TextBlock>
				Enable feature <Run Foreground="Blue" TextDecorations="Underline" FontWeight="Bold">WWW</Run>
			</TextBlock>
		</CheckBox>
	</StackPanel>
</Window>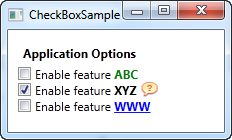
Zoals je in de voorbeeldopmaak kunt zien, kun je met de inhoud doen wat je wilt. Bij alle drie de selectievakjes doe ik iets anders met de tekst en bij de middelste doe ik er zelfs een afbeelding bij. Door een besturingselement te specificeren, in plaats van alleen tekst, krijgen we veel meer controle over het uiterlijk, en het leuke is dat het niet uitmaakt op welk deel van de inhoud je klikt, het zal de CheckBox activeren en aan- of uitzetten.
De IsDrieStandig Eigenshap
Zoals eerder gezegd stemt het Selectievakje standaard overeen met een booleanwaarde, wat betekent dat het maar twee standen heeft: waar of onwaar (aan of uit). Echter, omdat een Boolean datatype onbepaald (en: nullable) kan zijn, en hierdoor eigenlijk een derde stand toelaat (waar, onwaar of niet gedefinieerd), ondersteunt het Selectievakje ook deze stand. Door de IsDrieStandig eigenschap op waar te zetten, krijgt het Selectievakje een derde stand, "de onbepaalde stand" genoemd.
Een veelvoorkomend gebruik hiervan is een "Allemaal Aanzetten" Selectievakje, dat een set van kinderselectievakjes aanstuurt, en tegelijkertijd hun gezamenlijke stand toont. Ons voorbeeld toont hoe je een lijst kan creëren met functies die aan of uit kunnen worden gezet, met een algemeen "Allemaal Aanzetten" Selectievakje bovenaan:
<Window x:Class="WpfTutorialSamples.Basic_controls.CheckBoxThreeStateSample"
        xmlns="http://schemas.microsoft.com/winfx/2006/xaml/presentation"
        xmlns:x="http://schemas.microsoft.com/winfx/2006/xaml"
        Title="CheckBoxThreeStateSample" Height="170" Width="300">
	<StackPanel Margin="10">
		<Label FontWeight="Bold">Application Options</Label>
		<StackPanel Margin="10,5">
			<CheckBox IsThreeState="True" Name="cbAllFeatures" Checked="cbAllFeatures_CheckedChanged" Unchecked="cbAllFeatures_CheckedChanged">Enable all</CheckBox>
			<StackPanel Margin="20,5">
				<CheckBox Name="cbFeatureAbc" Checked="cbFeature_CheckedChanged" Unchecked="cbFeature_CheckedChanged">Enable feature ABC</CheckBox>
				<CheckBox Name="cbFeatureXyz" IsChecked="True" Checked="cbFeature_CheckedChanged" Unchecked="cbFeature_CheckedChanged">Enable feature XYZ</CheckBox>
				<CheckBox Name="cbFeatureWww" Checked="cbFeature_CheckedChanged" Unchecked="cbFeature_CheckedChanged">Enable feature WWW</CheckBox>
			</StackPanel>
		</StackPanel>
	</StackPanel>
</Window>using System;
using System.Windows;
namespace WpfTutorialSamples.Basic_controls
{
public partial class CheckBoxThreeStateSample : Window
{
public CheckBoxThreeStateSample()
{
InitializeComponent();
}
private void cbAllFeatures_CheckedChanged(object sender, RoutedEventArgs e)
{
bool newVal = (cbAllFeatures.IsChecked == true);
cbFeatureAbc.IsChecked = newVal;
cbFeatureXyz.IsChecked = newVal;
cbFeatureWww.IsChecked = newVal;
}
private void cbFeature_CheckedChanged(object sender, RoutedEventArgs e)
{
cbAllFeatures.IsChecked = null;
if((cbFeatureAbc.IsChecked == true) && (cbFeatureXyz.IsChecked == true) && (cbFeatureWww.IsChecked == true))
cbAllFeatures.IsChecked = true;
if((cbFeatureAbc.IsChecked == false) && (cbFeatureXyz.IsChecked == false) && (cbFeatureWww.IsChecked == false))
cbAllFeatures.IsChecked = false;
}
}
}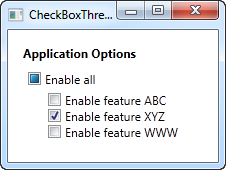
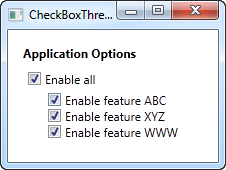
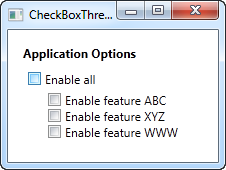
Dit voorbeeld werkt vanuit twee verschillende invalshoeken: Als je het selectievakje "Alles inschakelen" in- of uitschakelt, worden alle onderliggende selectievakjes, in het voorbeeld aangevinkt of niet aangevinkt. Het werkt ook andersom, het aan- of uitvinken van een onderliggende CheckBoxen beïnvloedt de "Enable all" CheckBox-status: Als ze allemaal zijn aangevinkt of niet aangevinkt, krijgt de "Enable all" CheckBox dezelfde status - anders zal de waarde worden achtergelaten met een Null, waardoor de CheckBox in de onbepaalde staat wordt gedwongen.
Al dit gedrag is te zien op de bovenstaande schermafbeeldingen en wordt bereikt door te subscriben op de Checked en Unchecked events van de CheckBox-besturingselementen. In een voorbeeld uit de echte wereld zou u in plaats daarvan waarschijnlijk de waarden binden, maar dit voorbeeld toont de basisprincipes van het gebruik van de eigenschap IsThreeState om een "Toggle all" effect te creëren.