The community is working on translating this tutorial into Lao, but it seems that no one has started the translation process for this article yet. If you can help us, then please click "More info".
The TextBox control
The TextBox control is the most basic text-input control found in WPF, allowing the end-user to write plain text, either on a single line, for dialog input, or in multiple lines, like an editor.
Single-line TextBox
The TextBox control is such a commonly used thing that you actually don't have to use any properties on it, to have a full-blown editable text field. Here's a barebone example:
<Window x:Class="WpfTutorialSamples.Basic_controls.TextBoxSample"
        xmlns="http://schemas.microsoft.com/winfx/2006/xaml/presentation"
        xmlns:x="http://schemas.microsoft.com/winfx/2006/xaml"
        Title="TextBoxSample" Height="80" Width="250">
    <StackPanel Margin="10">
		<TextBox />
	</StackPanel>
</Window>
That's all you need to get a text field. I added the text after running the sample and before taking the screenshot, but you can do it through markup as well, to pre-fill the textbox, using the Text property:
<TextBox Text="Hello, world!" />Try right-clicking in the TextBox. You will get a menu of options, allowing you to use the TextBox with the Windows Clipboard. The default keyboard shortcuts for undoing and redoing (Ctrl+Z and Ctrl+Y) should also work, and all of this functionality you get for free!
Multi-line TextBox
If you run the above example, you will notice that the TextBox control by default is a single-line control. Nothing happens when you press Enter and if you add more text than what can fit on a single line, the control just scrolls. However, making the TextBox control into a multi-line editor is very simple:
<Window x:Class="WpfTutorialSamples.Basic_controls.TextBoxSample"
        xmlns="http://schemas.microsoft.com/winfx/2006/xaml/presentation"
        xmlns:x="http://schemas.microsoft.com/winfx/2006/xaml"
        Title="TextBoxSample" Height="160" Width="280">
    <Grid Margin="10">
		<TextBox AcceptsReturn="True" TextWrapping="Wrap" />
	</Grid>
</Window>
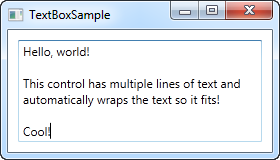
I have added two properties: The AcceptsReturn makes the TextBox into a multi-line control by allowing the use of the Enter/Return key to go to the next line, and the TextWrapping property, which will make the text wrap automatically when the end of a line is reached.
Spellcheck with TextBox
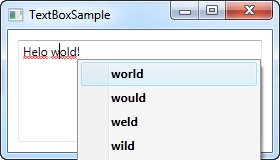
As an added bonus, the TextBox control actually comes with automatic spell checking for English and a couple of other languages (as of writing, English, French, German, and Spanish languages are supported).
It works much like in Microsoft Word, where spelling errors are underlined and you can right-click it for suggested alternatives. Enabling spell checking is very easy:
<Window x:Class="WpfTutorialSamples.Basic_controls.TextBoxSample"
        xmlns="http://schemas.microsoft.com/winfx/2006/xaml/presentation"
        xmlns:x="http://schemas.microsoft.com/winfx/2006/xaml"
        Title="TextBoxSample" Height="160" Width="280">
    <Grid Margin="10">
		<TextBox AcceptsReturn="True" TextWrapping="Wrap" SpellCheck.IsEnabled="True" Language="en-US" />
	</Grid>
</Window>
We have used the previous, multi-line textbox example as the basis and then I have added two new properties: The attached property from the SpellCheck class called IsEnabled, which simply enables spell checking on the parent control, and the Language property, which instructs the spell checker which language to use.
Working with TextBox selections
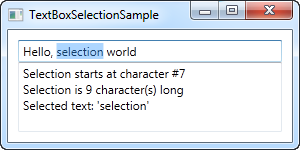
Just like any other editable control in Windows, the TextBox allows for selection of text, e.g. to delete an entire word at once or to copy a piece of the text to the clipboard. The WPF TextBox has several properties for working with selected text, all of them which you can read or even modify. In the next example, we will be reading these properties:
<Window x:Class="WpfTutorialSamples.Basic_controls.TextBoxSelectionSample"
        xmlns="http://schemas.microsoft.com/winfx/2006/xaml/presentation"
        xmlns:x="http://schemas.microsoft.com/winfx/2006/xaml"
        Title="TextBoxSelectionSample" Height="150" Width="300">
	<DockPanel Margin="10">
		<TextBox SelectionChanged="TextBox_SelectionChanged" DockPanel.Dock="Top" />
		<TextBox Name="txtStatus" AcceptsReturn="True" TextWrapping="Wrap" IsReadOnly="True" />

	</DockPanel>
</Window>
The example consists of two TextBox controls: One for editing and one for outputting the current selection status to. For this, we set the IsReadOnly property to true, to prevent editing of the status TextBox. We subscribe the SelectionChanged event on the first TextBox, which we handle in the Code-behind:
using System;
using System.Text;
using System.Windows;
using System.Windows.Controls;

namespace WpfTutorialSamples.Basic_controls
{
	public partial class TextBoxSelectionSample : Window
	{
		public TextBoxSelectionSample()
		{
			InitializeComponent();
		}

		private void TextBox_SelectionChanged(object sender, RoutedEventArgs e)
		{
			TextBox textBox = sender as TextBox;
			txtStatus.Text = "Selection starts at character #" + textBox.SelectionStart + Environment.NewLine;
			txtStatus.Text += "Selection is " + textBox.SelectionLength + " character(s) long" + Environment.NewLine;
			txtStatus.Text += "Selected text: '" + textBox.SelectedText + "'";
		}
	}
}
We use three interesting properties to accomplish this:
SelectionStart , which gives us the current cursor position or if there's a selection: Where it starts.
SelectionLength , which gives us the length of the current selection, if any. Otherwise it will just return 0.
SelectedText , which gives us the currently selected string if there's a selection. Otherwise an empty string is returned.
Modifying the selection
All of these properties are both readable and writable, which means that you can modify them as well. For instance, you can set the SelectionStart and SelectionLength properties to select a custom range of text, or you can use the SelectedText property to insert and select a string. Just remember that the TextBox has to have focus, e.g. by calling the Focus() method first, for this to work.