This article has been localized into Chinese by the community.
ListView数据绑定和ItemTemplate
在前一篇文章中,我们用XAML代码手动构建了一个ListView控件。但是,在WPF中, 到处都是数据绑定。虽然数据绑定的定义已经在本教程其它章节详细介绍过了,但是一般来说,数据绑定就是把数据从布局中分离出来。所以,让我们来试试吧一些数据绑定到ListView上:
<Window x:Class="WpfTutorialSamples.ListView_control.ListViewDataBindingSample"
        xmlns="http://schemas.microsoft.com/winfx/2006/xaml/presentation"
        xmlns:x="http://schemas.microsoft.com/winfx/2006/xaml"
        Title="ListViewDataBindingSample" Height="300" Width="300">
    <Grid>
		<ListView Margin="10" Name="lvDataBinding"></ListView>
	</Grid>
</Window>
using System;
using System.Collections.Generic;
using System.Windows;
namespace WpfTutorialSamples.ListView_control
{
public partial class ListViewDataBindingSample : Window
{
public ListViewDataBindingSample()
{
InitializeComponent();
List<User> items = new List<User>();
items.Add(new User() { Name = "John Doe", Age = 42 });
items.Add(new User() { Name = "Jane Doe", Age = 39 });
items.Add(new User() { Name = "Sammy Doe", Age = 13 });
lvDataBinding.ItemsSource = items;
}
}
public class User
{
public string Name { get; set; }
public int Age { get; set; }
}
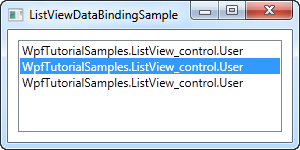
}我们给这个list添加了一些自定义的User实例,每个User实例包含一个姓名(name)和对应的年龄(age)属性。数据绑定会在我们把这个list赋给ListView的ItemsSource属性时自动执行,但这时的结果却有点出乎我们的意料:

在ListView中每个User显示的是这个类的类型名称。这实际上是预料之内的,因为.NET并不知道该如何展示我们的数据,所以它就调用每个object的ToString()方法并用这个结果来表示每项。
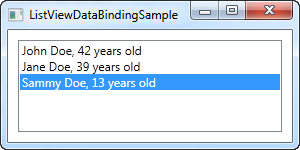
我们正好可以利用这一点,通过重写ToString()方法来获取实际有意义的输出结果。让我们把User类进行以下的修改:
public class User
{
	public string Name { get; set; }

	public int Age { get; set; }

	public override string ToString()
	{
		return this.Name + ", " + this.Age + " years old";
	}
}
现在ListView里展示的结果就能让人看懂了,这种方法在某些场景下也能获得不错的结果。但我们并不总想展示单纯的string文本。也许我们希望这个文本的某一部分可以加粗或者用另一种颜色展示,又或者我们想展示一张图片。幸运的是,通过模板(templates),我们在WPF中可以非常简单的实现这一点。
在ListView中单个项目的ItemTemplate模板
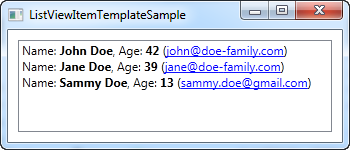
WPF的工作实际上就是不断定义模板,所以你可以很容易地给ListView定义数据模板。在下面的例子中,我们会给每个项自定义格式,只为了向你展示这样做会使ListView多么的灵活多变。
<Window x:Class="WpfTutorialSamples.ListView_control.ListViewItemTemplateSample"
        xmlns="http://schemas.microsoft.com/winfx/2006/xaml/presentation"
        xmlns:x="http://schemas.microsoft.com/winfx/2006/xaml"
        Title="ListViewItemTemplateSample" Height="150" Width="350">
    <Grid>
		<ListView Margin="10" Name="lvDataBinding">
			<ListView.ItemTemplate>
				<DataTemplate>
					<WrapPanel>
						<TextBlock Text="Name: " />
						<TextBlock Text="{Binding Name}" FontWeight="Bold" />
						<TextBlock Text=", " />
						<TextBlock Text="Age: " />
						<TextBlock Text="{Binding Age}" FontWeight="Bold" />
						<TextBlock Text=" (" />
						<TextBlock Text="{Binding Mail}" TextDecorations="Underline" Foreground="Blue" Cursor="Hand" />
						<TextBlock Text=")" />
					</WrapPanel>
				</DataTemplate>
			</ListView.ItemTemplate>
		</ListView>
	</Grid>
</Window>
using System;
using System.Collections.Generic;
using System.Windows;
namespace WpfTutorialSamples.ListView_control
{
public partial class ListViewItemTemplateSample : Window
{
public ListViewItemTemplateSample()
{
InitializeComponent();
List<User> items = new List<User>();
items.Add(new User() { Name = "John Doe", Age = 42, Mail = "john@doe-family.com" });
items.Add(new User() { Name = "Jane Doe", Age = 39, Mail = "jane@doe-family.com" });
items.Add(new User() { Name = "Sammy Doe", Age = 13, Mail = "sammy.doe@gmail.com" });
lvDataBinding.ItemsSource = items;
}
}
public class User
{
public string Name { get; set; }
public int Age { get; set; }
public string Mail { get; set; }
}
}
我们用了一些TextBlock控件来构建每一个项目,在其中我们让一些文本用粗体显示。在这个例子中我们让邮件地址用下划线显示,让字体颜色为蓝色并且设置鼠标在移到它们上面时变为手的样式,这样就让它们看起来更像一个超链接。
小结
通过自定义ItemTemplate和数据绑定,我们可以构建非常漂亮的ListView控件。然而它还是看起来很像一个ListBox。一个ListView的非常常见的使用场景是添加列,有时(例如在WinForm应用中)它还被用来当作展示一些具体数据的视图。WPF有一个自带的视图类来处理这些场景,而这将在下一章节具体讨论。