This article is currently in the process of being translated into Arabic (~57% done).
The CheckBox control
يسمح عنصر التحكم مربع الاختيار CheckBox للمستخدم بالتبديل بين حالة المربع محدد أو غير محدد ، وعادة ما يُقابَل هذا بقيمة منطقية مقابلة لتحديد أو الغاء خيار مربع الاختيار ككود برمجي في الخلفية. دعنا ننطلق مباشرة إلى المثال : في حال لست واثقا كيف يبدو مربع الاختيار CheckBox:
<Window x:Class="WpfTutorialSamples.Basic_controls.CheckBoxSample"
        xmlns="http://schemas.microsoft.com/winfx/2006/xaml/presentation"
        xmlns:x="http://schemas.microsoft.com/winfx/2006/xaml"
        Title="CheckBoxSample" Height="140" Width="250">
    <StackPanel Margin="10">
		<Label FontWeight="Bold">Application Options</Label>
		<CheckBox>Enable feature ABC</CheckBox>
		<CheckBox IsChecked="True">Enable feature XYZ</CheckBox>
		<CheckBox>Enable feature WWW</CheckBox>
	</StackPanel>
</Window>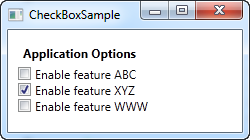
كما ترى ستجد أن مربع الإختيار سهل جدا الإستخدام. و لو نظرت الى ثاني مربع إختيار في الصورة ستجد أنني إستخدمت IsChecked بجعل قيمتها مساوية ل true حتي تكون الحالة الإفتراضية لمربع الإختيار مختار, ولا خصائص أخري ستحتاج إليها في حالة مربع الإختيار. خاصية IsChecked يمكن إستخدامها أيضا من خلال الكود المناظر لملف ال xml كي تتمكن من التحقق هل حالة مربع الإختيار مختارة أم لا.
محتوي مخصص
أداة مربع الإختيار ترث خصائصها و سلوكها من أداة المحتوي المسماه ContentControl Class و التي تعني أن بإمكان أداة مربع الإختيار أن تأخذ نص أو محتوى معين و تضعه بجانب مربع الإختيار. إذا قمت بتحديد نص أو محتوى كما هو موضح في المثال أعلاه, فسيقوم WPF بوضع هذا النص أو المحتوى بداخل ال TextBlock و يعرض هذا النص و لكن هذه الطريفه تعتبر مجرد إختصار ليس إلا لجعل الطريقة أسهل في الكتابة. يمكن أن تستخدم أي نوع من أدواة التحكم بداخل هذه الأداة كما سنري في المثال التالي:
<Window x:Class="WpfTutorialSamples.Basic_controls.CheckBoxSample"
        xmlns="http://schemas.microsoft.com/winfx/2006/xaml/presentation"
        xmlns:x="http://schemas.microsoft.com/winfx/2006/xaml"
        Title="CheckBoxSample" Height="140" Width="250">
    <StackPanel Margin="10">
		<Label FontWeight="Bold">Application Options</Label>
		<CheckBox>
			<TextBlock>
				Enable feature <Run Foreground="Green" FontWeight="Bold">ABC</Run>
			</TextBlock>
		</CheckBox>
		<CheckBox IsChecked="True">
			<WrapPanel>
				<TextBlock>
					Enable feature <Run FontWeight="Bold">XYZ</Run>
				</TextBlock>
				<Image Source="/WpfTutorialSamples;component/Images/question.png" Width="16" Height="16" Margin="5,0" />
			</WrapPanel>
		</CheckBox>
		<CheckBox>
			<TextBlock>
				Enable feature <Run Foreground="Blue" TextDecorations="Underline" FontWeight="Bold">WWW</Run>
			</TextBlock>
		</CheckBox>
	</StackPanel>
</Window>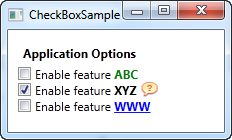
كما ترى من المثال اعلاه يمكن تفعل كل ما يحلو لك بالمحتوى. فى كل من الثلاث CheckBox فعلت شئ مختلف بالنص و فى الثانى حتى اضفت صورة , باضافتك عنصر كمحتوى بدلا من نص فقط يمكنك ان تتحكم اكثر بكثير فى المظهر, و الشئ الشيق هنا انه لا يهم اين فى جزئ المحتوى نقرت بالماوس ستؤثر فى الCheckBox و تغير حالته من مفعل لغير مفعل و العكس
The IsThreeState property
كما تعلم ان الCheckBox مناظر للقيم المنطقية اما (صح) او (خطأ) و لكن كما تعلم هناك حالة ثالثة و هى لا شئ و لكى تعبر الCheckBox تعبير دقيق عن القيم المنطقية يمكن ان نجعلها تعبر عن اللاشئ باستخدام خاصية IsThreeState و تفعيلها و جعلها تساوى true سيكون اذا للCheckBox ثلاث حالات صح او خطأ او لا شئ
A common usage for this is to have a "Enable all" CheckBox, which can control a set of child checkboxes, as well as show their collective state. Our example shows how you may create a list of features that can be toggled on and off, with a common "Enable all" CheckBox in the top:
<Window x:Class="WpfTutorialSamples.Basic_controls.CheckBoxThreeStateSample"
        xmlns="http://schemas.microsoft.com/winfx/2006/xaml/presentation"
        xmlns:x="http://schemas.microsoft.com/winfx/2006/xaml"
        Title="CheckBoxThreeStateSample" Height="170" Width="300">
	<StackPanel Margin="10">
		<Label FontWeight="Bold">Application Options</Label>
		<StackPanel Margin="10,5">
			<CheckBox IsThreeState="True" Name="cbAllFeatures" Checked="cbAllFeatures_CheckedChanged" Unchecked="cbAllFeatures_CheckedChanged">Enable all</CheckBox>
			<StackPanel Margin="20,5">
				<CheckBox Name="cbFeatureAbc" Checked="cbFeature_CheckedChanged" Unchecked="cbFeature_CheckedChanged">Enable feature ABC</CheckBox>
				<CheckBox Name="cbFeatureXyz" IsChecked="True" Checked="cbFeature_CheckedChanged" Unchecked="cbFeature_CheckedChanged">Enable feature XYZ</CheckBox>
				<CheckBox Name="cbFeatureWww" Checked="cbFeature_CheckedChanged" Unchecked="cbFeature_CheckedChanged">Enable feature WWW</CheckBox>
			</StackPanel>
		</StackPanel>
	</StackPanel>
</Window>
using System;
using System.Windows;
namespace WpfTutorialSamples.Basic_controls
{
public partial class CheckBoxThreeStateSample : Window
{
public CheckBoxThreeStateSample()
{
InitializeComponent();
}
private void cbAllFeatures_CheckedChanged(object sender, RoutedEventArgs e)
{
bool newVal = (cbAllFeatures.IsChecked == true);
cbFeatureAbc.IsChecked = newVal;
cbFeatureXyz.IsChecked = newVal;
cbFeatureWww.IsChecked = newVal;
}
private void cbFeature_CheckedChanged(object sender, RoutedEventArgs e)
{
cbAllFeatures.IsChecked = null;
if((cbFeatureAbc.IsChecked == true) && (cbFeatureXyz.IsChecked == true) && (cbFeatureWww.IsChecked == true))
cbAllFeatures.IsChecked = true;
if((cbFeatureAbc.IsChecked == false) && (cbFeatureXyz.IsChecked == false) && (cbFeatureWww.IsChecked == false))
cbAllFeatures.IsChecked = false;
}
}
}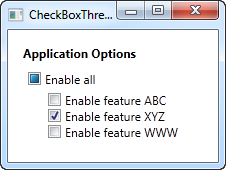
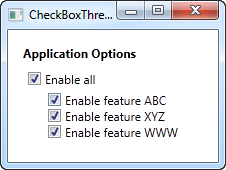
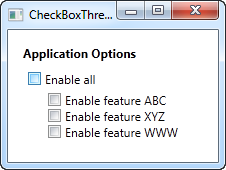
This example works from two different angles: If you check or uncheck the "Enable all" CheckBox, then all of the child check boxes, each representing an application feature in our example, is either checked or unchecked. It also works the other way around though, where checking or unchecking a child CheckBox affects the "Enable all" CheckBox state: If they are all checked or unchecked, then the "Enable all" CheckBox gets the same state - otherwise the value will be left with a null, which forces the CheckBox into the indeterminate state.
All of this behavior can be seen on the screenshots above, and is achieved by subscribing to the Checked and Unchecked events of the CheckBox controls. In a real world example, you would likely bind the values instead, but this example shows the basics of using the IsThreeState property to create a "Toggle all" effect.