This article is currently in the process of being translated into Arabic (~26% done).
The Canvas control
على الأرجح اللوحة هي أبسط صفيحة من الصفائح الأخرى. لا تطبق أي شيء تلقائيا، هي فقط تتيح المجال لتطبيق تحكمات فيها و وضعها بنفسك باستعمال إحداثيات محددة.
إذا كنت قد استعملت أي مكتبة واجهة مستخدم مثل WinForms، فهنا قد تشعر بأريحية تامة، ولكنه قد يكون جذابا أن تملك السيطرة المطلقة على كل التحكمات البنت، هذا يعني أيضا أن الصفيحة لن تفعل أي شيء لك عندما يبدأ المستعمل في تغيير أبعاد النافذة، إذا قيدت أبعاد النص بكيفية مطلقة أو إذا كان المحتوى يغير أبعاده.
سنتكلم عن ذلك لاحقا، لنبدأ بمثال بسيط. هذا سيعطيك فكرة حول صغر التحكم الذي تطبقه اللوحة تلقائيا.
<Window x:Class="WpfTutorialSamples.Panels.Canvas"
        xmlns="http://schemas.microsoft.com/winfx/2006/xaml/presentation"
        xmlns:x="http://schemas.microsoft.com/winfx/2006/xaml"
        Title="Canvas" Height="200" Width="200">
	<Canvas>
		<Button>Button 1</Button>
		<Button>Button 2</Button>
	</Canvas>
</Window>
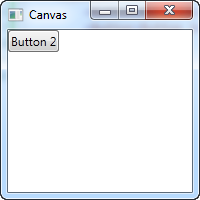
كما ترى، على الرغم من أننا نملك زرين، فهما موضوعان على نفس الموقع، فلذلك نرى نرى فقط الزر الأخير. اللوحة لا تعمل أي شيء حتى تبدأ أنت بإعطاء إحداثيات التحكم الإبن. يمكن فعل هذا عن طريق الخيارات يسار، يمين، أعلى و أسفل الملصقة بتحكم اللوحة.
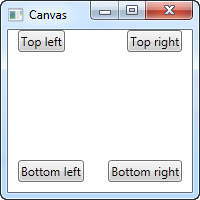
These properties allow you to specify the position relative to the four edges of the Canvas. By default, they are all set to NaN (Not a Number), which will make the Canvas place them in the upper left corner, but as mentioned, you can easily change this:
<Window x:Class="WpfTutorialSamples.Panels.Canvas"
        xmlns="http://schemas.microsoft.com/winfx/2006/xaml/presentation"
        xmlns:x="http://schemas.microsoft.com/winfx/2006/xaml"
        Title="Canvas" Height="200" Width="200">
	<Canvas>
		<Button Canvas.Left="10">Top left</Button>
		<Button Canvas.Right="10">Top right</Button>
		<Button Canvas.Left="10" Canvas.Bottom="10">Bottom left</Button>
		<Button Canvas.Right="10" Canvas.Bottom="10">Bottom right</Button>
	</Canvas>
</Window>
Notice how I only set the property or properties that I need. For the first two buttons, I only wish to specify a value for the X axis, so I use the Left and Right properties to push the buttons towards the center, from each direction.
For the bottom buttons, I use both Left/Right and Bottom to push them towards the center in both directions. You will usually specify either a Top or a Bottom value and/or a Left or a Right value.
As mentioned, since the Canvas gives you complete control of positions, it won't really care whether or not there's enough room for all your controls or if one is on top of another. This makes it a bad choice for pretty much any kind of dialog design, but the Canvas is, as the name implies, great for at least one thing: Painting. WPF has a bunch of controls that you can place inside a Canvas, to make nice illustrations.
Z-Index
In the next example, we'll use a couple of the shape related controls of WPF to illustrate another very important concept when using the Canvas: Z-Index. Normally, if two controls within a Canvas overlaps, the one defined last in the markup will take precedence and overlap the other(s). However, by using the attached ZIndex property on the Panel class, this can easily be changed.
First, an example where we don't use z-index at all:
<Window x:Class="WpfTutorialSamples.Panels.CanvasZIndex"
        xmlns="http://schemas.microsoft.com/winfx/2006/xaml/presentation"
        xmlns:x="http://schemas.microsoft.com/winfx/2006/xaml"
        Title="CanvasZIndex" Height="275" Width="260">
    <Canvas>
        <Ellipse Fill="Gainsboro" Canvas.Left="25" Canvas.Top="25" Width="200" Height="200" />
        <Rectangle Fill="LightBlue" Canvas.Left="25" Canvas.Top="25" Width="50" Height="50" />
        <Rectangle Fill="LightCoral" Canvas.Left="50" Canvas.Top="50" Width="50" Height="50" />
        <Rectangle Fill="LightCyan" Canvas.Left="75" Canvas.Top="75" Width="50" Height="50" />
    </Canvas>
</Window>
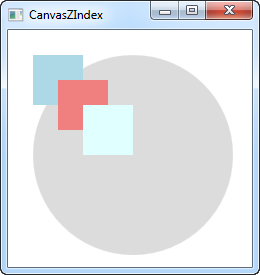
Notice that because each of the rectangles are defined after the circle, they all overlap the circle, and each of them will overlap the previously defined one. Let's try changing that:
<Window x:Class="WpfTutorialSamples.Panels.CanvasZIndex"
        xmlns="http://schemas.microsoft.com/winfx/2006/xaml/presentation"
        xmlns:x="http://schemas.microsoft.com/winfx/2006/xaml"
        Title="CanvasZIndex" Height="275" Width="260">
    <Canvas>
        <Ellipse Panel.ZIndex="2" Fill="Gainsboro" Canvas.Left="25" Canvas.Top="25" Width="200" Height="200" />
        <Rectangle Panel.ZIndex="3" Fill="LightBlue" Canvas.Left="25" Canvas.Top="25" Width="50" Height="50" />
        <Rectangle Panel.ZIndex="2" Fill="LightCoral" Canvas.Left="50" Canvas.Top="50" Width="50" Height="50" />
        <Rectangle Panel.ZIndex="4" Fill="LightCyan" Canvas.Left="75" Canvas.Top="75" Width="50" Height="50" />
    </Canvas>
</Window>
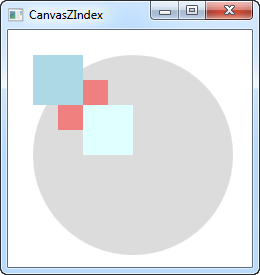
The default ZIndex value is 0, but we assign a new one to each of the shapes. The rule is that the element with the higher z-index overlaps the ones with the lower values. If two values are identical, the last defined element "wins". As you can see from the screenshot, changing the ZIndex property gives quite another look.