This article is currently in the process of being translated into Arabic (~16% done).
The WPF Menu control
احدى الاجزاء الشائعة في تطبيقات الوندوز هي القائمة العلوية ,احيانا تسمى القائمة الرئيسية لانها توجد في الغالب في التطبيقات , يعتبر عنصر القائمة عملي لانه يمنح العديد من الخيارات ,وياخذ حيزا صغيرا من المساحه ,وبالرغم من ان مايكروسوفت تنحاز لعنصر الشريط كبديل عن القائمة وشريط الادوات القديم والافضل ,ولكن هذه العناصر تضل موجوده للمطورين .
WPF تاتي مع مجموعة من عناصر التحكم الممتازة لعمل القائمة تسمى menu.اظافة عناصر الى القائمة يتم بسهولة عن طريف اظافة عنصر قائمة اليها ,وكل عنصر قائمة يمكن ان يحتوي علي مجموعة من العناصر الفرعية ,مما يسمح لك بانشاء قائمة هرمية كالتي تعرفها في تطبيقات الوندوز, لنذهب مباشرتا الى مثال حيث نستخدم عنصر القائمه:
<Window x:Class="WpfTutorialSamples.Common_interface_controls.MenuSample"
        xmlns="http://schemas.microsoft.com/winfx/2006/xaml/presentation"
        xmlns:x="http://schemas.microsoft.com/winfx/2006/xaml"
        Title="MenuSample" Height="200" Width="200">
    <DockPanel>
        <Menu DockPanel.Dock="Top">
            <MenuItem Header="_File">
                <MenuItem Header="_New" />
                <MenuItem Header="_Open" />
                <MenuItem Header="_Save" />
                <Separator />
                <MenuItem Header="_Exit" />
            </MenuItem>
        </Menu>
        <TextBox AcceptsReturn="True" />
    </DockPanel>
</Window>
كما في العديد من تطبيقات الوندوز ,عنصر القائمة الذي أنشأناها موضوع في اعلى النافذه ولكن بفضل المرونه الهائلة ل WPF ,بإمكانك ادراج عنصر القائمة في اي مكان تفضل ,وبالطول او العرض الذي ترغب به.
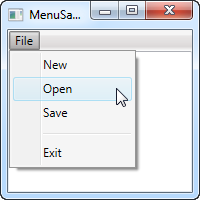
I have defined a single top-level item, with 4 child items and a separator. I use the Header property to define the label of the item, and you should notice the underscore before the first character of each label. It tells WPF to use that character as the accelerator key, which means that the user can press the Alt key followed by the given character, to activate the menu item. This works all the way from the top-level item and down the hierarchy, meaning that in this example I could press Alt, then F and then N, to activate the New item.
Icons and checkboxes
Two common features of a menu item is the icon, used to more easily identify the menu item and what it does, and the ability to have checkable menu items, which can toggle a specific feature on and off. The WPF MenuItem supports both, and it's very easy to use:
<Window x:Class="WpfTutorialSamples.Common_interface_controls.MenuIconCheckableSample"
        xmlns="http://schemas.microsoft.com/winfx/2006/xaml/presentation"
        xmlns:x="http://schemas.microsoft.com/winfx/2006/xaml"
        Title="MenuIconCheckableSample" Height="150" Width="300">
    <DockPanel>
        <Menu DockPanel.Dock="Top">
            <MenuItem Header="_File">
                <MenuItem Header="_Exit" />
            </MenuItem>
            <MenuItem Header="_Tools">
                <MenuItem Header="_Manage users">
                    <MenuItem.Icon>
                        <Image Source="/WpfTutorialSamples;component/Images/user.png" />
                    </MenuItem.Icon>
                </MenuItem>
                <MenuItem Header="_Show groups" IsCheckable="True" IsChecked="True" />
            </MenuItem>
        </Menu>
        <TextBox AcceptsReturn="True" />
    </DockPanel>
</Window>
For this example I've created a secondary top-level item, where I've added two items: One with an icon defined, using the Icon property with a standard Image control inside of it, and one where we use the IsCheckable property to allow the user to check and uncheck the item. I even used the IsChecked property to have it checked by default. From Code-behind, this is the same property that you can read to know whether a given menu item is checked or not.
Handling clicks
When the user clicks on a menu item, you will usually want something to happen. The easiest way is to simply add a click event handler to the MenuItem, like this:
<MenuItem Header="_New" Click="mnuNew_Click" />In Code-behind you will then need to implement the mnuNew_Click method, like this:
private void mnuNew_Click(object sender, RoutedEventArgs e)
{
	MessageBox.Show("New");
}
This will suffice for the more simple applications, or when prototyping something, but the WPF way is to use a Command for this.
Keyboard shortcuts and Commands
You can easily handle the Click event of a menu item like we did above, but the more common approach is to use WPF commands. There's a lot of theory on using and creating commands, so they have their own category of articles here on the site, but for now, I can tell you that they have a couple of advantages when used in WPF, especially in combination with a Menu or a Toolbar.
First of all, they ensure that you can have the same action on a toolbar, a menu and even a context menu, without having to implement the same code in multiple places. They also make the handling of keyboard shortcuts a whole lot easier, because unlike with WinForms, WPF is not listening for keyboard shortcuts automatically if you assign them to e.g. a menu item - you will have to do that manually.
However, when using commands, WPF is all ears and will respond to keyboard shortcuts automatically. The text (Header) of the menu item is also set automatically (although you can overwrite it if needed), and so is the InputGestureText, which shows the user which keyboard shortcut can be used to invoke the specific menu item. Let's jump straight to an example of combining the Menu with WPF commands:
<Window x:Class="WpfTutorialSamples.Common_interface_controls.MenuWithCommandsSample"
        xmlns="http://schemas.microsoft.com/winfx/2006/xaml/presentation"
        xmlns:x="http://schemas.microsoft.com/winfx/2006/xaml"
        Title="MenuWithCommandsSample" Height="200" Width="300">
    <Window.CommandBindings>
        <CommandBinding Command="New" CanExecute="NewCommand_CanExecute" Executed="NewCommand_Executed" />
    </Window.CommandBindings>
    <DockPanel>
        <Menu DockPanel.Dock="Top">
            <MenuItem Header="_File">
                <MenuItem Command="New" />
                <Separator />
                <MenuItem Header="_Exit" />
            </MenuItem>
            <MenuItem Header="_Edit">
                <MenuItem Command="Cut" />
                <MenuItem Command="Copy" />
                <MenuItem Command="Paste" />
            </MenuItem>
        </Menu>

        <TextBox AcceptsReturn="True" Name="txtEditor" />
    </DockPanel>
</Window>
using System;
using System.Windows;
using System.Windows.Input;
namespace WpfTutorialSamples.Common_interface_controls
{
public partial class MenuWithCommandsSample : Window
{
public MenuWithCommandsSample()
{
InitializeComponent();
}
private void NewCommand_CanExecute(object sender, CanExecuteRoutedEventArgs e)
{
e.CanExecute = true;
}
private void NewCommand_Executed(object sender, ExecutedRoutedEventArgs e)
{
txtEditor.Text = "";
}
}
}
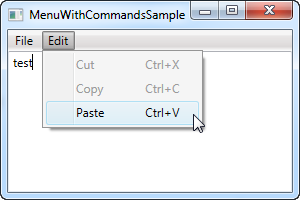
It might not be completely obvious, but by using commands, we just got a whole bunch of things for free: Keyboard shortcuts, text and InputGestureText on the items and WPF automatically enables/disables the items depending on the active control and its state. In this case, Cut and Copy are disabled because no text is selected, but Paste is enabled, because my clipboard is not empty!
And because WPF knows how to handle certain commands in combination with certain controls, in this case the Cut/Copy/Paste commands in combination with a text input control, we don't even have to handle their Execute events - they work right out of the box! We do have to handle it for theNew command though, since WPF has no way of guessing what we want it to do when the user activates it. This is done with the CommandBindings of the Window, all explained in detail in the chapter on commands.
Summary
Working with the WPF Menu control is both easy and fast, making it simple to create even complex menu hierarchies, and when combining it with WPF commands, you get so much functionality for free.