This article is currently in the process of being translated into Arabic (~32% done).
Creating & using a UserControl
عناصر تحكم المستخدم ، في WPF التي تمثلها فئة UserControl ، هي مفهوم تجميع العلامات والتعليمات البرمجية في حاوية قابلة لإعادة الاستخدام ، بحيث يمكن استخدام نفس الواجهة ، مع نفس الوظيفة ، في عدة أماكن مختلفة وحتى عبر العديد من التطبيقات.
يعمل عنصر تحكم المستخدم (User Control) مثل نافذة WPF -المنطقة يمكنك فيها وضع عناصر تحكم أخرى ، ثم ملف الكود الخلفي حيث يمكنك التفاعل مع عناصر التحكم هذه. ينتهي الملف الذي يحتوي على عنصر تحكم المستخدم أيضًا بـ .xaml ، وينتهي الكود الخلفي بـ .xaml.cs - تمامًا مثل النافذة. لكن يبدو ترميز البداية مختلفًا بعض الشيء على الرغم من ذلك:
<UserControl x:Class="WpfTutorialSamples.User_Controls.LimitedInputUserControl"
         xmlns="http://schemas.microsoft.com/winfx/2006/xaml/presentation"
         xmlns:x="http://schemas.microsoft.com/winfx/2006/xaml"
         xmlns:mc="http://schemas.openxmlformats.org/markup-compatibility/2006"
         xmlns:d="http://schemas.microsoft.com/expression/blend/2008"
         mc:Ignorable="d"
         d:DesignHeight="300" d:DesignWidth="300">
    <Grid>

    </Grid>
</UserControl>
أيضًا لا يوجد شيء غريب ومختلف - فمثل النافذة، لدينا عنصر UserControl جذري بدلاً من عنصر Window ، ثم خصائص DesignHeight و DesignWidth ، التي تتحكم في حجم تحكم المستخدم في وقت التصميم (في وقت التشغيل ، سيتم تحديد الحجم بواسطة الحاوية التي تحتوي على تحكم المستخدم). ستلاحظ نفس الشيء في الكود الخلفي ، حيث يرث ببساطة UserControl بدلاً من Window .
Creating a User Control
أضف عنصر تحكم مستخدم (User Control) إلى مشروعك تمامًا كما لو كنت تضيف نافذة أخرى ، عن طريق النقر بزر الماوس الأيمن على اسم المشروع أو المجلد حيث تريد إضافته ، كما هو موضح في لقطة الشاشة هذه (قد تبدو الأشياء مختلفة بعض الشيء ، اعتمادًا على إصدار Visual Studio الذي تستخدمه):

For this article, we'll be creating a useful User control with the ability to limit the amount of text in a TextBox to a specific number of characters, while showing the user how many characters have been used and how many may be used in total. This is very simple to do, and used in a lot of web applications like Twitter. It would be easy to just add this functionality to your regular Window, but since it could be useful to do in several places in your application, it makes sense to wrap it in an easily reusable UserControl.
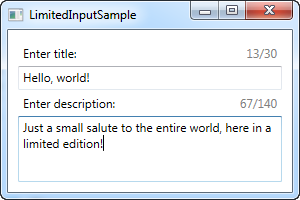
Before we dive into the code, let's have a look at the end result that we're going for:

Here's the code for the user control itself:
<UserControl x:Class="WpfTutorialSamples.User_Controls.LimitedInputUserControl"
         xmlns="http://schemas.microsoft.com/winfx/2006/xaml/presentation"
         xmlns:x="http://schemas.microsoft.com/winfx/2006/xaml"
         xmlns:mc="http://schemas.openxmlformats.org/markup-compatibility/2006"
         xmlns:d="http://schemas.microsoft.com/expression/blend/2008"
         mc:Ignorable="d"
         d:DesignHeight="300" d:DesignWidth="300">
    <Grid>
    <Grid.RowDefinitions>
        <RowDefinition Height="Auto" />
        <RowDefinition Height="*" />
    </Grid.RowDefinitions>
    <Grid.ColumnDefinitions>
        <ColumnDefinition Width="*" />
        <ColumnDefinition Width="Auto" />
    </Grid.ColumnDefinitions>
    <Label Content="{Binding Title}" />
    <Label Grid.Column="1">
        <StackPanel Orientation="Horizontal">
        <TextBlock Text="{Binding ElementName=txtLimitedInput, Path=Text.Length}" />
        <TextBlock Text="/" />
        <TextBlock Text="{Binding MaxLength}" />
        </StackPanel>
    </Label>
    <TextBox MaxLength="{Binding MaxLength}" Grid.Row="1" Grid.ColumnSpan="2" Name="txtLimitedInput" ScrollViewer.VerticalScrollBarVisibility="Auto" TextWrapping="Wrap" />
    </Grid>
</UserControl>
using System;
using System.Windows.Controls;
namespace WpfTutorialSamples.User_Controls
{
public partial class LimitedInputUserControl : UserControl
{
public LimitedInputUserControl()
{
InitializeComponent();
this.DataContext = this;
}
public string Title { get; set; }
public int MaxLength { get; set; }
}
}The markup is pretty straight forward: A Grid, with two columns and two rows. The upper part of the Grid contains two labels, one showing the title and the other one showing the stats. Each of them use data binding for all of the information needed - the Title and MaxLength comes from the Code-behind properties, which we have defined in as regular properties on a regular class.
The current character count is obtained by binding to the Text.Length property directly on the TextBox control, which uses the lower part of the user control. The result can be seen on the screenshot above. Notice that because of all these bindings, we don't need any C# code to update the labels or set the MaxLength property on the TextBox - instead, we just bind directly to the properties.
Consuming/using the User Control
With the above code in place, all we need is to consume (use) the User control within our Window. We'll do that by adding a reference to the namespace the UserControl lives in, in the top of the XAML code of your Window:
xmlns:uc="clr-namespace:WpfTutorialSamples.User_Controls"After that, we can use the uc prefix to add the control to our Window like it was any other WPF control:
<uc:LimitedInputUserControl Title="Enter title:" MaxLength="30" Height="50" />Notice how we use the Title and MaxLength properties directly in the XAML. Here's the full code sample for our window:
<Window x:Class="WpfTutorialSamples.User_Controls.LimitedInputSample"
    xmlns="http://schemas.microsoft.com/winfx/2006/xaml/presentation"
    xmlns:x="http://schemas.microsoft.com/winfx/2006/xaml"
    xmlns:uc="clr-namespace:WpfTutorialSamples.User_Controls"
    Title="LimitedInputSample" Height="200" Width="300">
    <Grid Margin="10">
    <Grid.RowDefinitions>
        <RowDefinition Height="Auto" />
        <RowDefinition Height="*" />
    </Grid.RowDefinitions>

    <uc:LimitedInputUserControl Title="Enter title:" MaxLength="30" Height="50" />
    <uc:LimitedInputUserControl Title="Enter description:" MaxLength="140" Grid.Row="1" />

    </Grid>
</Window>
With that, we can reuse this entire piece of functionality in a single line of code, as illustrated in this example where we have the limited text input control two times. As already shown, the final result looks like this:

Summary
Placing commonly used interfaces and functionality in User Controls is highly recommended, and as you can see from the above example, they are very easy to create and use.