This article is currently in the process of being translated into Greek (~34% done).
Using the WPF TabControl
Το WPF TabControl σας επιτρέπει να διαμερίσετε το γραφικό περιβάλλον διασύνδεσης χρήστη ( interface ) σας σε διαφορετικές περιοχές, καθεμία των οποίων καθίσταται προσβάσιμη με ένα κλίκ πάνω στην ετικέτα της κάθε καρτέλας (ΤΑΒ), συνήθως ευρισκόμενη στην κορυφή του στοιχείου ελέγχου. Τα Στοιχεία Καρτέλας ( Tab Controls ) είναι εκ των κοινοτέρων εν χρήσει σε Εφαρμογές των Windows αλλά ακόμα και στα περιβάλλοντα διασύνδεσης των ίδιων των Windows, όπως στον διάλογο Ιδιοτήτων για αρχεία/φακέλους κλπ.
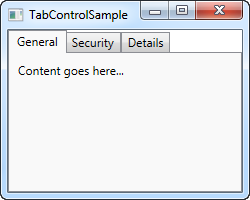
Όπως και με την πλειονότητα των Στοιχείων Ελέγχου του WPF, το TabControl, είναι μια εύκολη αφετηρία απο την οποία κανείς μπορεί να ξεκινήσει να καταπιάνεται. Να ένα πολύ απλό παράδειγμα:
<Window x:Class="WpfTutorialSamples.Misc_controls.TabControlSample"
        xmlns="http://schemas.microsoft.com/winfx/2006/xaml/presentation"
        xmlns:x="http://schemas.microsoft.com/winfx/2006/xaml"
        Title="TabControlSample" Height="200" Width="250">
    <Grid>
        <TabControl>
            <TabItem Header="General">
                <Label Content="Content goes here..." />
            </TabItem>
            <TabItem Header="Security" />
            <TabItem Header="Details" />
        </TabControl>
    </Grid>
</Window>
Όπως θα παρατηρείτε, κάθε καρτέλα εκπροσωπείται απο ενα μέλος TabItem (Αντικείμενο Καρτέλας) , επι του οποίου αναγράφεται το κείμενο και το οποίο ελέγχεται απο την Ιδιότητα "Κεφαλίδα" (Header Property). Το μέλος, Αντικείμενο Καρτέλας, (TabItem ) προέρχεται απο την Τάξη "ContentControl ", πράγμα που εννοεί πως είναι δυνατόν να ορισθεί έστω και ενα μοναδικό μέλος, εντός της καρτέλας, το οποίο θα είναι ορατό, εάν η καρτέλα είναι ενεργή (όπως και στο στιγμιότυπο οθόνης). ΄Εγώ εχω χρησιμοποιήση μια Ετικέτα (Label) εν προκειμένω, αλλά εσείς, αν ΄θέλετε, προσθέστε πσνω απο ένα στοιχείο ελέγχου στο φάκελο, απλώς χρησιμοποιείστε πίνακες (panels) με θυγατρικά Στοιχεία Ελέγχου, για να προσθέσετε στην Καρτέλα.
Customized headers
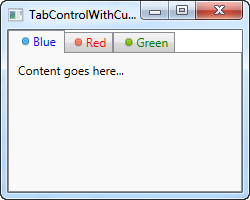
Once again, WPF proves to be extremely flexible when you want to customize the look of your tabs. Obviously the content can be rendered any way you like it, but so can the tab headers! The Header property can be filled with anything you like, which we'll take advantage of in the next example:
<Window x:Class="WpfTutorialSamples.Misc_controls.TabControlWithCustomHeadersSample"
        xmlns="http://schemas.microsoft.com/winfx/2006/xaml/presentation"
        xmlns:x="http://schemas.microsoft.com/winfx/2006/xaml"
        Title="TabControlWithCustomHeadersSample" Height="200" Width="250">
    <Grid>
        <Grid>
            <TabControl>
                <TabItem>
                    <TabItem.Header>
                        <StackPanel Orientation="Horizontal">
                            <Image Source="/WpfTutorialSamples;component/Images/bullet_blue.png" />
                            <TextBlock Text="Blue" Foreground="Blue" />
                        </StackPanel>
                    </TabItem.Header>
                    <Label Content="Content goes here..." />
                </TabItem>
                <TabItem>
                    <TabItem.Header>
                        <StackPanel Orientation="Horizontal">
                            <Image Source="/WpfTutorialSamples;component/Images/bullet_red.png" />
                            <TextBlock Text="Red" Foreground="Red" />
                        </StackPanel>
                    </TabItem.Header>
                </TabItem>
                <TabItem>
                    <TabItem.Header>
                        <StackPanel Orientation="Horizontal">
                            <Image Source="/WpfTutorialSamples;component/Images/bullet_green.png" />
                            <TextBlock Text="Green" Foreground="Green" />
                        </StackPanel>
                    </TabItem.Header>
                </TabItem>
            </TabControl>
        </Grid>
    </Grid>
</Window>
The amount of markup might be a bit overwhelming, but as you can probably see once you dig into it, it's all very simple. Each of the tabs now has a TabControl.Header element, which contains a StackPanel, which in turn contains an Image and a TextBlock control. This allows us to have an image on each of the tabs as well as customize the color of the text (we could have made it bold, italic or another size as well).
Controlling the TabControl
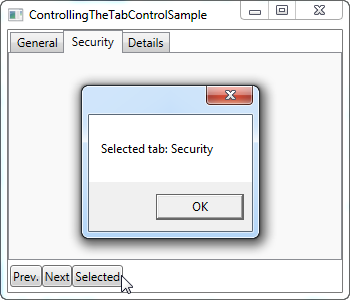
Sometimes you may wish to control which tab is selected programmatically or perhaps get some information about the selected tab. The WPF TabControl has several properties which makes this possible, including SelectedIndex and SelectedItem. In the next example, I've added a couple of buttons to the first example which allows us to control the TabControl:
<Window x:Class="WpfTutorialSamples.Misc_controls.ControllingTheTabControlSample"
        xmlns="http://schemas.microsoft.com/winfx/2006/xaml/presentation"
        xmlns:x="http://schemas.microsoft.com/winfx/2006/xaml"
        Title="ControllingTheTabControlSample" Height="300" Width="350">
    <DockPanel>
        <StackPanel Orientation="Horizontal" DockPanel.Dock="Bottom" Margin="2,5">
            <Button Name="btnPreviousTab" Click="btnPreviousTab_Click">Prev.</Button>
            <Button Name="btnNextTab" Click="btnNextTab_Click">Next</Button>
            <Button Name="btnSelectedTab" Click="btnSelectedTab_Click">Selected</Button>
        </StackPanel>
        <TabControl Name="tcSample">
            <TabItem Header="General">
                <Label Content="Content goes here..." />
            </TabItem>
            <TabItem Header="Security" />
            <TabItem Header="Details" />
        </TabControl>

    </DockPanel>
</Window>
using System;
using System.Windows;
using System.Windows.Controls;
namespace WpfTutorialSamples.Misc_controls
{
public partial class ControllingTheTabControlSample : Window
{
public ControllingTheTabControlSample()
{
InitializeComponent();
}
private void btnPreviousTab_Click(object sender, RoutedEventArgs e)
{
int newIndex = tcSample.SelectedIndex - 1;
if(newIndex < 0)
newIndex = tcSample.Items.Count - 1;
tcSample.SelectedIndex = newIndex;
}
private void btnNextTab_Click(object sender, RoutedEventArgs e)
{
int newIndex = tcSample.SelectedIndex + 1;
if(newIndex >= tcSample.Items.Count)
newIndex = 0;
tcSample.SelectedIndex = newIndex;
}
private void btnSelectedTab_Click(object sender, RoutedEventArgs e)
{
MessageBox.Show("Selected tab: " + (tcSample.SelectedItem as TabItem).Header);
}
}
}
As you can see, I've simply added a set of buttons in the lower part of the interface. The first two allows will select the previous or next tab on the control, while the last one will display information about the currently selected tab, as demonstrated on the screenshot.
The first two buttons uses the SelectedIndex property to determine where we are and then either subtracts or adds one to that value, making sure that the new index doesn't fall below or above the amount of available items. The third button uses the SelectedItem property to get a reference to the selected tab. As you can see, I have to typecast it into the TabItem class to get a hold of the header property, since the SelectedProperty is of the object type by default.
Summary
The TabControl is great when you need a clear separation in a dialog or when there's simply not enough space for all the controls you want in it. In the next couple of chapters, we'll look into some of the possibilites there are when using the TabControl for various purposes.