The community is working on translating this tutorial into Finnish, but it seems that no one has started the translation process for this article yet. If you can help us, then please click "More info".
Implementing a custom WPF Command
In the previous chapter, we looked at various ways of using commands already defined in WPF, but of course, you can implement your own commands as well. It's pretty simple, and once you've done it, you can use your own commands just like the ones defined in WPF.
The easiest way to start implementing your own commands is to have a static class that will contain them. Each command is then added to this class as static fields, allowing you to use them in your application. Since WPF, for some strange reason, doesn't implement an Exit/Quit command, I decided to implement one for our custom commands example. It looks like this:
<Window x:Class="WpfTutorialSamples.Commands.CustomCommandSample"
        xmlns="http://schemas.microsoft.com/winfx/2006/xaml/presentation"
        xmlns:x="http://schemas.microsoft.com/winfx/2006/xaml"
        xmlns:self="clr-namespace:WpfTutorialSamples.Commands"
        Title="CustomCommandSample" Height="150" Width="200">
    <Window.CommandBindings>
        <CommandBinding Command="self:CustomCommands.Exit" CanExecute="ExitCommand_CanExecute" Executed="ExitCommand_Executed" />
    </Window.CommandBindings>
    <Grid>
        <Grid.RowDefinitions>
            <RowDefinition Height="Auto" />
            <RowDefinition Height="*" />
        </Grid.RowDefinitions>
        <Menu>
            <MenuItem Header="File">
                <MenuItem Command="self:CustomCommands.Exit" />
            </MenuItem>
        </Menu>
        <StackPanel Grid.Row="1" HorizontalAlignment="Center" VerticalAlignment="Center">
            <Button Command="self:CustomCommands.Exit">Exit</Button>
        </StackPanel>
    </Grid>
</Window>
using System;
using System.Collections.Generic;
using System.Windows;
using System.Windows.Input;
namespace WpfTutorialSamples.Commands
{
public partial class CustomCommandSample : Window
{
public CustomCommandSample()
{
InitializeComponent();
}
private void ExitCommand_CanExecute(object sender, CanExecuteRoutedEventArgs e)
{
e.CanExecute = true;
}
private void ExitCommand_Executed(object sender, ExecutedRoutedEventArgs e)
{
Application.Current.Shutdown();
}
}
public static class CustomCommands
{
public static readonly RoutedUICommand Exit = new RoutedUICommand
(
"Exit",
"Exit",
typeof(CustomCommands),
new InputGestureCollection()
{
new KeyGesture(Key.F4, ModifierKeys.Alt)
}
);
//Define more commands here, just like the one above
}
}
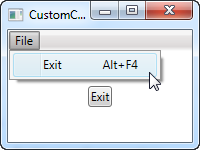
In the markup, I've defined a very simple interface with a menu and a button, both of them using our new, custom Exit command. This command is defined in Code-behind, in our own CustomCommands class, and then referenced in the CommandBindings collection of the window, where we assign the events that it should use to execute/check if it's allowed to execute.
All of this is just like the examples in the previous chapter, except for the fact that we're referencing the command from our own code (using the "self" namespace defined in the top) instead of a built-in command.
In Code-behind, we respond to the two events for our command: One event just allows the command to execute all the time, since that's usually true for an exit/quit command, and the other one calls the Shutdown method that will terminate our application. All very simple.
As already explained, we implement our Exit command as a field on a static CustomCommands class. There are several ways of defining and assigning properties on the commands, but I've chosen the more compact approach (it would be even more compact if placed on the same line, but I've added line breaks here for readability) where I assign all of it through the constructor. The parameters are the text/label of the command, the name of the command, the owner type and then an InputGestureCollection, allowing me to define a default shortcut for the command (Alt+F4).
Summary
Implementing custom WPF commands is almost as easy as consuming the built-in commands, and it allows you to use commands for every purpose in your application. This makes it very easy to re-use actions in several places, as shown in the example of this chapter.