This article is currently in the process of being translated into Finnish (~45% done).
Control ToolTips
Vihjelaatikot, infolaatikot ja vihjeet - useita nimiä, mutta konsepti on sama: Kyky saada lisää tietoa tietystä kontrollista tai linkistä viemällä hiiri sen kohdalle. WPF selvästikin myös tukee tätä konseptia, ja sitä voi hyödyntää käyttämällä ToolTip ominaisuutta, joka löytyy FrameworkElement -luokasta, jonka puolestaan melkein kaikki kontrollit perivät.
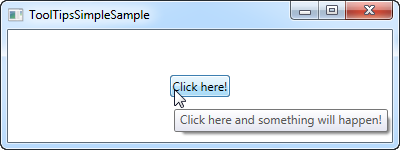
Specifying a tooltip for a control is very easy, as you will see in this first and very basic example:
<Window x:Class="WpfTutorialSamples.Control_concepts.ToolTipsSimpleSample"
        xmlns="http://schemas.microsoft.com/winfx/2006/xaml/presentation"
        xmlns:x="http://schemas.microsoft.com/winfx/2006/xaml"
        Title="ToolTipsSimpleSample" Height="150" Width="400">
    <Grid VerticalAlignment="Center" HorizontalAlignment="Center">

        <Button ToolTip="Click here and something will happen!">Click here!</Button>

    </Grid>
</Window>
Kuten huomaat kuvakaappauksista, hiiren vieminen napin ylle johtaa kelluvaan laatikkoon, jossa on määritelty merkkijono. Suurin osa UI frameworkeista tarjoaa tämän ominaisuuden - merkkijonon näyttäminen, eikä mitään muuta.
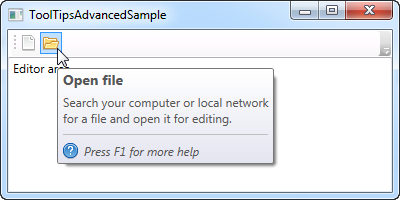
WPF:ssä ToolTip ominaisuus ei kuitenkaan itseasiassa ole merkkijono tyypiltään, vaan objekti, mikä tarkoittaa sitä, että voimme laittaa sinne mitä vaan haluamme. Tämä tuo siistejä mahdollisuuksia, joiden avulla voimme tarjota käyttäjälle sisältörikkaampia ja avuliaampia vihjelaatikoita. Esimerkiksi, tarkastele tätä vaihtoehtoa ja vertaa sitä aiempaan:
<Window x:Class="WpfTutorialSamples.Control_concepts.ToolTipsAdvancedSample"
        xmlns="http://schemas.microsoft.com/winfx/2006/xaml/presentation"
        xmlns:x="http://schemas.microsoft.com/winfx/2006/xaml"
        Title="ToolTipsAdvancedSample" Height="200" Width="400" UseLayoutRounding="True">
    <DockPanel>
        <ToolBar DockPanel.Dock="Top">
            <Button ToolTip="Create a new file">
                <Button.Content>
                    <Image Source="/WpfTutorialSamples;component/Images/page_white.png" Width="16" Height="16" />
                </Button.Content>
            </Button>
            <Button>
                <Button.Content>
                    <Image Source="/WpfTutorialSamples;component/Images/folder.png" Width="16" Height="16" />
                </Button.Content>
                <Button.ToolTip>
                    <StackPanel>
                        <TextBlock FontWeight="Bold" FontSize="14" Margin="0,0,0,5">Open file</TextBlock>
                        <TextBlock>
                        Search your computer or local network
                        <LineBreak />
                        for a file and open it for editing.
                        </TextBlock>
                        <Border BorderBrush="Silver" BorderThickness="0,1,0,0" Margin="0,8" />
                        <WrapPanel>
                            <Image Source="/WpfTutorialSamples;component/Images/help.png" Margin="0,0,5,0" />
                            <TextBlock FontStyle="Italic">Press F1 for more help</TextBlock>
                        </WrapPanel>
                    </StackPanel>
                </Button.ToolTip>
            </Button>
        </ToolBar>

        <TextBox>
            Editor area...
        </TextBox>
    </DockPanel>
</Window>
Huomaa kuinka tämä esimerkki käyttää yksinkertaista merkkijonoa ensimmäisen napin vihjeessä ja paljon kehittyneempää seuraavassa. Kehittyneemmässä tapauksessa käytämme paneelia peruskontrollina, minkä ansiosta voimme sitten lisätä haluamiamme muita kontrolleja. Lopputulos on hieno: otsikko, kuvaus ja vihje, jonka mukaan F1:stä painamalla saa lisää tietoa, sekä ohjeikoni.
Advanced options
The ToolTipService class has a bunch of interesting properties that will affect the behavior of your tooltips. You set them directly on the control that has the tooltip, for instance like here, where we extend the time a tooltip is shown using the ShowDuration property (we set it to 5.000 milliseconds or 5 seconds):
<Button ToolTip="Create a new file" ToolTipService.ShowDuration="5000" Content="Open" />You can also control whether or not the popup should have a shadow, using the HasDropShadow property, or whether tooltips should be displayed for disabled controls as well, using the ShowOnDisabled property. There are several other interesting properties, so for a complete list, please consult the documentation: http://msdn.microsoft.com/en-us/library/system.windows.controls.tooltipservice.aspx
Summary
Tooltips can be a great help for the user, and in WPF, they are both easy to use and extremely flexible. Combine the fact that you can completely control the design and content of the tooltip, with properties from the ToolTipService class, to create more user friendly inline help in your applications.