This article is currently in the process of being translated into Croatian (~44% done).
Using WPF commands
U prethodnom članku puno smo toga napisali o tome što su to naredbe i kako rade. U ovom ćemo poglavlju pogledati kako se koriste tako što ćemo ih pridijeliti elementima korisničkog sučelja i kreirat ćemo naredbene veze koje sve to povezuju.
Počet ćemo s jednostavnim primjerom:
<Window x:Class="WpfTutorialSamples.Commands.UsingCommandsSample"
        xmlns="http://schemas.microsoft.com/winfx/2006/xaml/presentation"
        xmlns:x="http://schemas.microsoft.com/winfx/2006/xaml"
        Title="UsingCommandsSample" Height="100" Width="200">
    <Window.CommandBindings>
        <CommandBinding Command="ApplicationCommands.New" Executed="NewCommand_Executed" CanExecute="NewCommand_CanExecute" />
    </Window.CommandBindings>

    <StackPanel HorizontalAlignment="Center" VerticalAlignment="Center">
        <Button Command="ApplicationCommands.New">New</Button>
    </StackPanel>
</Window>
using System;
using System.Collections.Generic;
using System.Windows;
using System.Windows.Input;
namespace WpfTutorialSamples.Commands
{
public partial class UsingCommandsSample : Window
{
public UsingCommandsSample()
{
InitializeComponent();
}
private void NewCommand_CanExecute(object sender, CanExecuteRoutedEventArgs e)
{
e.CanExecute = true;
}
private void NewCommand_Executed(object sender, ExecutedRoutedEventArgs e)
{
MessageBox.Show("The New command was invoked");
}
}
}
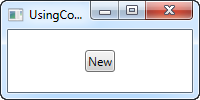
Definiramo naredbenu vezu na prozoru tako što mu dodajemo CommandBindings kolekciju. Onda navodimo naredbu koju želimo koristiti (naredba New iz ApplicationCommands) te dva rukovatelja događajima. Vizualno sučelje se sastoji od jednog dugmeta kojem pridružujemo naredbu pomoću Command svojstva.
U pozadinskom kodu rukujemo s ova dva događaja. CanExecute rukovatelj, kojeg će WPF pozvati kada je aplikacija neaktivna kako bi provjerio da li je specifična naredba trenutno dostupna, je poprilično jednostavan za ovaj primjer jer želimo da ova naredba bude dostupna cijelo vrijeme. To se postiže tako da se CanExecute svojstvo postavi na true.
Executed rukovatelj samo prikazuje poruku u dijaloškom okviru kada se naredba pozove. Ako pokrenete primjer i pritisnete dugme vidjet ćete ovu poruku. Ono što treba primijetiti je da ova komanda ima zadanu prečicu, a to dobivate kao dodatni bonus. Umjesto da kliknete gumb, možete pokušati pritisnuti Ctrl+N na tipkovnici - rezultat je isti.
Korištenje CanExecute metode
U prvom primjeru implementirali smo CanExecute događaj koji je uvijek vraćao true, tako da je dugme bilo dostupno cijelo vrijeme. Međutim, ovo naravno nije ispravno za svu dugmad - često želite da dugme bude omogućeno ili onemogućeno ovisno o nekom stanju vaše aplikacije.
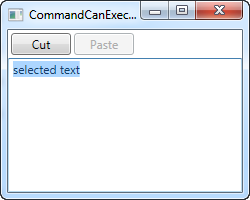
Jako čest primjer omogućavanja i onemogućavanja dugmadi je kod korištenja Windows međuspremnika, gdje želite da Izreži i Kopiraj dugmad bude omogućena samo onda kada je neki tekst odabran, a Zalijepi dugme da bude omogućeno samo onda kada se u međuspremniku nalazi neki tekst. To je točno ono što ćemo postići u ovom primjeru:
<Window x:Class="WpfTutorialSamples.Commands.CommandCanExecuteSample"
        xmlns="http://schemas.microsoft.com/winfx/2006/xaml/presentation"
        xmlns:x="http://schemas.microsoft.com/winfx/2006/xaml"
        Title="CommandCanExecuteSample" Height="200" Width="250">
    <Window.CommandBindings>
        <CommandBinding Command="ApplicationCommands.Cut" CanExecute="CutCommand_CanExecute" Executed="CutCommand_Executed" />
        <CommandBinding Command="ApplicationCommands.Paste" CanExecute="PasteCommand_CanExecute" Executed="PasteCommand_Executed" />
    </Window.CommandBindings>
    <DockPanel>
        <WrapPanel DockPanel.Dock="Top" Margin="3">
            <Button Command="ApplicationCommands.Cut" Width="60">_Cut</Button>
            <Button Command="ApplicationCommands.Paste" Width="60" Margin="3,0">_Paste</Button>
        </WrapPanel>
        <TextBox AcceptsReturn="True" Name="txtEditor" />
    </DockPanel>
</Window>
using System;
using System.Collections.Generic;
using System.Windows;
using System.Windows.Input;
namespace WpfTutorialSamples.Commands
{
public partial class CommandCanExecuteSample : Window
{
public CommandCanExecuteSample()
{
InitializeComponent();
}
private void CutCommand_CanExecute(object sender, CanExecuteRoutedEventArgs e)
{
e.CanExecute = (txtEditor != null) && (txtEditor.SelectionLength > 0);
}
private void CutCommand_Executed(object sender, ExecutedRoutedEventArgs e)
{
txtEditor.Cut();
}
private void PasteCommand_CanExecute(object sender, CanExecuteRoutedEventArgs e)
{
e.CanExecute = Clipboard.ContainsText();
}
private void PasteCommand_Executed(object sender, ExecutedRoutedEventArgs e)
{
txtEditor.Paste();
}
}
}
Imamo ovo vrlo jednostavno sučelje s nekoliko dugmadi i TextBox kontrolom. Prvo dugme će služiti za izrezivanje teksta, a drugo za zalijepiti tekst.
In Code-behind, we have two events for each button: One that performs the actual action, which name ends with _Executed, and then the CanExecute events. In each of them, you will see that I apply some logic to decide whether or not the action can be executed and then assign it to the return value CanExecute on the EventArgs.
The cool thing about this is that you don't have to call these methods to have your buttons updated - WPF does it automatically when the application has an idle moment, making sure that you interface remains updated all the time.
Default command behavior and CommandTarget
As we saw in the previous example, handling a set of commands can lead to quite a bit of code, with a lot of being method declarations and very standard logic. That's probably why the WPF team decided to handle some it for you. In fact, we could have avoided all of the Code-behind in the previous example, because a WPF TextBox can automatically handle common commands like Cut, Copy, Paste, Undo and Redo.
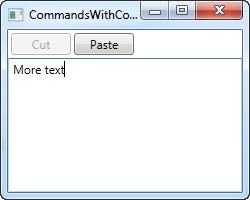
WPF does this by handling the Executed and CanExecute events for you, when a text input control like the TextBox has focus. You are free to override these events, which is basically what we did in the previous example, but if you just want the basic behavior, you can let WPF connect the commands and the TextBox control and do the work for you. Just see how much simpler this example is:
<Window x:Class="WpfTutorialSamples.Commands.CommandsWithCommandTargetSample"
        xmlns="http://schemas.microsoft.com/winfx/2006/xaml/presentation"
        xmlns:x="http://schemas.microsoft.com/winfx/2006/xaml"
        Title="CommandsWithCommandTargetSample" Height="200" Width="250">
    <DockPanel>
        <WrapPanel DockPanel.Dock="Top" Margin="3">
            <Button Command="ApplicationCommands.Cut" CommandTarget="{Binding ElementName=txtEditor}" Width="60">_Cut</Button>
            <Button Command="ApplicationCommands.Paste" CommandTarget="{Binding ElementName=txtEditor}" Width="60" Margin="3,0">_Paste</Button>
        </WrapPanel>
        <TextBox AcceptsReturn="True" Name="txtEditor" />
    </DockPanel>
</Window>
No Code-behind code needed for this example - WPF deals with all of it for us, but only because we want to use these specific commands for this specific control. The TextBox does the work for us.
Notice how I use the CommandTarget properties on the buttons, to bind the commands to our TextBox control. This is required in this particular example, because the WrapPanel doesn't handle focus the same way e.g. a Toolbar or a Menu would, but it also makes pretty good sense to give the commands a target.
Summary
Dealing with commands is pretty straight forward, but does involve a bit extra markup and code. The reward is especially obvious when you need to invoke the same action from multiple places though, or when you use built-in commands that WPF can handle completely for you, as we saw in the last example.