This article is currently in the process of being translated into Japanese (~96% done).
Using WPF commands
前の記事では、コマンドについて多くの理論とその動作について議論しました。この章では、ユーザーインターフェース要素にコマンドを割当て、それら全てにリンクするコマンドバインディングを作ることで、コマンドの実際の使い方について見ていきます。
簡単なサンプルから始めましょう。
<Window x:Class="WpfTutorialSamples.Commands.UsingCommandsSample"
        xmlns="http://schemas.microsoft.com/winfx/2006/xaml/presentation"
        xmlns:x="http://schemas.microsoft.com/winfx/2006/xaml"
        Title="UsingCommandsSample" Height="100" Width="200">
    <Window.CommandBindings>
        <CommandBinding Command="ApplicationCommands.New" Executed="NewCommand_Executed" CanExecute="NewCommand_CanExecute" />
    </Window.CommandBindings>

    <StackPanel HorizontalAlignment="Center" VerticalAlignment="Center">
        <Button Command="ApplicationCommands.New">New</Button>
    </StackPanel>
</Window>using System;
using System.Collections.Generic;
using System.Windows;
using System.Windows.Input;
namespace WpfTutorialSamples.Commands
{
public partial class UsingCommandsSample : Window
{
public UsingCommandsSample()
{
InitializeComponent();
}
private void NewCommand_CanExecute(object sender, CanExecuteRoutedEventArgs e)
{
e.CanExecute = true;
}
private void NewCommand_Executed(object sender, ExecutedRoutedEventArgs e)
{
MessageBox.Show("The New command was invoked");
}
}
}
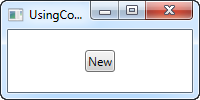
ウィンドウの CommandBindings コレクションに加えることによってコマンドバインディングを定義します。そのコマンドに使いたいコマンド( ApplicationCommands の New コマンド)を指定し、同じ様に2つのイベントハンドラも指定します。インターフェースの外観は1個のボタンで、Command プロパティを使ってコマンドにアタッチしています。
コードビハインドでは2つのイベントを扱います。CanExecute ハンドラはアプリケーションのアイドル時にコマンドが有効かどうか調べるために呼ばれますが、このサンプルではこのコマンドはいつも有効にしておきたいのでたいへん簡単です。このイベント引数の CanExecute プロパティを true に設定すればいつも有効になります。
Executed ハンドラはコマンドが実行された時、単純にメッセージを表示するだけです。このサンプルを実行してボタンを押すと、このメッセージが出ます。注意することはデフォルトキーボードショートカットが定義されていることです。これはボーナスです。ボタンをクリックする代わりにキーボードで Ctrl+N を押してみてください。同じ結果になります。
CanExecute メソッドの使用
最初のサンプルでは、CanExecute イベントを単純に true を返すように実装したので、ボタンはいつでも有効になっています。しかし、もちろんこれは全てのボタンで true にするものではありません。多くの場合はアプリケーションのいくつかの状態によってボタンを有効または無効にします。
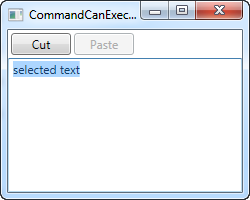
この、非常に一般的なサンプルは、Windows のクリップボードを使うためのトグルするボタンです。つまり、Cut と Copy ボタンはテキストが選択されているときだけ有効で、Paste ボタンはテキストがクリップボードにあるときだけ有効になります。このサンプルでこれら動作が出来ます。
<Window x:Class="WpfTutorialSamples.Commands.CommandCanExecuteSample"
        xmlns="http://schemas.microsoft.com/winfx/2006/xaml/presentation"
        xmlns:x="http://schemas.microsoft.com/winfx/2006/xaml"
        Title="CommandCanExecuteSample" Height="200" Width="250">
    <Window.CommandBindings>
        <CommandBinding Command="ApplicationCommands.Cut" CanExecute="CutCommand_CanExecute" Executed="CutCommand_Executed" />
        <CommandBinding Command="ApplicationCommands.Paste" CanExecute="PasteCommand_CanExecute" Executed="PasteCommand_Executed" />
    </Window.CommandBindings>
    <DockPanel>
        <WrapPanel DockPanel.Dock="Top" Margin="3">
            <Button Command="ApplicationCommands.Cut" Width="60">_Cut</Button>
            <Button Command="ApplicationCommands.Paste" Width="60" Margin="3,0">_Paste</Button>
        </WrapPanel>
        <TextBox AcceptsReturn="True" Name="txtEditor" />
    </DockPanel>
</Window>using System;
using System.Collections.Generic;
using System.Windows;
using System.Windows.Input;
namespace WpfTutorialSamples.Commands
{
public partial class CommandCanExecuteSample : Window
{
public CommandCanExecuteSample()
{
InitializeComponent();
}
private void CutCommand_CanExecute(object sender, CanExecuteRoutedEventArgs e)
{
e.CanExecute = (txtEditor != null) && (txtEditor.SelectionLength > 0);
}
private void CutCommand_Executed(object sender, ExecutedRoutedEventArgs e)
{
txtEditor.Cut();
}
private void PasteCommand_CanExecute(object sender, CanExecuteRoutedEventArgs e)
{
e.CanExecute = Clipboard.ContainsText();
}
private void PasteCommand_Executed(object sender, ExecutedRoutedEventArgs e)
{
txtEditor.Paste();
}
}
}
これは2つのボタンと TextBox コントロールを持った大変簡単なサンプルです。最初のボタンはクリップボードにカットし、二番目はクリップボードからペーストします。
コードビハインドではそれぞれのボタンに2つのイベントがあります。一つは名前の終わりが_Executed で、実際の動作を行い、もう一つは CanExecute イベントです。それぞれの中で、実行するかどうかを決めるロジックを使用し、その結果を EventArgs の CanExecute に戻り値として割り当てているのがわかるでしょう。
これの賢いところは、ボタンを更新するためにこれらのメソッドを呼ぶ必要がないということです。WPFがアプリケーションのアイドル中に自動で実行し、インターフェースはいつでも更新されている状態になります。
デフォルトのコマンドのふるまいと CommandTarget
前のサンプルを見ると、一連のコマンドの対応は、非常に標準的なロジックの多くのメソッドの定義から成る、かなりの量のコードにつながるかもしれません。これがおそらくWPFチームがあなたのためにコマンドを処理することを決めた理由です。実際、先のサンプルのコードビハインド全てを書かずに済ませることが出来ます。何故なら、WPFの TextBox はカット、コピー、ペースト、アンドゥ、リドゥなどの共通コマンドは自動で対応できるからです。
WPFは TextBix のようなテキスト入力コントロールがフォーカスを持っている時に Executed とCanExecute イベントを処理することで、これをあなたに代わって行います。これらのイベントを、前のサンプルで行ったようにオーバーライドすることは自由ですが、基本的な振る舞いをしたいだけなら、WPFをコマンドと TextBox を接続させ、作業することが出来ます。次のサンプルがどんなに簡単かを見てください。
<Window x:Class="WpfTutorialSamples.Commands.CommandsWithCommandTargetSample"
        xmlns="http://schemas.microsoft.com/winfx/2006/xaml/presentation"
        xmlns:x="http://schemas.microsoft.com/winfx/2006/xaml"
        Title="CommandsWithCommandTargetSample" Height="200" Width="250">
    <DockPanel>
        <WrapPanel DockPanel.Dock="Top" Margin="3">
            <Button Command="ApplicationCommands.Cut" CommandTarget="{Binding ElementName=txtEditor}" Width="60">_Cut</Button>
            <Button Command="ApplicationCommands.Paste" CommandTarget="{Binding ElementName=txtEditor}" Width="60" Margin="3,0">_Paste</Button>
        </WrapPanel>
        <TextBox AcceptsReturn="True" Name="txtEditor" />
    </DockPanel>
</Window>
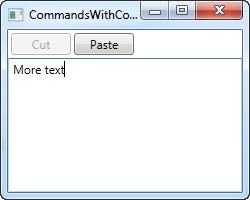
このサンプルにはコードビハインドは必要ありません。WPFが全てを処理しますが、これは、これらの特定のコマンドを特定のコントロールに使うだけだからです。TextBox が全てを実行します。
ボタンでTextBoxコントロールにコマンドをバインドするために CommandTarget プロパティを使っていることに注意してください。これはこの特別なサンプルに必要です。何故なら WrapPanel は ToolBar や Menu がするのと同じ方法でフォーカスを扱いません。しかし、これはターゲットにコマンドを与える非常に良い方法です。
まとめ
コマンドを扱うことは単純明快ですが、マークアップとコードが少し余分に必要になります。しかし、いくつかの場所から同じ動作を実行する必要があるときや、最後のサンプルのようにWPFが完全に処理してくれる組み込みコマンドを使うとき、特に有用です。