This article is currently in the process of being translated into Japanese (~71% done).
Panels:
Using the Grid: A contact form
最後の2つの章では、大変論理的な例で、多くの論理的な知識を検討します。この章ではこれまでにグリッドについて学んだことを組み合わせて、実際に使える例、簡単なコンタクトフォームを作ります。
コンタクトフォームの良いところは、共通に使えるダイアログということです。ここで使ったテクニックは、あなたが必要とする殆どのタイプのダイアログで使えます。
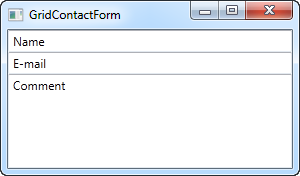
この仕事の最初の作業は大変簡単で、たいへん基本的なコンタクトフォームになります。3つのロウからなり、2つは自動の高さで最後の一つはスター高さで、残りの有効なスペースを使います。
<Window x:Class="WpfTutorialSamples.Panels.GridContactForm"
        xmlns="http://schemas.microsoft.com/winfx/2006/xaml/presentation"
        xmlns:x="http://schemas.microsoft.com/winfx/2006/xaml"
        Title="GridContactForm" Height="300" Width="300">
    <Grid>
		<Grid.RowDefinitions>
			<RowDefinition Height="Auto" />
			<RowDefinition Height="Auto" />
			<RowDefinition Height="*" />
		</Grid.RowDefinitions>
		<TextBox>Name</TextBox>
		<TextBox Grid.Row="1">E-mail</TextBox>
		<TextBox Grid.Row="2" AcceptsReturn="True">Comment</TextBox>
	</Grid>
</Window>
見ればわかるように、最後のテキストボックスは残りのスペースを占め、最初の2つはそれぞれが必要な分のみを占めています。ウィンドウをリサイズすれば、コメントのテキストボックスのサイズが変わります。
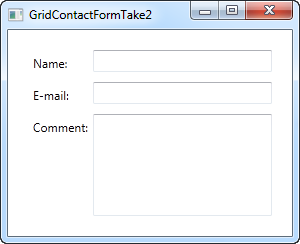
この大変簡単な例では、それぞれのフィールドを指定するラベルはありません。代わりにテキストボックスの中に説明するテキストがありますが、これは一般的なWindowsのダイアログの外観ではありません。見栄えと使い勝手を少し改善しましょう。
<Window x:Class="WpfTutorialSamples.Panels.GridContactFormTake2"
        xmlns="http://schemas.microsoft.com/winfx/2006/xaml/presentation"
        xmlns:x="http://schemas.microsoft.com/winfx/2006/xaml"
        Title="GridContactFormTake2" Height="300" Width="300">
	<Grid Margin="10">
		<Grid.ColumnDefinitions>
			<ColumnDefinition Width="Auto" />
			<ColumnDefinition Width="*" />
		</Grid.ColumnDefinitions>
		<Grid.RowDefinitions>
			<RowDefinition Height="Auto" />
			<RowDefinition Height="Auto" />
			<RowDefinition Height="*" />
		</Grid.RowDefinitions>
		<Label>Name: </Label>
		<TextBox Grid.Column="1" Margin="0,0,0,10" />
		<Label Grid.Row="1">E-mail: </Label>
		<TextBox Grid.Row="1" Grid.Column="1" Margin="0,0,0,10" />
		<Label Grid.Row="2">Comment: </Label>
		<TextBox Grid.Row="2" Grid.Column="1" AcceptsReturn="True" />
	</Grid>
</Window>
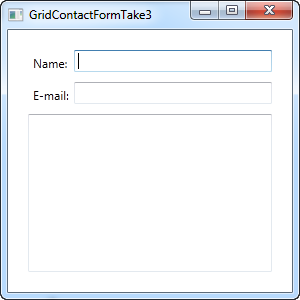
だけど、多分、コメントフィールドはそれ自身でわかると思いませんか?この場合は、ラベルを省略して、コメントテキストボックスにさらにスペースを割くために、ColumnSpan を使います。
<TextBox Grid.ColumnSpan="2" Grid.Row="2" AcceptsReturn="True" />
このように、グリッドは大変強力なパネルです。あなたがダイアログを設計する時、これら全てのテクニックを使えるよう願っています。
This article has been fully translated into the following languages:
Is your preferred language not on the list? Click here to help us translate this article into your language!