The community is working on translating this tutorial into Macedonian, but it seems that no one has started the translation process for this article yet. If you can help us, then please click "More info".
The FlowDocumentScrollViewer control
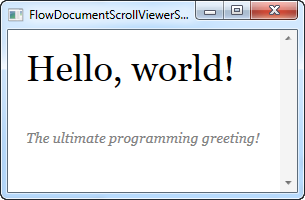
In the range of FlowDocument wrappers, discussed in the introduction, the FlowDocumentScrollViewer is the simplest one. It simply allows the users to scroll to long documents, using regular scrollbars. Since this is our first meeting with the FlowDocument used in any form, we'll start off with a basic "Hello World!" example, and besides the use of FlowDocumentScrollViewer, this article will also cover several concepts common between all of the wrappers. Here's the first example:
<Window x:Class="WpfTutorialSamples.Rich_text_controls.FlowDocumentScrollViewerSample"
        xmlns="http://schemas.microsoft.com/winfx/2006/xaml/presentation"
        xmlns:x="http://schemas.microsoft.com/winfx/2006/xaml"
        Title="FlowDocumentScrollViewerSample" Height="200" Width="300">
    <Grid>
        <FlowDocumentScrollViewer>
            <FlowDocument>
                <Paragraph FontSize="36">Hello, world!</Paragraph>
                <Paragraph FontStyle="Italic" TextAlignment="Left" FontSize="14" Foreground="Gray">The ultimate programming greeting!</Paragraph>
            </FlowDocument>
        </FlowDocumentScrollViewer>
    </Grid>
</Window>
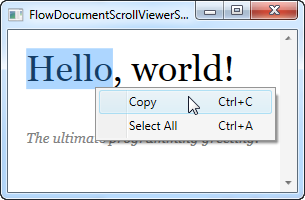
Notice how easy it was to specify the text, using simple markup tags, in this case the Paragraph tag. Now you might argue that this could have been achieved with a couple of TextBlock controls, and you would be absolutely right, but even with an extremely basic example like this, you get a bit of added functionality for free: You can select the text and copy it to the clipboard. It'll look like this:

Zooming and scrollbar visibility
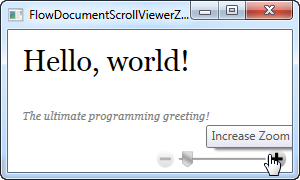
As previously mentioned, all of the FlowDocument wrappers support zooming out of the box. With the example above, you can simply hold down the Ctrl key while using the mouse wheel to zoom in and out. This might not be obvious to your end users though, so you can help them by displaying the built-in toolbar of the FlowDocumentScrollViewer, which has controls that will allow you to change the zoom level. Just set the IsToolBarVisible property to true on the FlowDocumentScrollViewer, and you're good to go, as you can see in the next example:
<Window x:Class="WpfTutorialSamples.Rich_text_controls.FlowDocumentScrollViewerZoomSample"
        xmlns="http://schemas.microsoft.com/winfx/2006/xaml/presentation"
        xmlns:x="http://schemas.microsoft.com/winfx/2006/xaml"
        Title="FlowDocumentScrollViewerZoomSample" Height="180" Width="300">
    <Grid>
        <FlowDocumentScrollViewer IsToolBarVisible="True" Zoom="80" ScrollViewer.VerticalScrollBarVisibility="Auto">
            <FlowDocument>
                <Paragraph FontSize="36">Hello, world!</Paragraph>
                <Paragraph FontStyle="Italic" TextAlignment="Left" FontSize="14" Foreground="Gray">The ultimate programming greeting!</Paragraph>
            </FlowDocument>
        </FlowDocumentScrollViewer>
    </Grid>
</Window>
Now the user can control the zoom level using the slider and the buttons in the toolbar below the document. Notice also that we changed the default zoom level, using the Zoom property - it defines the zoom level in percentages, so in this case, the text is zoomed out to 80% by default.
The last thing I changed in this example, in comparison to the first one, is the use of the ScrollViewer.VerticalScrollBarVisibility property. By setting it to Auto, the scrollbars will be invisible until the content actually goes beyond the available space, which is usually what you want.
Text alignment
You may have noticed that I specifically used the TextAlignment property in the above examples. That's because the text is rendered justified by default, in a WPF FlowDocument, meaning that each line of text is stretched to cover the entire available width, if needed. As you can see, this can be changed, either on a single paragraph or globally for the entire document by setting the same property on the FlowDocument element.
However, in many situations, justified text makes sense, but it can result in some very bad layout, with very excessive amounts of whitespace on lines where a linebreak is inserted right before a very long word.
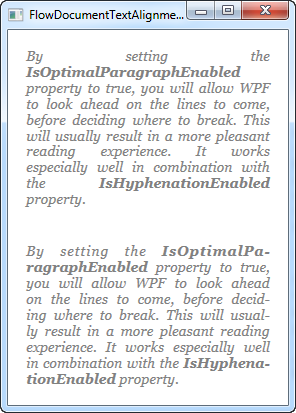
The following example will illustrate that, as well as provide a solution that will help remedy the problem. By using the IsOptimalParagraphEnabled property in combination with the IsHyphenationEnabled property, you will give WPF a better chance of laying out the text in the best possible way.
IsOptimalParagraphEnabled allows WPF to look ahead in your text, to see if it would make more sense to break the text in a different position than right at the moment where it runs out of space. IsHyphenationEnabled allows WPF to split your words with a hyphen, if it would allow for a more natural layout of the text.
In the next example, I've rendered the same text twice - one without these properties, and one with. The difference is quite obvious:
<Window x:Class="WpfTutorialSamples.Rich_text_controls.FlowDocumentTextAlignmentSample"
        xmlns="http://schemas.microsoft.com/winfx/2006/xaml/presentation"
        xmlns:x="http://schemas.microsoft.com/winfx/2006/xaml"
        Title="FlowDocumentTextAlignmentSample" Height="400" Width="330">
    <StackPanel>
        <FlowDocumentScrollViewer ScrollViewer.VerticalScrollBarVisibility="Auto">
            <FlowDocument>
                <Paragraph FontStyle="Italic" FontSize="14" Foreground="Gray">
                    By setting the
                    <Bold>IsOptimalParagraphEnabled</Bold> property to true,
                    you will allow WPF to look ahead on the lines to come, before deciding
                    where to break. This will usually result in a more pleasant reading
                    experience. It works especially well in combination with the
                    <Bold>IsHyphenationEnabled</Bold> property.
                </Paragraph>
            </FlowDocument>
        </FlowDocumentScrollViewer>
        <FlowDocumentScrollViewer ScrollViewer.VerticalScrollBarVisibility="Auto">
            <FlowDocument IsOptimalParagraphEnabled="True" IsHyphenationEnabled="True">
                <Paragraph FontStyle="Italic" FontSize="14" Foreground="Gray">
                    By setting the <Bold>IsOptimalParagraphEnabled</Bold> property to true,
                    you will allow WPF to look ahead on the lines to come, before deciding
                    where to break. This will usually result in a more pleasant reading
                    experience. It works especially well in combination with the
                    <Bold>IsHyphenationEnabled</Bold> property.
                </Paragraph>
            </FlowDocument>
        </FlowDocumentScrollViewer>
    </StackPanel>
</Window>
IsOptimalParagraphEnabled is not enabled by default because it does require a bit more CPU power when rendering the text, especially if the window is frequently resized. For most situations this shouldn't be a problem though.
If you have a lot of FlowDocument instances in your application and you prefer this optimal rendering method, you can enable it on all of your FlowDocument instances by specifying a global style that enables it, in your App.xaml. Here's an example:
<Application x:Class="WpfTutorialSamples.App"
             xmlns="http://schemas.microsoft.com/winfx/2006/xaml/presentation"
             xmlns:x="http://schemas.microsoft.com/winfx/2006/xaml"
             xmlns:sys="clr-namespace:System;assembly=mscorlib"
             StartupUri="Rich text controls/FlowDocumentTextAlignmentSample.xaml">
    <Application.Resources>
        <Style TargetType="FlowDocument">
            <Setter Property="IsOptimalParagraphEnabled" Value="True" />
            <Setter Property="IsHyphenationEnabled" Value="True" />
        </Style>
    </Application.Resources>
</Application>