The community is working on translating this tutorial into Malay, but it seems that no one has started the translation process for this article yet. If you can help us, then please click "More info".
How-to: Creating a Rich Text Editor
This is another how-to article, inspired by how cool the RichTextBox control is and how easy it makes it to create a small but very capable rich text editor - think Windows Wordpad! While WPF makes this really easy for us, there will be a bit more XAML and C# code than usual, but that's okay. We'll go through the interesting sections one at a time, and then in the end, I will show you the entire code listing.
In this article, we'll be using lots of controls and techniques that we've used in other parts of the tutorial, so the explanations won't be too detailed. In case you need to freshen up on parts of it, you can always go back for the fully detailed descriptions.
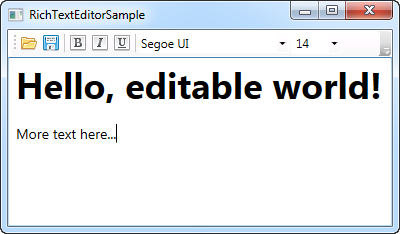
As a start, let's have a look at what we're going for. This should be the final result:

Interface
The interface consists of a ToolBar control with buttons and combo boxes on it. There are buttons for loading and saving a document, buttons for controlling various font weight and style properties, and then two combo boxes for controlling the font family and size.
Below the toolbar is the RichTextBox control, where all the editing will be done.
Commands
The first thing you might notice is the use of WPF Commands, which we've already discussed previously in this article. We use the Open and Save commands from the ApplicationCommands class to load and save the document, and we use the ToggleBold, ToggleItalic and ToggleUnderline commands from the EditingCommands class for our style related buttons.
The advantage of using Commands is once again obvious, since the RichTextBox control already implements the ToggleBold, ToggleItalic and ToggleUnderline commands. This means that we don't have to write any code for them to work. Just hook them up to the designated button and it works:
<ToggleButton Command="EditingCommands.ToggleBold" Name="btnBold">
    <Image Source="/WpfTutorialSamples;component/Images/text_bold.png" Width="16" Height="16" />
</ToggleButton>
We also get keyboard shortcuts for free - press Ctrl+B to activate ToggleBold, Ctrl+I to activate ToggleItalic and Ctrl+U to activate ToggleUnderline.
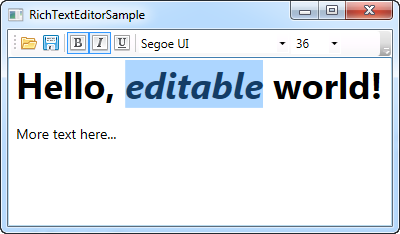
Notice that I'm using a ToggleButton instead of a regular Button control. I want the button to be checkable, if the selection is currently bold, and that's supported through the IsChecked property of the ToggleButton. Unfortunately, WPF has no way of handling this part for us, so we need a bit of code to update the various button and combo box states. More about that later.
The Open and Save commands can't be handled automatically, so we'll have to do that as usual, with a CommandBinding for the Window and then an event handler in Code-behind:
<Window.CommandBindings>
    <CommandBinding Command="ApplicationCommands.Open" Executed="Open_Executed" />
    <CommandBinding Command="ApplicationCommands.Save" Executed="Save_Executed" />
</Window.CommandBindings>
I'll show you the implementation later in this article.
Font family and size
To show and change the font family and size, we have a couple of combo boxes. They are populated with the system font families as well as a selection of possible sizes in the constructor for the window, like this:
public RichTextEditorSample()
{
	InitializeComponent();
	cmbFontFamily.ItemsSource = Fonts.SystemFontFamilies.OrderBy(f => f.Source);
	cmbFontSize.ItemsSource = new List<double>() { 8, 9, 10, 11, 12, 14, 16, 18, 20, 22, 24, 26, 28, 36, 48, 72 };
}
Once again, WPF makes it easy for us to get a list of possible fonts, by using the SystemFontFamilies property. Since the list of sizes is more of a suggestion, we make that ComboBox control editable, so that the user may enter a custom size:
<ComboBox Name="cmbFontFamily" Width="150" SelectionChanged="cmbFontFamily_SelectionChanged" />
<ComboBox Name="cmbFontSize" Width="50" IsEditable="True" TextBoxBase.TextChanged="cmbFontSize_TextChanged" />
This also means that we'll be handling changes differently. For the font family ComboBox, we can just handle the SelectionChanged event, while we hook into the TextBoxBase.TextChanged event of the size ComboBox, to handle the fact that the user can both select and manually enter a size.
WPF handles the implementation of the Bold, Italic and Underline commands for us, but for font family and size, we'll have to manually change these values. Fortunately, it's quite easy to do, using the ApplyPropertyValue() method. The above mentioned event handlers look like this.
private void cmbFontFamily_SelectionChanged(object sender, SelectionChangedEventArgs e)
{
	if(cmbFontFamily.SelectedItem != null)
		rtbEditor.Selection.ApplyPropertyValue(Inline.FontFamilyProperty, cmbFontFamily.SelectedItem);
}

private void cmbFontSize_TextChanged(object sender, TextChangedEventArgs e)
{
	rtbEditor.Selection.ApplyPropertyValue(Inline.FontSizeProperty, cmbFontSize.Text);
}
Nothing too fancy here - we simply pass on the selected/entered value to the ApplyPropertyValue() method, along with the property that we wish to change.
Updating the state
As previously mentioned, WPF handles the Bold, Italic and Underline commands for us, but we have to manually update the state of their buttons, since this is not a part of the Commands functionality. However, that's okay, since we also have to update the two combo boxes to reflect the current font family and size.
We want to update the state as soon as the cursor moves and/or the selection changes, and for that, the SelectionChanged event of the RichTextBox is perfect. Here's how we handle it:
private void rtbEditor_SelectionChanged(object sender, RoutedEventArgs e)
{
	object temp = rtbEditor.Selection.GetPropertyValue(Inline.FontWeightProperty);
	btnBold.IsChecked = (temp != DependencyProperty.UnsetValue) && (temp.Equals(FontWeights.Bold));
	temp = rtbEditor.Selection.GetPropertyValue(Inline.FontStyleProperty);
	btnItalic.IsChecked = (temp != DependencyProperty.UnsetValue) && (temp.Equals(FontStyles.Italic));
	temp = rtbEditor.Selection.GetPropertyValue(Inline.TextDecorationsProperty);
	btnUnderline.IsChecked = (temp != DependencyProperty.UnsetValue) && (temp.Equals(TextDecorations.Underline));

	temp = rtbEditor.Selection.GetPropertyValue(Inline.FontFamilyProperty);
	cmbFontFamily.SelectedItem = temp;
	temp = rtbEditor.Selection.GetPropertyValue(Inline.FontSizeProperty);
	cmbFontSize.Text = temp.ToString();
}
Quite a bit of lines, but the actual job only requires a couple of lines - we just repeat them with a small variation to update each of the three buttons, as well as the two combo boxes.
The principle is quite simple. For the buttons, we use the GetPropertyValue() method to get the current value for a given text property, e.g. the FontWeight, and then we update the IsChecked property depending on whether the returned value is the same as the one we're looking for or not.
For the combo boxes, we do the same thing, but instead of setting an IsChecked property, we set the SelectedItem or Text properties directly with the returned values.
Loading and saving a file
When handling the Open and Save commands, we use some very similar code:
private void Open_Executed(object sender, ExecutedRoutedEventArgs e)
{
	OpenFileDialog dlg = new OpenFileDialog();
	dlg.Filter = "Rich Text Format (*.rtf)|*.rtf|All files (*.*)|*.*";
	if(dlg.ShowDialog() == true)
	{
		FileStream fileStream = new FileStream(dlg.FileName, FileMode.Open);
		TextRange range = new TextRange(rtbEditor.Document.ContentStart, rtbEditor.Document.ContentEnd);
		range.Load(fileStream, DataFormats.Rtf);
	}
}

private void Save_Executed(object sender, ExecutedRoutedEventArgs e)
{
	SaveFileDialog dlg = new SaveFileDialog();
	dlg.Filter = "Rich Text Format (*.rtf)|*.rtf|All files (*.*)|*.*";
	if(dlg.ShowDialog() == true)
	{
		FileStream fileStream = new FileStream(dlg.FileName, FileMode.Create);
		TextRange range = new TextRange(rtbEditor.Document.ContentStart, rtbEditor.Document.ContentEnd);
		range.Save(fileStream, DataFormats.Rtf);
	}
}
An OpenFileDialog or SaveFileDialog is used to specify the location and filename, and then the text is either loaded or saved by using a TextRange object, which we obtain directly from the RichTextBox, in combination with a FileStream, which provides the access to the physical file. The file is loaded and saved in the RTF format, but you can specify one of the other format types if you want your editor to support other formats, e.g. plain text.
The complete example
Here's the code for the entire application - first the XAML and then the C# Code-behind:
<Window x:Class="WpfTutorialSamples.Rich_text_controls.RichTextEditorSample"
        xmlns="http://schemas.microsoft.com/winfx/2006/xaml/presentation"
        xmlns:x="http://schemas.microsoft.com/winfx/2006/xaml"
        Title="RichTextEditorSample" Height="300" Width="400">
    <Window.CommandBindings>
        <CommandBinding Command="ApplicationCommands.Open" Executed="Open_Executed" />
        <CommandBinding Command="ApplicationCommands.Save" Executed="Save_Executed" />
    </Window.CommandBindings>
    <DockPanel>
        <ToolBar DockPanel.Dock="Top">
            <Button Command="ApplicationCommands.Open">
                <Image Source="/WpfTutorialSamples;component/Images/folder.png" Width="16" Height="16" />
            </Button>
            <Button Command="ApplicationCommands.Save">
                <Image Source="/WpfTutorialSamples;component/Images/disk.png" Width="16" Height="16" />
            </Button>
            <Separator />
            <ToggleButton Command="EditingCommands.ToggleBold" Name="btnBold">
                <Image Source="/WpfTutorialSamples;component/Images/text_bold.png" Width="16" Height="16" />
            </ToggleButton>
            <ToggleButton Command="EditingCommands.ToggleItalic" Name="btnItalic">
                <Image Source="/WpfTutorialSamples;component/Images/text_italic.png" Width="16" Height="16" />
            </ToggleButton>
            <ToggleButton Command="EditingCommands.ToggleUnderline" Name="btnUnderline">
                <Image Source="/WpfTutorialSamples;component/Images/text_underline.png" Width="16" Height="16" />
            </ToggleButton>
            <Separator />
            <ComboBox Name="cmbFontFamily" Width="150" SelectionChanged="cmbFontFamily_SelectionChanged" />
            <ComboBox Name="cmbFontSize" Width="50" IsEditable="True" TextBoxBase.TextChanged="cmbFontSize_TextChanged" />
        </ToolBar>
        <RichTextBox Name="rtbEditor" SelectionChanged="rtbEditor_SelectionChanged" />
    </DockPanel>
</Window>
using System;
using System.Linq;
using System.Collections.Generic;
using System.IO;
using System.Windows;
using System.Windows.Documents;
using System.Windows.Input;
using System.Windows.Media;
using Microsoft.Win32;
using System.Windows.Controls;
namespace WpfTutorialSamples.Rich_text_controls
{
public partial class RichTextEditorSample : Window
{
public RichTextEditorSample()
{
InitializeComponent();
cmbFontFamily.ItemsSource = Fonts.SystemFontFamilies.OrderBy(f => f.Source);
cmbFontSize.ItemsSource = new List<double>() { 8, 9, 10, 11, 12, 14, 16, 18, 20, 22, 24, 26, 28, 36, 48, 72 };
}
private void rtbEditor_SelectionChanged(object sender, RoutedEventArgs e)
{
object temp = rtbEditor.Selection.GetPropertyValue(Inline.FontWeightProperty);
btnBold.IsChecked = (temp != DependencyProperty.UnsetValue) && (temp.Equals(FontWeights.Bold));
temp = rtbEditor.Selection.GetPropertyValue(Inline.FontStyleProperty);
btnItalic.IsChecked = (temp != DependencyProperty.UnsetValue) && (temp.Equals(FontStyles.Italic));
temp = rtbEditor.Selection.GetPropertyValue(Inline.TextDecorationsProperty);
btnUnderline.IsChecked = (temp != DependencyProperty.UnsetValue) && (temp.Equals(TextDecorations.Underline));
temp = rtbEditor.Selection.GetPropertyValue(Inline.FontFamilyProperty);
cmbFontFamily.SelectedItem = temp;
temp = rtbEditor.Selection.GetPropertyValue(Inline.FontSizeProperty);
cmbFontSize.Text = temp.ToString();
}
private void Open_Executed(object sender, ExecutedRoutedEventArgs e)
{
OpenFileDialog dlg = new OpenFileDialog();
dlg.Filter = "Rich Text Format (*.rtf)|*.rtf|All files (*.*)|*.*";
if(dlg.ShowDialog() == true)
{
FileStream fileStream = new FileStream(dlg.FileName, FileMode.Open);
TextRange range = new TextRange(rtbEditor.Document.ContentStart, rtbEditor.Document.ContentEnd);
range.Load(fileStream, DataFormats.Rtf);
}
}
private void Save_Executed(object sender, ExecutedRoutedEventArgs e)
{
SaveFileDialog dlg = new SaveFileDialog();
dlg.Filter = "Rich Text Format (*.rtf)|*.rtf|All files (*.*)|*.*";
if(dlg.ShowDialog() == true)
{
FileStream fileStream = new FileStream(dlg.FileName, FileMode.Create);
TextRange range = new TextRange(rtbEditor.Document.ContentStart, rtbEditor.Document.ContentEnd);
range.Save(fileStream, DataFormats.Rtf);
}
}
private void cmbFontFamily_SelectionChanged(object sender, SelectionChangedEventArgs e)
{
if(cmbFontFamily.SelectedItem != null)
rtbEditor.Selection.ApplyPropertyValue(Inline.FontFamilyProperty, cmbFontFamily.SelectedItem);
}
private void cmbFontSize_TextChanged(object sender, TextChangedEventArgs e)
{
rtbEditor.Selection.ApplyPropertyValue(Inline.FontSizeProperty, cmbFontSize.Text);
}
}
}And here's another screenshot where we've selected some text. Notice how the toolbar controls reflects the state of the current selection:

Summary
As you can see, implementing a rich text editor in WPF is very simple, especially because of the excellent RichTextBox control. If you want, you can easily extend this example with stuff like text alignment, colors, lists and even tables.
Please be aware that while the above example should work just fine, there's absolutely no exception handling or checking at all, to keep the amount of code to a minimum. There are several places which could easily throw an exception, like the font size combo box, where one could cause an exception by entering a non-numeric value. You should of course check all of this and handle possible exceptions if you wish to expand on this example for your work.