This article is currently in the process of being translated into Romanian (~35% done).
The WPF Menu control
Una dintre cele mai comune părți ale unei aplicații Windows este meniul, denumit uneori meniul principal, deoarece în aplicație există de obicei unul singur. Meniul este practic pentru că oferă o mulțime de opțiuni, folosind doar foarte puțin spațiu și, deși Microsoft recomandă Ribbon ca înlocuitor pentru meniul și barele de instrumente bune, vechi, cu siguranță încă își au locul în cutia de instrumente a fiecărui programator bun.
WPF vine cu un control bun pentru crearea de meniuri numit... Meniu. Adăugarea elementelor la acesta este foarte simplă - pur și simplu adăugați elemente MenuItem la acesta, iar fiecare MenuItem poate avea o gamă de sub-articole, permițându-vă să creați meniuri ierarhice așa cum le cunoașteți dintr-o mulțime de aplicații Windows. Să trecem direct la un exemplu în care folosim Meniul:
<Window x:Class="WpfTutorialSamples.Common_interface_controls.MenuSample"
        xmlns="http://schemas.microsoft.com/winfx/2006/xaml/presentation"
        xmlns:x="http://schemas.microsoft.com/winfx/2006/xaml"
        Title="MenuSample" Height="200" Width="200">
    <DockPanel>
        <Menu DockPanel.Dock="Top">
            <MenuItem Header="_File">
                <MenuItem Header="_New" />
                <MenuItem Header="_Open" />
                <MenuItem Header="_Save" />
                <Separator />
                <MenuItem Header="_Exit" />
            </MenuItem>
        </Menu>
        <TextBox AcceptsReturn="True" />
    </DockPanel>
</Window>
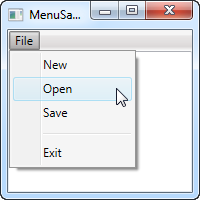
La fel ca în majoritatea aplicațiilor Windows, meniul meu este plasat în partea de sus a ferestrei, dar în conformitate cu enorma flexibilitate a WPF, puteți plasa de fapt un control Meniu oriunde va place și în orice lățime sau înălțime doriți.
Am definit un singur articol de nivel superior, cu 4 articole copil și un separator. Folosesc proprietatea Header pentru a defini eticheta articolului și ar trebui să observați liniuța de subliniere înainte de primul caracter al fiecărei etichete. Îi spune WPF să folosească acel caracter ca tasta de accelerație, ceea ce înseamnă că utilizatorul poate apăsa tasta Alt urmată de caracterul dat, pentru a activa elementul de meniu. Acest lucru funcționează de la elementul de nivel superior și în jos în ierarhie, ceea ce înseamnă că în acest exemplu aș putea apăsa Alt, apoi F și apoi N, pentru a activa elementul Nou.
Icons and checkboxes
Două caracteristici comune ale unui element de meniu sunt pictograma, folosită pentru a identifica mai ușor elementul de meniu și ceea ce face, și capacitatea de a avea elemente de meniu care pot fi verificate, care pot activa și dezactiva o anumită funcție. WPF MenuItem acceptă ambele și este foarte ușor de utilizat:
<Window x:Class="WpfTutorialSamples.Common_interface_controls.MenuIconCheckableSample"
        xmlns="http://schemas.microsoft.com/winfx/2006/xaml/presentation"
        xmlns:x="http://schemas.microsoft.com/winfx/2006/xaml"
        Title="MenuIconCheckableSample" Height="150" Width="300">
    <DockPanel>
        <Menu DockPanel.Dock="Top">
            <MenuItem Header="_File">
                <MenuItem Header="_Exit" />
            </MenuItem>
            <MenuItem Header="_Tools">
                <MenuItem Header="_Manage users">
                    <MenuItem.Icon>
                        <Image Source="/WpfTutorialSamples;component/Images/user.png" />
                    </MenuItem.Icon>
                </MenuItem>
                <MenuItem Header="_Show groups" IsCheckable="True" IsChecked="True" />
            </MenuItem>
        </Menu>
        <TextBox AcceptsReturn="True" />
    </DockPanel>
</Window>
For this example I've created a secondary top-level item, where I've added two items: One with an icon defined, using the Icon property with a standard Image control inside of it, and one where we use the IsCheckable property to allow the user to check and uncheck the item. I even used the IsChecked property to have it checked by default. From Code-behind, this is the same property that you can read to know whether a given menu item is checked or not.
Handling clicks
When the user clicks on a menu item, you will usually want something to happen. The easiest way is to simply add a click event handler to the MenuItem, like this:
<MenuItem Header="_New" Click="mnuNew_Click" />In Code-behind you will then need to implement the mnuNew_Click method, like this:
private void mnuNew_Click(object sender, RoutedEventArgs e)
{
	MessageBox.Show("New");
}
This will suffice for the more simple applications, or when prototyping something, but the WPF way is to use a Command for this.
Keyboard shortcuts and Commands
You can easily handle the Click event of a menu item like we did above, but the more common approach is to use WPF commands. There's a lot of theory on using and creating commands, so they have their own category of articles here on the site, but for now, I can tell you that they have a couple of advantages when used in WPF, especially in combination with a Menu or a Toolbar.
First of all, they ensure that you can have the same action on a toolbar, a menu and even a context menu, without having to implement the same code in multiple places. They also make the handling of keyboard shortcuts a whole lot easier, because unlike with WinForms, WPF is not listening for keyboard shortcuts automatically if you assign them to e.g. a menu item - you will have to do that manually.
However, when using commands, WPF is all ears and will respond to keyboard shortcuts automatically. The text (Header) of the menu item is also set automatically (although you can overwrite it if needed), and so is the InputGestureText, which shows the user which keyboard shortcut can be used to invoke the specific menu item. Let's jump straight to an example of combining the Menu with WPF commands:
<Window x:Class="WpfTutorialSamples.Common_interface_controls.MenuWithCommandsSample"
        xmlns="http://schemas.microsoft.com/winfx/2006/xaml/presentation"
        xmlns:x="http://schemas.microsoft.com/winfx/2006/xaml"
        Title="MenuWithCommandsSample" Height="200" Width="300">
    <Window.CommandBindings>
        <CommandBinding Command="New" CanExecute="NewCommand_CanExecute" Executed="NewCommand_Executed" />
    </Window.CommandBindings>
    <DockPanel>
        <Menu DockPanel.Dock="Top">
            <MenuItem Header="_File">
                <MenuItem Command="New" />
                <Separator />
                <MenuItem Header="_Exit" />
            </MenuItem>
            <MenuItem Header="_Edit">
                <MenuItem Command="Cut" />
                <MenuItem Command="Copy" />
                <MenuItem Command="Paste" />
            </MenuItem>
        </Menu>

        <TextBox AcceptsReturn="True" Name="txtEditor" />
    </DockPanel>
</Window>using System;
using System.Windows;
using System.Windows.Input;
namespace WpfTutorialSamples.Common_interface_controls
{
public partial class MenuWithCommandsSample : Window
{
public MenuWithCommandsSample()
{
InitializeComponent();
}
private void NewCommand_CanExecute(object sender, CanExecuteRoutedEventArgs e)
{
e.CanExecute = true;
}
private void NewCommand_Executed(object sender, ExecutedRoutedEventArgs e)
{
txtEditor.Text = "";
}
}
}
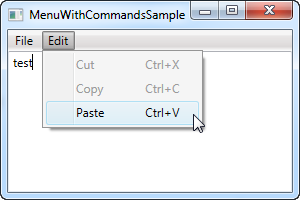
It might not be completely obvious, but by using commands, we just got a whole bunch of things for free: Keyboard shortcuts, text and InputGestureText on the items and WPF automatically enables/disables the items depending on the active control and its state. In this case, Cut and Copy are disabled because no text is selected, but Paste is enabled, because my clipboard is not empty!
And because WPF knows how to handle certain commands in combination with certain controls, in this case the Cut/Copy/Paste commands in combination with a text input control, we don't even have to handle their Execute events - they work right out of the box! We do have to handle it for theNew command though, since WPF has no way of guessing what we want it to do when the user activates it. This is done with the CommandBindings of the Window, all explained in detail in the chapter on commands.
Summary
Working with the WPF Menu control is both easy and fast, making it simple to create even complex menu hierarchies, and when combining it with WPF commands, you get so much functionality for free.