This article has been localized into Chinese by the community.
Grid控件
Grid是面板类型中最复杂的。Grid可以包含多行和多个列。您为每行定义一个高度,为每列定义一个宽度,以像素的绝对数量、可用空间的百分比或自动方式,其中行或列将根据内容自动调整其大小。当其他面板不能胜任时使用Grid,例如,当您需要多个列并且经常与其他面板组合时。
在最基本的形式中,Grid将简单地接受您放入其中的所有控件,将它们拉伸以使用最大可用空间并将他们堆叠:
<Window x:Class="WpfTutorialSamples.Panels.Grid"
        xmlns="http://schemas.microsoft.com/winfx/2006/xaml/presentation"
        xmlns:x="http://schemas.microsoft.com/winfx/2006/xaml"
        Title="Grid" Height="300" Width="300">
    <Grid>
		<Button>Button 1</Button>
		<Button>Button 2</Button>
	</Grid>
</Window>
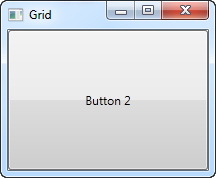
正如你所看到的,最后一个控件得到顶部位置,在这种情况下意味着你甚至看不到第一个按钮。不过,对于大多数情况来说,这并不是非常有用,所以让我们试着划分空间,这就是网格所能做到的。我们通过使用ColumnDefinitions和RowDefinitions.定义来实现这一点。在第一个例子中,我们将划分列:
<Window x:Class="WpfTutorialSamples.Panels.Grid"
        xmlns="http://schemas.microsoft.com/winfx/2006/xaml/presentation"
        xmlns:x="http://schemas.microsoft.com/winfx/2006/xaml"
        Title="Grid" Height="300" Width="300">
    <Grid>
		<Grid.ColumnDefinitions>
			<ColumnDefinition Width="*" />
			<ColumnDefinition Width="*" />
		</Grid.ColumnDefinitions>
		<Button>Button 1</Button>
		<Button Grid.Column="1">Button 2</Button>
	</Grid>
</Window>
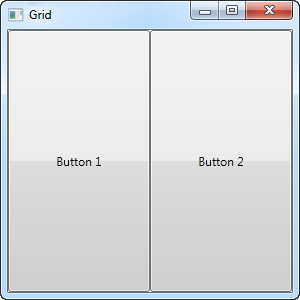
在这个示例中,我们简单地将可用空间划分为两列,它们将使用“星形宽度”(这将在后面解释)来平均共享空间。在第二个按钮上,我使用所谓的Attached属性将按钮放置在第二列中(0是第一列,1是第二列,依此类推)。我本来也可以在第一个按钮上使用这个属性,但是它会自动分配到第一列和第一行,这正是我们在这里想要的。
如您所见,控件占据了所有可用空间,这是网格排列其子控件时的默认行为。它通过在其子控件上设置水平对齐和垂直对齐来拉伸。
在某些情况下,您可能希望它们只占用它们所需的空间,和/或控制它们如何放置在网格中。最简单的方法是直接在希望操作的控件上设置水平对齐和垂直对齐。下面是上面例子的修改版本:
<Window x:Class="WpfTutorialSamples.Panels.Grid"
        xmlns="http://schemas.microsoft.com/winfx/2006/xaml/presentation"
        xmlns:x="http://schemas.microsoft.com/winfx/2006/xaml"
        Title="Grid" Height="300" Width="300">
    <Grid>
		<Grid.ColumnDefinitions>
			<ColumnDefinition Width="*" />
			<ColumnDefinition Width="*" />
		</Grid.ColumnDefinitions>
		<Button VerticalAlignment="Top" HorizontalAlignment="Center">Button 1</Button>
		<Button Grid.Column="1" VerticalAlignment="Center" HorizontalAlignment="Right">Button 2</Button>
	</Grid>
</Window>
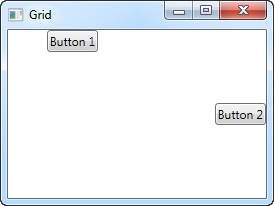
从结果屏幕截图中可以看到,第一个按钮现在位于顶部并居中。 第二个按钮位于中间,与右侧对齐。
小结
Grid是一个非常通用的面板,我们在这篇文章中看到了更多的可能性。我们将在接下来的几篇文章中挖掘它们的其余部分。