This article has been localized into Chinese by the community.
WPF上下文菜单
上下文菜单(通常称为弹出菜单或右键菜单)是在某些用户动作时显示的菜单,通常是在特定控件或窗口上用鼠标右键单击。 上下文菜单通常用于提供在单个控件内相关的功能。
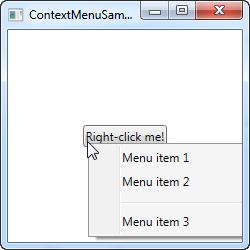
WPF带有ContextMenu控件。由于上下文菜单几乎总是绑定到一个特定的控件,通常我们也是通过这种方式将它添加到界面。这是通过ContextMenu属性(英文版中此处写的是ContextProperty,怀疑写错了)完成的,所有控件都对外暴露ContextMenu属性(该属性来自FrameworkElement类,而大多数WPF控件继承自该类)。看看下一个示例,了解它是怎么做的:
<Window x:Class="WpfTutorialSamples.Common_interface_controls.ContextMenuSample"
        xmlns="http://schemas.microsoft.com/winfx/2006/xaml/presentation"
        xmlns:x="http://schemas.microsoft.com/winfx/2006/xaml"
        Title="ContextMenuSample" Height="250" Width="250">
    <Grid>
        <Button Content="Right-click me!" VerticalAlignment="Center" HorizontalAlignment="Center">
            <Button.ContextMenu>
                <ContextMenu>
                    <MenuItem Header="Menu item 1" />
                    <MenuItem Header="Menu item 2" />
                    <Separator />
                    <MenuItem Header="Menu item 3" />
                </ContextMenu>
            </Button.ContextMenu>
        </Button>
    </Grid>
</Window>
如果您已经阅读了上个章节的常规菜单,您很快就会意识到ContextMenu的工作方式完全相同,不足为奇,因为它们都继承了MenuBase类。 就像我们在使用常规菜单的示例中看到的那样,您当然可以将Click事件添加到这些项目以便在用户单击它们时进行处理,但更适合使用WPF的方法是使用命令。
包含命令和图标的ContextMenu
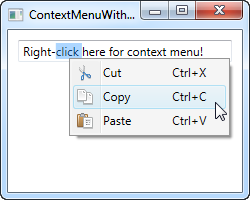
在下一个示例中,我将向您展示使用ContextMenu时的两个关键概念:使用WPF命令,它将为我们提供许多功能,包括Click事件处理程序,文本和快捷键文本,只需简单的设定Command属性。 我还将向您展示在ContextMenu项目上使用图标。 看一看:
<Window x:Class="WpfTutorialSamples.Common_interface_controls.ContextMenuWithCommandsSample"
        xmlns="http://schemas.microsoft.com/winfx/2006/xaml/presentation"
        xmlns:x="http://schemas.microsoft.com/winfx/2006/xaml"
        Title="ContextMenuWithCommandsSample" Height="200" Width="250">
    <StackPanel Margin="10">
        <TextBox Text="Right-click here for context menu!">
            <TextBox.ContextMenu>
                <ContextMenu>
                    <MenuItem Command="Cut">
                        <MenuItem.Icon>
                            <Image Source="/WpfTutorialSamples;component/Images/cut.png" />
                        </MenuItem.Icon>
                    </MenuItem>
                    <MenuItem Command="Copy">
                        <MenuItem.Icon>
                            <Image Source="/WpfTutorialSamples;component/Images/copy.png" />
                        </MenuItem.Icon>
                    </MenuItem>
                    <MenuItem Command="Paste">
                        <MenuItem.Icon>
                            <Image Source="/WpfTutorialSamples;component/Images/paste.png" />
                        </MenuItem.Icon>
                    </MenuItem>
                </ContextMenu>
            </TextBox.ContextMenu>
        </TextBox>
    </StackPanel>
</Window>
尝试运行该示例,通过为菜单项分配命令,看看我们可以免费获得多少功能。 还要注意在ContextMenu的菜单项上使用图标是多么简单。
从后台代码调用ContextMenu
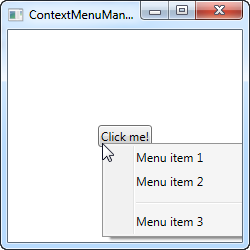
到目前为止,在右键单击它所属的控件时调用了ContextMenu。 当我们将它分配给ContextMenu属性时,WPF会自动为我们执行此操作。 但是,在某些情况下,您可能希望从代码中手动调用它。 这也很容易,让我们用第一个例子来演示它:
<Window x:Class="WpfTutorialSamples.Common_interface_controls.ContextMenuManuallyInvokedSample"
        xmlns="http://schemas.microsoft.com/winfx/2006/xaml/presentation"
        xmlns:x="http://schemas.microsoft.com/winfx/2006/xaml"
        Title="ContextMenuManuallyInvokedSample" Height="250" Width="250">
    <Window.Resources>
        <ContextMenu x:Key="cmButton">
            <MenuItem Header="Menu item 1" />
            <MenuItem Header="Menu item 2" />
            <Separator />
            <MenuItem Header="Menu item 3" />
        </ContextMenu>
    </Window.Resources>
    <Grid>
        <Button Content="Click me!" VerticalAlignment="Center" HorizontalAlignment="Center" Click="Button_Click" />
    </Grid>
</Window>
using System;
using System.Windows;
using System.Windows.Controls;
namespace WpfTutorialSamples.Common_interface_controls
{
public partial class ContextMenuManuallyInvokedSample : Window
{
public ContextMenuManuallyInvokedSample()
{
InitializeComponent();
}
private void Button_Click(object sender, RoutedEventArgs e)
{
ContextMenu cm = this.FindResource("cmButton") as ContextMenu;
cm.PlacementTarget = sender as Button;
cm.IsOpen = true;
}
}
}
你应该注意的我已经将ContextMenu从按钮移开了。 做为代替,我已将其添加为Window的资源,以使其可以在Window中的所有位置使用。 这使我们在需要显示它时容易找到。
Button现在有一个Click事件处理程序,我在后台代码中处理它。 在那里,我只是在窗口资源中找到ContextMenu实例然后我做两件事:我设置它的PlacementTarget属性,它告诉WPF它应该根据哪个元素计算位置,然后我将IsOpen设置为true打开菜单。 这就是你需要做的!