This article has been localized into Chinese by the community.
ItemsControl
WPF具有多种用于显示数据列表的控件。它们有多种形状和形式,并且它们的复杂程度和它们为您执行的工作量各不相同。最简单的变体是ItemsControl,它几乎只是一个基于标记的循环 - 你需要应用所有的样式和模板,但在很多情况下,这正是你需要的。
一個簡單的ItemsControl範例
首先讓我們用一個手動填入項目(items)的方法作簡單的範例, 它會告訴你ItemsControl是多麼的簡單
<Window x:Class="WpfTutorialSamples.ItemsControl.ItemsControlSample"
        xmlns="http://schemas.microsoft.com/winfx/2006/xaml/presentation"
        xmlns:x="http://schemas.microsoft.com/winfx/2006/xaml"
		xmlns:system="clr-namespace:System;assembly=mscorlib"
        Title="ItemsControlSample" Height="150" Width="200">
    <Grid Margin="10">
		<ItemsControl>
			<system:String>ItemsControl Item #1</system:String>
			<system:String>ItemsControl Item #2</system:String>
			<system:String>ItemsControl Item #3</system:String>
			<system:String>ItemsControl Item #4</system:String>
			<system:String>ItemsControl Item #5</system:String>
		</ItemsControl>
	</Grid>
</Window>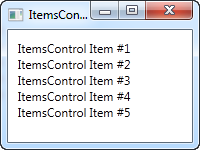
正如您所看到的,没有任何内容表明我们使用控件来重复项目而不是仅仅手动添加项目。 5个TextBlock控件 - 默认情况下,ItemsControl完全没有外观。如果你点击其中一个项目,没有任何反应,因为没有选定项目的概念或类似的东西。
有数据绑定的ItemsControl
當然ItemsControl並不是像前一個例子一樣逐一輸入, 而更像是其他WPF中的控件一樣做data binding, 這裡我們使用template來定義隱藏在類別的程式碼將會如何呈現。
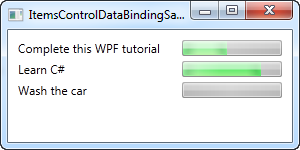
为了证明这一点,我举了一个例子,我们向用户显示了一个TODO列表,并向您展示了一旦定义自己的模板后所有内容的灵活性,我使用了ProgressBar控件来向您显示当前的完成情况百分比。首先是一些代码,然后是截图,然后是对它的解释:
<Window x:Class="WpfTutorialSamples.ItemsControl.ItemsControlDataBindingSample"
        xmlns="http://schemas.microsoft.com/winfx/2006/xaml/presentation"
        xmlns:x="http://schemas.microsoft.com/winfx/2006/xaml"
        Title="ItemsControlDataBindingSample" Height="150" Width="300">
    <Grid Margin="10">
		<ItemsControl Name="icTodoList">
			<ItemsControl.ItemTemplate>
				<DataTemplate>
					<Grid Margin="0,0,0,5">
						<Grid.ColumnDefinitions>
							<ColumnDefinition Width="*" />
							<ColumnDefinition Width="100" />
						</Grid.ColumnDefinitions>
						<TextBlock Text="{Binding Title}" />
						<ProgressBar Grid.Column="1" Minimum="0" Maximum="100" Value="{Binding Completion}" />
					</Grid>
				</DataTemplate>
			</ItemsControl.ItemTemplate>
		</ItemsControl>
	</Grid>
</Window>
using System;
using System.Windows;
using System.Collections.Generic;
namespace WpfTutorialSamples.ItemsControl
{
public partial class ItemsControlDataBindingSample : Window
{
public ItemsControlDataBindingSample()
{
InitializeComponent();
List<TodoItem> items = new List<TodoItem>();
items.Add(new TodoItem() { Title = "Complete this WPF tutorial", Completion = 45 });
items.Add(new TodoItem() { Title = "Learn C#", Completion = 80 });
items.Add(new TodoItem() { Title = "Wash the car", Completion = 0 });
icTodoList.ItemsSource = items;
}
}
public class TodoItem
{
public string Title { get; set; }
public int Completion { get; set; }
}
}
此示例中最重要的部分是我们在ItemsControl内部指定的模板,使用ItemsControl.ItemTemplate内部的DataTemplate标记。我们添加一个Grid面板,以获得两列:第一列我们有一个TextBlock,它将显示TODO项的标题,在第二列中我们有一个ProgressBar控件,我们绑定到Completion属性的值。
模板现在代表一个TodoItem,我们在Code-behind文件中声明,我们还在其中实例化它们并将它们添加到列表中。最后,这个列表被分配给ItemsControl的ItemsSource属性,然后为我们完成剩下的工作。列表中的每个项目都使用我们的模板显示,您可以从生成的屏幕截图中看到。
ItemsPanelTemplate属性
在上面的示例中,所有项目都是从上到下呈现,每个项目占据整行。发生这种情况是因为ItemsControl默认情况下将所有项抛出到垂直对齐的StackPanel中。尽管如此,它很容易改变,因为ItemsControl允许您更改用于保存所有项目的面板类型。这是一个例子:
<Window x:Class="WpfTutorialSamples.ItemsControl.ItemsControlPanelSample"
        xmlns="http://schemas.microsoft.com/winfx/2006/xaml/presentation"
        xmlns:x="http://schemas.microsoft.com/winfx/2006/xaml"
		xmlns:system="clr-namespace:System;assembly=mscorlib"
        Title="ItemsControlPanelSample" Height="150" Width="250">
	<Grid Margin="10">
		<ItemsControl>
			<ItemsControl.ItemsPanel>
				<ItemsPanelTemplate>
					<WrapPanel />
				</ItemsPanelTemplate>
			</ItemsControl.ItemsPanel>
			<ItemsControl.ItemTemplate>
				<DataTemplate>
					<Button Content="{Binding}" Margin="0,0,5,5" />
				</DataTemplate>
			</ItemsControl.ItemTemplate>
			<system:String>Item #1</system:String>
			<system:String>Item #2</system:String>
			<system:String>Item #3</system:String>
			<system:String>Item #4</system:String>
			<system:String>Item #5</system:String>
		</ItemsControl>
	</Grid>
</Window>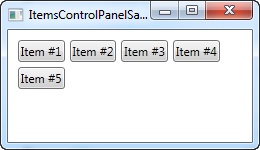
我们指定ItemsControl应该使用WrapPanel作为其模板,方法是在ItemsPanelTemplate属性中声明一个,只是为了好玩,我们引入一个ItemTemplate,使字符串呈现为按钮。您可以使用任何WPF面板,但有些面板比其他面板更有用。
另一个很好的例子是UniformGrid面板,我们可以在其中定义多个列,然后将我们的项目整齐地显示在同样宽的列中:
<Window x:Class="WpfTutorialSamples.ItemsControl.ItemsControlPanelSample"
        xmlns="http://schemas.microsoft.com/winfx/2006/xaml/presentation"
        xmlns:x="http://schemas.microsoft.com/winfx/2006/xaml"
		xmlns:system="clr-namespace:System;assembly=mscorlib"
        Title="ItemsControlPanelSample" Height="150" Width="250">
	<Grid Margin="10">
		<ItemsControl>
			<ItemsControl.ItemsPanel>
				<ItemsPanelTemplate>
					<UniformGrid Columns="2" />
				</ItemsPanelTemplate>
			</ItemsControl.ItemsPanel>
			<ItemsControl.ItemTemplate>
				<DataTemplate>
					<Button Content="{Binding}" Margin="0,0,5,5" />
				</DataTemplate>
			</ItemsControl.ItemTemplate>
			<system:String>Item #1</system:String>
			<system:String>Item #2</system:String>
			<system:String>Item #3</system:String>
			<system:String>Item #4</system:String>
			<system:String>Item #5</system:String>
		</ItemsControl>
	</Grid>
</Window>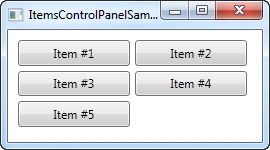
带滚动条的ItemsControl
一旦你开始使用ItemsControl,你可能会遇到一个非常常见的问题:默认情况下,ItemsControl没有任何滚动条,这意味着如果内容不适合,它只是被剪裁。通过本文中的第一个示例并调整窗口大小可以看出这一点:
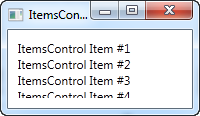
这个问题在WPF中很容易解决。有一些可行的解决方案,比如你可以改变ItemsControl的模板,使其包含一个ScrollViewer来引入滚动功能。但最简单的方法是将ItemsControl放置在一个ScrollViewer中。这是一个例子:
<Window x:Class="WpfTutorialSamples.ItemsControl.ItemsControlSample"
        xmlns="http://schemas.microsoft.com/winfx/2006/xaml/presentation"
        xmlns:x="http://schemas.microsoft.com/winfx/2006/xaml"
		xmlns:system="clr-namespace:System;assembly=mscorlib"
        Title="ItemsControlSample" Height="150" Width="200">
	<Grid Margin="10">
		<ScrollViewer VerticalScrollBarVisibility="Auto" HorizontalScrollBarVisibility="Auto">
			<ItemsControl>
				<system:String>ItemsControl Item #1</system:String>
				<system:String>ItemsControl Item #2</system:String>
				<system:String>ItemsControl Item #3</system:String>
				<system:String>ItemsControl Item #4</system:String>
				<system:String>ItemsControl Item #5</system:String>
			</ItemsControl>
		</ScrollViewer>
	</Grid>
</Window>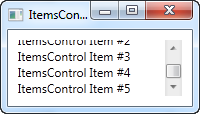
我将两个可见性选项设置为“自动”,以使它们仅在需要时可见。从屏幕截图中可以看到,您现在可以滚动项目列表。
小结
当您想要完全控制数据的显示方式,以及何时不需要任何内容可供选择时,ItemsControl非常棒。如果您希望用户能够从列表中选择项目,那么您最好使用其他控件之一,例如: ListBox或ListView。它们将在后面的章节中描述。