The community is working on translating this tutorial into isiZulu, but it seems that no one has started the translation process for this article yet. If you can help us, then please click "More info".
The WPF ContextMenu
A context menu, often referred to as a popup or pop-up menu, is a menu which is shown upon certain user actions, usually a right-click with the mouse on a specific control or window. Contextual menus are often used to offer functionality that's relevant within a single control.
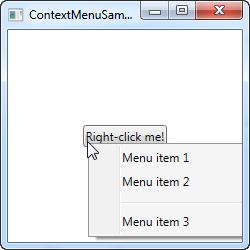
WPF comes with a ContextMenu control and because it's almost always tied to a specific control, that's also usually how you add it to the interface. This is done through the ContextProperty, which all controls exposes (it comes from the FrameworkElement which most WPF controls inherits from). Consider the next example to see how it's done:
<Window x:Class="WpfTutorialSamples.Common_interface_controls.ContextMenuSample"
        xmlns="http://schemas.microsoft.com/winfx/2006/xaml/presentation"
        xmlns:x="http://schemas.microsoft.com/winfx/2006/xaml"
        Title="ContextMenuSample" Height="250" Width="250">
    <Grid>
        <Button Content="Right-click me!" VerticalAlignment="Center" HorizontalAlignment="Center">
            <Button.ContextMenu>
                <ContextMenu>
                    <MenuItem Header="Menu item 1" />
                    <MenuItem Header="Menu item 2" />
                    <Separator />
                    <MenuItem Header="Menu item 3" />
                </ContextMenu>
            </Button.ContextMenu>
        </Button>
    </Grid>
</Window>
If you've already read the chapter on the regular menu, you will soon realize that the ContextMenu works exactly the same way, and no wonder, since they both inherit the MenuBase class. Just like we saw in the examples on using the regular Menu, you can of course add Click events to these items to handle when the user clicks on them, but a more WPF-suitable way is to use Commands.
ContextMenu with Commands and icons
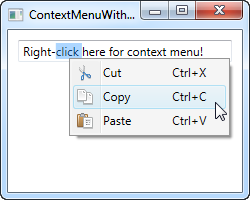
In this next example, I'm going to show you two key concepts when using the ContextMenu: The usage of WPF Commands, which will provide us with lots of functionality including a Click event handler, a text and a shortcut text, simply by assigning something to the Command property. I will also show you to use icons on your ContextMenu items. Have a look:
<Window x:Class="WpfTutorialSamples.Common_interface_controls.ContextMenuWithCommandsSample"
        xmlns="http://schemas.microsoft.com/winfx/2006/xaml/presentation"
        xmlns:x="http://schemas.microsoft.com/winfx/2006/xaml"
        Title="ContextMenuWithCommandsSample" Height="200" Width="250">
    <StackPanel Margin="10">
        <TextBox Text="Right-click here for context menu!">
            <TextBox.ContextMenu>
                <ContextMenu>
                    <MenuItem Command="Cut">
                        <MenuItem.Icon>
                            <Image Source="/WpfTutorialSamples;component/Images/cut.png" />
                        </MenuItem.Icon>
                    </MenuItem>
                    <MenuItem Command="Copy">
                        <MenuItem.Icon>
                            <Image Source="/WpfTutorialSamples;component/Images/copy.png" />
                        </MenuItem.Icon>
                    </MenuItem>
                    <MenuItem Command="Paste">
                        <MenuItem.Icon>
                            <Image Source="/WpfTutorialSamples;component/Images/paste.png" />
                        </MenuItem.Icon>
                    </MenuItem>
                </ContextMenu>
            </TextBox.ContextMenu>
        </TextBox>
    </StackPanel>
</Window>
Try running the example and see for yourself how much functionality we get for free by assigning commands to the items. Also notice how fairly simple it is to use icons on the menu items of the ContextMenu.
Invoke ContextMenu from Code-behind
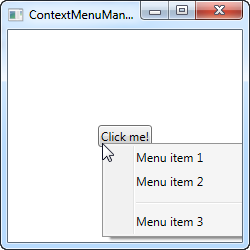
So far, the ContextMenu has been invoked when right-clicking on the control to which it belongs. WPF does this for us automatically, when we assign it to the ContextMenu property. However, in some situations, you might very well want to invoke it manually from code. This is pretty easy as well, so let's re-use the first example to demonstrate it with:
<Window x:Class="WpfTutorialSamples.Common_interface_controls.ContextMenuManuallyInvokedSample"
        xmlns="http://schemas.microsoft.com/winfx/2006/xaml/presentation"
        xmlns:x="http://schemas.microsoft.com/winfx/2006/xaml"
        Title="ContextMenuManuallyInvokedSample" Height="250" Width="250">
    <Window.Resources>
        <ContextMenu x:Key="cmButton">
            <MenuItem Header="Menu item 1" />
            <MenuItem Header="Menu item 2" />
            <Separator />
            <MenuItem Header="Menu item 3" />
        </ContextMenu>
    </Window.Resources>
    <Grid>
        <Button Content="Click me!" VerticalAlignment="Center" HorizontalAlignment="Center" Click="Button_Click" />
    </Grid>
</Window>
using System;
using System.Windows;
using System.Windows.Controls;
namespace WpfTutorialSamples.Common_interface_controls
{
public partial class ContextMenuManuallyInvokedSample : Window
{
public ContextMenuManuallyInvokedSample()
{
InitializeComponent();
}
private void Button_Click(object sender, RoutedEventArgs e)
{
ContextMenu cm = this.FindResource("cmButton") as ContextMenu;
cm.PlacementTarget = sender as Button;
cm.IsOpen = true;
}
}
}
The first thing you should notice is that I've moved the ContextMenu away from the button. Instead, I've added it as a resource of the Window, to make it available from all everywhere within the Window. This also makes it a lot easier to find when we need to show it.
The Button now has a Click event handler, which I handle in Code-behind. From there, I simply find the ContextMenu instance within the window resources and then I do two things: I set it's PlacementTarget property, which tells WPF which element it should calculate the position based on, and then I set the IsOpen to true, to open the menu. That's all you need!