The community is working on translating this tutorial into Afrikaans, but it seems that no one has started the translation process for this article yet. If you can help us, then please click "More info".
Resources
WPF introduces a very handy concept: The ability to store data as a resource, either locally for a control, locally for the entire window or globally for the entire application. The data can be pretty much whatever you want, from actual information to a hierarchy of WPF controls. This allows you to place data in one place and then use it from or several other places, which is very useful.
The concept is used a lot for styles and templates, which we'll discuss later on in this tutorial, but as it will be illustrated in this chapter, you can use it for many other things as well. Allow me to demonstrate it with a simple example:
<Window x:Class="WpfTutorialSamples.WPF_Application.ResourceSample"
        xmlns="http://schemas.microsoft.com/winfx/2006/xaml/presentation"
        xmlns:x="http://schemas.microsoft.com/winfx/2006/xaml"
        xmlns:sys="clr-namespace:System;assembly=mscorlib"
        Title="ResourceSample" Height="150" Width="350">
    <Window.Resources>
        <sys:String x:Key="strHelloWorld">Hello, world!</sys:String>
    </Window.Resources>
    <StackPanel Margin="10">
        <TextBlock Text="{StaticResource strHelloWorld}" FontSize="56" />
        <TextBlock>Just another "<TextBlock Text="{StaticResource strHelloWorld}" />" example, but with resources!</TextBlock>
    </StackPanel>
</Window>
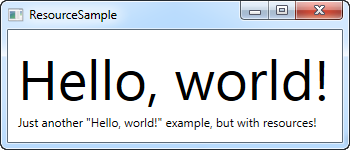
Resources are given a key, using the x:Key attribute, which allows you to reference it from other parts of the application by using this key, in combination with the StaticResource markup extension. In this example, I just store a simple string, which I then use from two different TextBlock controls.
StaticResource vs. DynamicResource
In the examples so far, I have used the StaticResource markup extension to reference a resource. However, an alternative exists, in form of the DynamicResource.
The main difference is that a static resource is resolved only once, which is at the point where the XAML is loaded. If the resource is then changed later on, this change will not be reflected where you have used the StaticResource.
A DynamicResource on the other hand, is resolved once it's actually needed, and then again if the resource changes. Think of it as binding to a static value vs. binding to a function that monitors this value and sends it to you each time it's changed - it's not exactly how it works, but it should give you a better idea of when to use what. Dynamic resources also allows you to use resources which are not even there during design time, e.g. if you add them from Code-behind during the startup of the application.
More resource types
Sharing a simple string was easy, but you can do much more. In the next example, I'll also store a complete array of strings, along with a gradient brush to be used for the background. This should give you a pretty good idea of just how much you can do with resources:
<Window x:Class="WpfTutorialSamples.WPF_Application.ExtendedResourceSample"
        xmlns="http://schemas.microsoft.com/winfx/2006/xaml/presentation"
        xmlns:x="http://schemas.microsoft.com/winfx/2006/xaml"
        xmlns:sys="clr-namespace:System;assembly=mscorlib"
        Title="ExtendedResourceSample" Height="160" Width="300"
        Background="{DynamicResource WindowBackgroundBrush}">
    <Window.Resources>
        <sys:String x:Key="ComboBoxTitle">Items:</sys:String>

        <x:Array x:Key="ComboBoxItems" Type="sys:String">
            <sys:String>Item #1</sys:String>
            <sys:String>Item #2</sys:String>
            <sys:String>Item #3</sys:String>
        </x:Array>

        <LinearGradientBrush x:Key="WindowBackgroundBrush">
            <GradientStop Offset="0" Color="Silver"/>
            <GradientStop Offset="1" Color="Gray"/>
        </LinearGradientBrush>
    </Window.Resources>
    <StackPanel Margin="10">
        <Label Content="{StaticResource ComboBoxTitle}" />
        <ComboBox ItemsSource="{StaticResource ComboBoxItems}" />
    </StackPanel>
</Window>
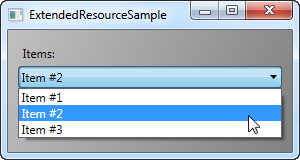
This time, we've added a couple of extra resources, so that our Window now contains a simple string, an array of strings and a LinearGradientBrush. The string is used for the label, the array of strings is used as items for the ComboBox control and the gradient brush is used as background for the entire window. So, as you can see, pretty much anything can be stored as a resource.
Local and application wide resources
For now, we have stored resources on a window-level, which means that you can access them from all over the window.
If you only need a given resource for a specific control, you can make it more local by adding it to this specific control, instead of the window. It works exactly the same way, the only difference being that you can now only access from inside the scope of the control where you put it:
<StackPanel Margin="10">
    <StackPanel.Resources>
        <sys:String x:Key="ComboBoxTitle">Items:</sys:String>
    </StackPanel.Resources>
    <Label Content="{StaticResource ComboBoxTitle}" />
</StackPanel>
In this case, we add the resource to the StackPanel and then use it from its child control, the Label. Other controls inside of the StackPanel could have used it as well, just like children of these child controls would have been able to access it. Controls outside of this particular StackPanel wouldn't have access to it, though.
If you need the ability to access the resource from several windows, this is possible as well. The App.xaml file can contain resources just like the window and any kind of WPF control, and when you store them in App.xaml, they are globally accessible in all of windows and user controls of the project. It works exactly the same way as when storing and using from a Window:
<Application x:Class="WpfTutorialSamples.App"
             xmlns="http://schemas.microsoft.com/winfx/2006/xaml/presentation"
             xmlns:x="http://schemas.microsoft.com/winfx/2006/xaml"
             xmlns:sys="clr-namespace:System;assembly=mscorlib"
             StartupUri="WPF application/ExtendedResourceSample.xaml">
    <Application.Resources>
        <sys:String x:Key="ComboBoxTitle">Items:</sys:String>
    </Application.Resources>
</Application>
Using it is also the same - WPF will automatically go up the scope, from the local control to the window and then to App.xaml, to find a given resource:
<Label Content="{StaticResource ComboBoxTitle}" />Resources from Code-behind
So far, we've accessed all of our resources directly from XAML, using a markup extension. However, you can of course access your resources from Code-behind as well, which can be useful in several situations. In the previous example, we saw how we could store resources in several different places, so in this example, we'll be accessing three different resources from Code-behind, each stored in a different scope:
App.xaml:
<Application x:Class="WpfTutorialSamples.App"
             xmlns="http://schemas.microsoft.com/winfx/2006/xaml/presentation"
             xmlns:x="http://schemas.microsoft.com/winfx/2006/xaml"
             xmlns:sys="clr-namespace:System;assembly=mscorlib"
             StartupUri="WPF application/ResourcesFromCodeBehindSample.xaml">
    <Application.Resources>
        <sys:String x:Key="strApp">Hello, Application world!</sys:String>
    </Application.Resources>
</Application>
Window:
<Window x:Class="WpfTutorialSamples.WPF_Application.ResourcesFromCodeBehindSample"
        xmlns="http://schemas.microsoft.com/winfx/2006/xaml/presentation"
        xmlns:x="http://schemas.microsoft.com/winfx/2006/xaml"
        xmlns:sys="clr-namespace:System;assembly=mscorlib"
        Title="ResourcesFromCodeBehindSample" Height="175" Width="250">
    <Window.Resources>
        <sys:String x:Key="strWindow">Hello, Window world!</sys:String>
    </Window.Resources>
    <DockPanel Margin="10" Name="pnlMain">
        <DockPanel.Resources>
            <sys:String x:Key="strPanel">Hello, Panel world!</sys:String>
        </DockPanel.Resources>

        <WrapPanel DockPanel.Dock="Top" HorizontalAlignment="Center" Margin="10">
            <Button Name="btnClickMe" Click="btnClickMe_Click">Click me!</Button>
        </WrapPanel>

        <ListBox Name="lbResult" />
    </DockPanel>
</Window>
Code-behind:
using System;
using System.Windows;

namespace WpfTutorialSamples.WPF_Application
{
	public partial class ResourcesFromCodeBehindSample : Window
	{
		public ResourcesFromCodeBehindSample()
		{
			InitializeComponent();
		}

		private void btnClickMe_Click(object sender, RoutedEventArgs e)
		{
			lbResult.Items.Add(pnlMain.FindResource("strPanel").ToString());
			lbResult.Items.Add(this.FindResource("strWindow").ToString());
			lbResult.Items.Add(Application.Current.FindResource("strApp").ToString());
		}
	}
}
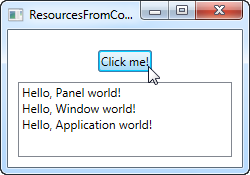
So, as you can see, we store three different "Hello, world!" messages: One in App.xaml, one inside the window, and one locally for the main panel. The interface consists of a button and a ListBox.
In Code-behind, we handle the click event of the button, in which we add each of the text strings to the ListBox, as seen on the screenshot. We use the FindResource() method, which will return the resource as an object (if found), and then we turn it into the string that we know it is by using the ToString() method.
Notice how we use the FindResource() method on different scopes - first on the panel, then on the window and then on the current Application object. It makes sense to look for the resource where we know it is, but as already mentioned, if a resource is not found, the search progresses up the hierarchy, so in principal, we could have used the FindResource() method on the panel in all three cases, since it would have continued up to the window and later on up to the application level, if not found.
The same is not true the other way around - the search doesn't navigate down the tree, so you can't start looking for a resource on the application level, if it has been defined locally for the control or for the window.