The community is working on translating this tutorial into Greek, but it seems that no one has started the translation process for this article yet. If you can help us, then please click "More info".
Using WPF commands
In the previous article, we discussed a lot of theory about what commands are and how they work. In this chapter, we'll look into how you actually use commands, by assigning them to user interface elements and creating command bindings that links it all together.
We'll start off with a very simple example:
<Window x:Class="WpfTutorialSamples.Commands.UsingCommandsSample"
        xmlns="http://schemas.microsoft.com/winfx/2006/xaml/presentation"
        xmlns:x="http://schemas.microsoft.com/winfx/2006/xaml"
        Title="UsingCommandsSample" Height="100" Width="200">
    <Window.CommandBindings>
        <CommandBinding Command="ApplicationCommands.New" Executed="NewCommand_Executed" CanExecute="NewCommand_CanExecute" />
    </Window.CommandBindings>

    <StackPanel HorizontalAlignment="Center" VerticalAlignment="Center">
        <Button Command="ApplicationCommands.New">New</Button>
    </StackPanel>
</Window>
using System;
using System.Collections.Generic;
using System.Windows;
using System.Windows.Input;
namespace WpfTutorialSamples.Commands
{
public partial class UsingCommandsSample : Window
{
public UsingCommandsSample()
{
InitializeComponent();
}
private void NewCommand_CanExecute(object sender, CanExecuteRoutedEventArgs e)
{
e.CanExecute = true;
}
private void NewCommand_Executed(object sender, ExecutedRoutedEventArgs e)
{
MessageBox.Show("The New command was invoked");
}
}
}
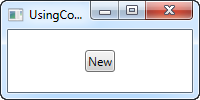
We define a command binding on the Window, by adding it to its CommandBindings collection. We specify that Command that we wish to use (the New command from the ApplicationCommands), as well as two event handlers. The visual interface consists of a single button, which we attach the command to using the Command property.
In Code-behind, we handle the two events. The CanExecute handler, which WPF will call when the application is idle to see if the specific command is currently available, is very simple for this example, as we want this particular command to be available all the time. This is done by setting the CanExecute property of the event arguments to true.
The Executed handler simply shows a message box when the command is invoked. If you run the sample and press the button, you will see this message. A thing to notice is that this command has a default keyboard shortcut defined, which you get as an added bonus. Instead of clicking the button, you can try to press Ctrl+N on your keyboard - the result is the same.
Using the CanExecute method
In the first example, we implemented a CanExecute event that simply returned true, so that the button would be available all the time. However, this is of course not true for all buttons - in many cases, you want the button to be enabled or disabled depending on some sort of state in your application.
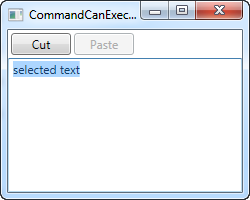
A very common example of this is the toggling of buttons for using the Windows Clipboard, where you want the Cut and Copy buttons to be enabled only when text is selected, and the Paste button to only be enabled when text is present in the clipboard. This is exactly what we'll accomplish in this example:
<Window x:Class="WpfTutorialSamples.Commands.CommandCanExecuteSample"
        xmlns="http://schemas.microsoft.com/winfx/2006/xaml/presentation"
        xmlns:x="http://schemas.microsoft.com/winfx/2006/xaml"
        Title="CommandCanExecuteSample" Height="200" Width="250">
    <Window.CommandBindings>
        <CommandBinding Command="ApplicationCommands.Cut" CanExecute="CutCommand_CanExecute" Executed="CutCommand_Executed" />
        <CommandBinding Command="ApplicationCommands.Paste" CanExecute="PasteCommand_CanExecute" Executed="PasteCommand_Executed" />
    </Window.CommandBindings>
    <DockPanel>
        <WrapPanel DockPanel.Dock="Top" Margin="3">
            <Button Command="ApplicationCommands.Cut" Width="60">_Cut</Button>
            <Button Command="ApplicationCommands.Paste" Width="60" Margin="3,0">_Paste</Button>
        </WrapPanel>
        <TextBox AcceptsReturn="True" Name="txtEditor" />
    </DockPanel>
</Window>
using System;
using System.Collections.Generic;
using System.Windows;
using System.Windows.Input;
namespace WpfTutorialSamples.Commands
{
public partial class CommandCanExecuteSample : Window
{
public CommandCanExecuteSample()
{
InitializeComponent();
}
private void CutCommand_CanExecute(object sender, CanExecuteRoutedEventArgs e)
{
e.CanExecute = (txtEditor != null) && (txtEditor.SelectionLength > 0);
}
private void CutCommand_Executed(object sender, ExecutedRoutedEventArgs e)
{
txtEditor.Cut();
}
private void PasteCommand_CanExecute(object sender, CanExecuteRoutedEventArgs e)
{
e.CanExecute = Clipboard.ContainsText();
}
private void PasteCommand_Executed(object sender, ExecutedRoutedEventArgs e)
{
txtEditor.Paste();
}
}
}
So, we have this very simple interface with a couple of buttons and a TextBox control. The first button will cut to the clipboard and the second one will paste from it.
In Code-behind, we have two events for each button: One that performs the actual action, which name ends with _Executed, and then the CanExecute events. In each of them, you will see that I apply some logic to decide whether or not the action can be executed and then assign it to the return value CanExecute on the EventArgs.
The cool thing about this is that you don't have to call these methods to have your buttons updated - WPF does it automatically when the application has an idle moment, making sure that you interface remains updated all the time.
Default command behavior and CommandTarget
As we saw in the previous example, handling a set of commands can lead to quite a bit of code, with a lot of being method declarations and very standard logic. That's probably why the WPF team decided to handle some it for you. In fact, we could have avoided all of the Code-behind in the previous example, because a WPF TextBox can automatically handle common commands like Cut, Copy, Paste, Undo and Redo.
WPF does this by handling the Executed and CanExecute events for you, when a text input control like the TextBox has focus. You are free to override these events, which is basically what we did in the previous example, but if you just want the basic behavior, you can let WPF connect the commands and the TextBox control and do the work for you. Just see how much simpler this example is:
<Window x:Class="WpfTutorialSamples.Commands.CommandsWithCommandTargetSample"
        xmlns="http://schemas.microsoft.com/winfx/2006/xaml/presentation"
        xmlns:x="http://schemas.microsoft.com/winfx/2006/xaml"
        Title="CommandsWithCommandTargetSample" Height="200" Width="250">
    <DockPanel>
        <WrapPanel DockPanel.Dock="Top" Margin="3">
            <Button Command="ApplicationCommands.Cut" CommandTarget="{Binding ElementName=txtEditor}" Width="60">_Cut</Button>
            <Button Command="ApplicationCommands.Paste" CommandTarget="{Binding ElementName=txtEditor}" Width="60" Margin="3,0">_Paste</Button>
        </WrapPanel>
        <TextBox AcceptsReturn="True" Name="txtEditor" />
    </DockPanel>
</Window>
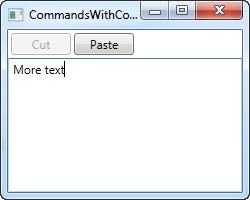
No Code-behind code needed for this example - WPF deals with all of it for us, but only because we want to use these specific commands for this specific control. The TextBox does the work for us.
Notice how I use the CommandTarget properties on the buttons, to bind the commands to our TextBox control. This is required in this particular example, because the WrapPanel doesn't handle focus the same way e.g. a Toolbar or a Menu would, but it also makes pretty good sense to give the commands a target.
Summary
Dealing with commands is pretty straight forward, but does involve a bit extra markup and code. The reward is especially obvious when you need to invoke the same action from multiple places though, or when you use built-in commands that WPF can handle completely for you, as we saw in the last example.