This article is currently in the process of being translated into Japanese (~2% done).
The WPF Menu control
メニューといえば、Windowsのアプリケーションで一番良く見かける要素の一つで、一つのアプリに一つしかないことから、メインメニューと呼ばれることもあります。 メニューは小スペースでいろいろな項目にアクセスできます。マイクロソフトはリボンメニューをリプレイスメントとして推しているようですが、古いメニューやツールバーはたしかに開発者の良い引き出しとしてその地位を維持しています。
WPFはメニューを作るのに十分なコントロールを含んだ状態でリリースされました。その名前はMenuです(そのまま)。Menuにはとても簡単にアイテムを追加でき、MenuItemを追加するだけで、それぞれのMenuItemが子アイテムのスペースを持てます。これにより、よく見かけるWindowsアプリみたいに階層化されたメニューを作ることができるというわけです。 まずは、Menuが使われている例を見てみましょう。
<Window x:Class="WpfTutorialSamples.Common_interface_controls.MenuSample"
        xmlns="http://schemas.microsoft.com/winfx/2006/xaml/presentation"
        xmlns:x="http://schemas.microsoft.com/winfx/2006/xaml"
        Title="MenuSample" Height="200" Width="200">
    <DockPanel>
        <Menu DockPanel.Dock="Top">
            <MenuItem Header="_File">
                <MenuItem Header="_New" />
                <MenuItem Header="_Open" />
                <MenuItem Header="_Save" />
                <Separator />
                <MenuItem Header="_Exit" />
            </MenuItem>
        </Menu>
        <TextBox AcceptsReturn="True" />
    </DockPanel>
</Window>
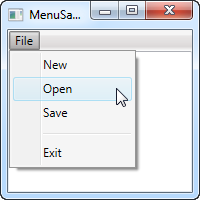
よくあるWindowsアプリのように、メニューがウィンドウ上部に張り付いています。ですが、WPFが持つ柔軟性のお陰でメニューが好きなところに設置出来ますし、幅と高さも好きなように変更することができます。
四つの子アイテムとセパレータを持った最上位のメニューアイテムを定義してみました。Headerプロパティを使ってアイテムのラベルを変更していますが、注目すべきはそれぞれのラベルの最初の文字の前にあるアンダースコアです。このアンダースコアはWPFにその文字をアクセラレータキーとして使うことを伝えています。アクセラレータキーは、Altキーを押してからそのキーを押すと、メニューアイテムにアクセスできるような機能を持ちます。 これは最上位のアイテムから下の階層まで、すべてにおいて機能します。この例では、Altキーを押してから、F、Nの順に押すとNewアイテムにアクセスできます。
アイコンとチェックボックス
さて、メニューアイテムがもつ一般的な機能といえば、何を思い浮かべるでしょうか? 大体の人はアイコンとチェックボックスを思い浮かべると思います。 アイコンはメニューアイテムとその機能を認識するのに便利ですし、チェックボックスは特定の機能のオンオフを切り替えるのに使えます。WPFのMenuItemはそのどちらもサポートしていて、非常に簡単に扱うことができます。以下が例です:
<Window x:Class="WpfTutorialSamples.Common_interface_controls.MenuIconCheckableSample"
        xmlns="http://schemas.microsoft.com/winfx/2006/xaml/presentation"
        xmlns:x="http://schemas.microsoft.com/winfx/2006/xaml"
        Title="MenuIconCheckableSample" Height="150" Width="300">
    <DockPanel>
        <Menu DockPanel.Dock="Top">
            <MenuItem Header="_File">
                <MenuItem Header="_Exit" />
            </MenuItem>
            <MenuItem Header="_Tools">
                <MenuItem Header="_Manage users">
                    <MenuItem.Icon>
                        <Image Source="/WpfTutorialSamples;component/Images/user.png" />
                    </MenuItem.Icon>
                </MenuItem>
                <MenuItem Header="_Show groups" IsCheckable="True" IsChecked="True" />
            </MenuItem>
        </Menu>
        <TextBox AcceptsReturn="True" />
    </DockPanel>
</Window>
For this example I've created a secondary top-level item, where I've added two items: One with an icon defined, using the Icon property with a standard Image control inside of it, and one where we use the IsCheckable property to allow the user to check and uncheck the item. I even used the IsChecked property to have it checked by default. From Code-behind, this is the same property that you can read to know whether a given menu item is checked or not.
クリックを処理する
When the user clicks on a menu item, you will usually want something to happen. The easiest way is to simply add a click event handler to the MenuItem, like this:
<MenuItem Header="_New" Click="mnuNew_Click" />In Code-behind you will then need to implement the mnuNew_Click method, like this:
private void mnuNew_Click(object sender, RoutedEventArgs e)
{
	MessageBox.Show("New");
}
This will suffice for the more simple applications, or when prototyping something, but the WPF way is to use a Command for this.
キーボードショートカットとコマンド
You can easily handle the Click event of a menu item like we did above, but the more common approach is to use WPF commands. There's a lot of theory on using and creating commands, so they have their own category of articles here on the site, but for now, I can tell you that they have a couple of advantages when used in WPF, especially in combination with a Menu or a Toolbar.
First of all, they ensure that you can have the same action on a toolbar, a menu and even a context menu, without having to implement the same code in multiple places. They also make the handling of keyboard shortcuts a whole lot easier, because unlike with WinForms, WPF is not listening for keyboard shortcuts automatically if you assign them to e.g. a menu item - you will have to do that manually.
However, when using commands, WPF is all ears and will respond to keyboard shortcuts automatically. The text (Header) of the menu item is also set automatically (although you can overwrite it if needed), and so is the InputGestureText, which shows the user which keyboard shortcut can be used to invoke the specific menu item. Let's jump straight to an example of combining the Menu with WPF commands:
<Window x:Class="WpfTutorialSamples.Common_interface_controls.MenuWithCommandsSample"
        xmlns="http://schemas.microsoft.com/winfx/2006/xaml/presentation"
        xmlns:x="http://schemas.microsoft.com/winfx/2006/xaml"
        Title="MenuWithCommandsSample" Height="200" Width="300">
    <Window.CommandBindings>
        <CommandBinding Command="New" CanExecute="NewCommand_CanExecute" Executed="NewCommand_Executed" />
    </Window.CommandBindings>
    <DockPanel>
        <Menu DockPanel.Dock="Top">
            <MenuItem Header="_File">
                <MenuItem Command="New" />
                <Separator />
                <MenuItem Header="_Exit" />
            </MenuItem>
            <MenuItem Header="_Edit">
                <MenuItem Command="Cut" />
                <MenuItem Command="Copy" />
                <MenuItem Command="Paste" />
            </MenuItem>
        </Menu>

        <TextBox AcceptsReturn="True" Name="txtEditor" />
    </DockPanel>
</Window>
using System;
using System.Windows;
using System.Windows.Input;
namespace WpfTutorialSamples.Common_interface_controls
{
public partial class MenuWithCommandsSample : Window
{
public MenuWithCommandsSample()
{
InitializeComponent();
}
private void NewCommand_CanExecute(object sender, CanExecuteRoutedEventArgs e)
{
e.CanExecute = true;
}
private void NewCommand_Executed(object sender, ExecutedRoutedEventArgs e)
{
txtEditor.Text = "";
}
}
}
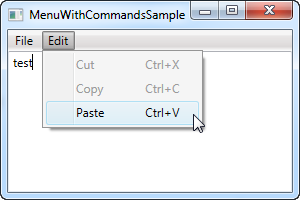
It might not be completely obvious, but by using commands, we just got a whole bunch of things for free: Keyboard shortcuts, text and InputGestureText on the items and WPF automatically enables/disables the items depending on the active control and its state. In this case, Cut and Copy are disabled because no text is selected, but Paste is enabled, because my clipboard is not empty!
And because WPF knows how to handle certain commands in combination with certain controls, in this case the Cut/Copy/Paste commands in combination with a text input control, we don't even have to handle their Execute events - they work right out of the box! We do have to handle it for theNew command though, since WPF has no way of guessing what we want it to do when the user activates it. This is done with the CommandBindings of the Window, all explained in detail in the chapter on commands.
まとめ
WPFのMenuコントロールは簡単に扱えて、かつ高速です。複雑な構造のメニューでも、簡単に作ることができ、WPFのコマンドと組み合わせることで、たくさんの機能を得ることが出来ます。