This article is currently in the process of being translated into Portuguese (~23% done).
In this article series, we're building a complete Snake game from scratch. It makes sense to start with the Introduction and then work your way through the articles one by one, to get the full understanding.
If you want to get the complete source code for the game at once, to get started modifying and learning from it right now, consider downloading all our samples!
Improving SnakeWPF: Adding a high score list
No artigo anterior, fizemos muitas melhorias visuais em nossa implementação do SnakeWPF. Neste artigo, gostaria de adicionar um recurso muito legal: A high score list! Além disso, gostaria de tornar o jogo um pouco mais amigável, adicionando uma tela de boas-vindas . Eu também irei substituir a caixa de mensagem "You died", que não é muito útil para jogos, por uma tela do jogo.
Precisamos de bastante código e markup extra para isto, mas vamos começar pela parte mais fácil - XAML!
XAML
A primeira coisa que eu gostaria de fazer é adicionar um monte de XAML à janela do Snake. Isso consistirá principalmente em 4 novos contêineres (neste caso, controles de borda), que hospedarão uma variedade de controles filhos para suportar várias situações:
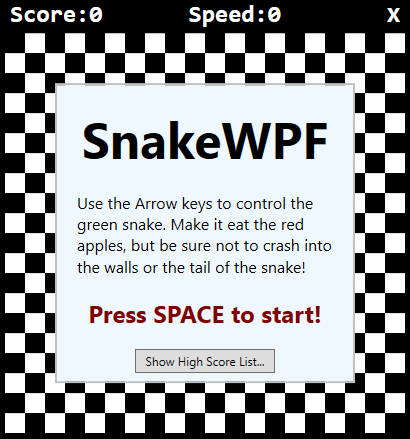
- Um container para apresentar uma mensagem de boas vindas quando o jogo começar, informando sobre que controlos a usar, etc.
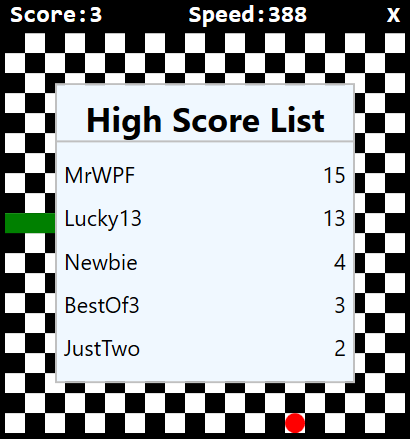
- Um container para mostrar a lista de melhores resultados
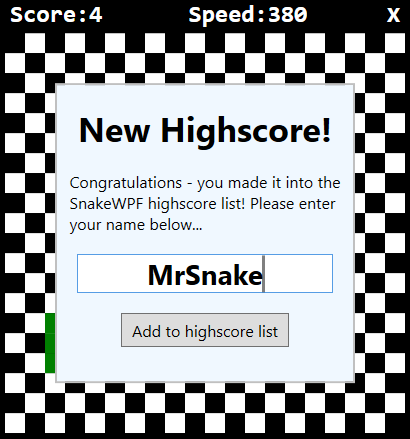
- Um container para mostrar que o utilizador bateu um dos melhores resultados, incluindo uma caixa de texto para introdução dum nome
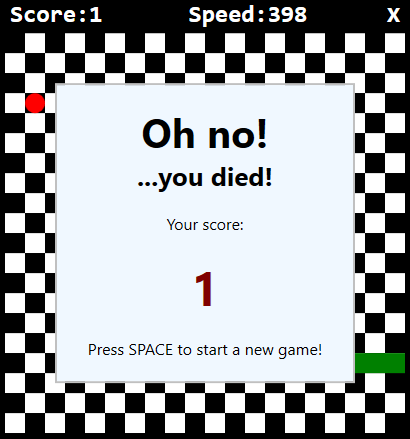
- Um container para mostrar que o utilizador morreu mas que não conseguiu entrar na lista de melhores resultados (substituindo a aborrecida MessageBox usada anteriormente)
Vamos adicionar estes container à GameArea canvas e simplesmente escondê-los quando não necessitarmos deles. Como mencionado, cada container vai servir um propósito diferente e incluir bastante markup, mas só vamos usar controlos WPF que já tenham sido discutidos neste tutorial.
Mensagem de Boas-Vindas
Adicione este pedaço de XAML dentro do controle GameArea Canvas:
<Border BorderBrush="Silver" BorderThickness="2" Width="300" Height="300" Canvas.Left="50" Canvas.Top="50" Name="bdrWelcomeMessage" Panel.ZIndex="1">
    <StackPanel Orientation="Vertical" Background="AliceBlue">
    <TextBlock FontWeight="Bold" FontSize="50" HorizontalAlignment="Center" Margin="0,20,0,0">SnakeWPF</TextBlock>
    <TextBlock TextWrapping="Wrap" Margin="20" FontSize="16">Use the Arrow keys to control the green snake. Make it eat the red apples, but be sure not to crash into the walls or the tail of the snake!</TextBlock>
    <TextBlock FontWeight="Bold" HorizontalAlignment="Center" FontSize="24" Foreground="Maroon">Press SPACE to start!</TextBlock>
    <Button Margin="20" Name="btnShowHighscoreList" Click="BtnShowHighscoreList_Click" HorizontalAlignment="Center" Padding="10,3">Show High Score List...</Button>
    </StackPanel>
</Border>
Em poucas palavras diz ao utilizador o objetivo do jogo, como é que a Snake é controlada e como começar o jogo. A borda, que contêm todo o conteúdo, está inicialmente visível, assim será a primeira coisa que o utilizador conhece quando o jogo começa. Na parte de baixo do ecrã, adicionámos um botão para mostrar a lista de melhores resultados (que vamos adicionar daqui a pouco). O gestor de eventos para o clique vai ser implementado mais tarde no código-fonte.
Lista de Pontuação mais Alta (Recorde)
Now it gets a bit more complex, because I want to do this the WPF-way and use data-binding to display the high score list instead of e.g. manually building and updating the list. But don't worry, I'll explain it all as we move along. First, add this piece of XAML inside the GameArea Canvas, just like we did before - the Canvas will, as mentioned, hold all our Border controls, each of them offering their own piece of functionality for our game:
<Border BorderBrush="Silver" BorderThickness="2" Width="300" Height="300" Canvas.Left="50" Canvas.Top="50" Name="bdrHighscoreList" Panel.ZIndex="1" Visibility="Collapsed">
    <StackPanel Orientation="Vertical" Background="AliceBlue">
    <Border BorderThickness="0,0,0,2" BorderBrush="Silver" Margin="0,10">
        <TextBlock HorizontalAlignment="Center" FontSize="34" FontWeight="Bold">High Score List</TextBlock>
    </Border>
    <ItemsControl ItemsSource="{Binding Source={StaticResource HighScoreListViewSource}}">
        <ItemsControl.ItemTemplate>
        <DataTemplate>
            <DockPanel Margin="7">
            <TextBlock Text="{Binding PlayerName}" DockPanel.Dock="Left" FontSize="22"></TextBlock>
            <TextBlock Text="{Binding Score}" DockPanel.Dock="Right" FontSize="22" HorizontalAlignment="Right"></TextBlock>
            </DockPanel>
        </DataTemplate>
        </ItemsControl.ItemTemplate>
    </ItemsControl>
    </StackPanel>
</Border>
Notice how this Border is initially not displayed (Visibility = Collapsed). We use an ItemsControl (we talked about this previously in this tutorial), with a custom ItemsSource called HighScoreListViewSource. We will be using a CollectionViewSource to make sure that the collection we bind to is always sorted properly. We need to define this resource in the Window XAML, so as a child to the Window tag, you should add this piece of markup, making your Window declaration look like this:
<Window x:Class="WpfTutorialSamples.Games.SnakeWPFSample"
    xmlns="http://schemas.microsoft.com/winfx/2006/xaml/presentation"
    xmlns:x="http://schemas.microsoft.com/winfx/2006/xaml"
    xmlns:d="http://schemas.microsoft.com/expression/blend/2008"
    xmlns:mc="http://schemas.openxmlformats.org/markup-compatibility/2006"
    xmlns:local="clr-namespace:WpfTutorialSamples.Games"
    mc:Ignorable="d"
    x:Name="window"
    xmlns:scm="clr-namespace:System.ComponentModel;assembly=WindowsBase"
    Title="SnakeWPF - Score: 0" SizeToContent="WidthAndHeight" ContentRendered="Window_ContentRendered" KeyUp="Window_KeyUp"
    ResizeMode="NoResize" WindowStyle="None" Background="Black" MouseDown="Window_MouseDown">

    <Window.Resources>
    <CollectionViewSource Source="{Binding ElementName=window, Path=HighscoreList}" x:Key="HighScoreListViewSource">
        <CollectionViewSource.SortDescriptions>
        <scm:SortDescription Direction="Descending" PropertyName="Score" />
        </CollectionViewSource.SortDescriptions>
    </CollectionViewSource>
    </Window.Resources>
    ................
Notice that I sneaked in a new reference: The xmlns:scm, used to access the SortDescription type. I also added the x:Name property and set it to window, so that we can reference members defined on the MainWindow class in Code-behind.
In the Window.Resources, I have added a new CollectionViewSource. It uses binding to attach to a property called HighscoreList, which we will define in Code-behind. Notice also that I add a SortDescription to it, specifying that the list should be sorted descendent by a property called Score, basically meaning that the highest score will be displayed first and so on.
In Code-behind, we need to define the property called HighscoreList, which the ItemsSource relies on, but we'll get to that after we're done adding the last XAML.
Novo recorde
When the user beats an existing high score, we will display a nicely looking message about it. The XAML looks like this, and once again, it should be added inside the GameArea Canvas:
<Border BorderBrush="Silver" BorderThickness="2" Width="300" Height="300" Canvas.Left="50" Canvas.Top="50" Name="bdrNewHighscore" Panel.ZIndex="1" Visibility="Collapsed">
    <StackPanel Orientation="Vertical" Background="AliceBlue">
    <TextBlock HorizontalAlignment="Center" FontSize="34" FontWeight="Bold" Margin="20">New Highscore!</TextBlock>
    <TextBlock HorizontalAlignment="Center" TextWrapping="Wrap" FontSize="16">
        Congratulations - you made it into the SnakeWPF highscore list! Please enter your name below...
    </TextBlock>
    <TextBox Name="txtPlayerName" FontSize="28" FontWeight="Bold" MaxLength="8" Margin="20" HorizontalContentAlignment="Center"></TextBox>
    <Button Name="btnAddToHighscoreList" FontSize="16" HorizontalAlignment="Center" Click="BtnAddToHighscoreList_Click" Padding="10,5">Add to highscore list</Button>
    </StackPanel>
</Border>
All very simple with some text, a TextBox for entering the name and a Button to click to add to the list - we'll define the BtnAddToHighscoreList_Click event handler later.
"Ah não - você morreu!"
The last part is the "Oh no, you died and you didn't make it into the high score list" screen, which we'll use to replace the boring MessageBox which did the same thing previously. The XAML looks like this:
<Border BorderBrush="Silver" BorderThickness="2" Width="300" Height="300" Canvas.Left="50" Canvas.Top="50" Name="bdrEndOfGame" Panel.ZIndex="1" Visibility="Collapsed">
    <StackPanel Orientation="Vertical" Background="AliceBlue">
    <TextBlock HorizontalAlignment="Center" FontSize="40" FontWeight="Bold" Margin="0,20,0,0">Oh no!</TextBlock>
    <TextBlock HorizontalAlignment="Center" FontSize="26" FontWeight="Bold">...you died!</TextBlock>
    <TextBlock Margin="20" TextAlignment="Center" FontSize="16">Your score: </TextBlock>
    <TextBlock Name="tbFinalScore" TextAlignment="Center" FontSize="48" FontWeight="Bold" Foreground="Maroon">0</TextBlock>
    <TextBlock TextAlignment="Center" FontSize="16" Margin="20">Press SPACE to start a new game!</TextBlock>
    </StackPanel>
</Border>
It informs the user about the unfortunate turn of events, displays the final score and tells the user how to start a new game - pretty simple!
Code-behind
With all the XAML in place, we're finally ready to implement the Code-behind stuff! First, we need to implement the event handlers we defined in the XAML. Here's the one for the "Show high score list" button:
private void BtnShowHighscoreList_Click(object sender, RoutedEventArgs e)
{
    bdrWelcomeMessage.Visibility = Visibility.Collapsed;
    bdrHighscoreList.Visibility = Visibility.Visible;
}
Quite simple, as you can see - when the button is clicked, we hide the welcome message and then we display the high score list - we'll add that now.
Implementando o recorde
The other event handler we have relates to adding a new entry to the high score list, but for that, we need a couple of other additions - first of all, the actual property for holding the high score entries:
public ObservableCollection<SnakeHighscore> HighscoreList
{
    get; set;
} = new ObservableCollection<SnakeHighscore>();
As you can see, this is an ObservableCollection, holding the type SnakeHighscore. First, be sure to include the namespace holding the ObservableCollection type:
using System.Collections.ObjectModel;Then implement the SnakeHighscore class:
public class SnakeHighscore
{
    public string PlayerName { get; set; }

    public int Score { get; set; }
}
Quite a simple class, as you can see - it just serves as a container for the name and score of the player who made it into the high score list.
Carregando/Salvando o recorde
We also need some code to load and save the list - the Save method will be called when a new entry is added to the list, while the Load method is called when our game starts. I'll be using a simple XML file to hold the list, which will allow us to use the built-in XmlSerializer class to automatically load and save the list.
There are MANY ways of loading/saving data, and several other relevant formats like JSON or even a plain text file, but I wanted to keep this part in as few lines of code as possible, since it's not that relevant for a WPF tutorial. Also, the XmlSerializer approach makes the code pretty flexible - you can easily add new properties to the SnakeHighscore class and they will be automatically persisted. Here's the LoadHighscoreList() method:
private void LoadHighscoreList()
{
    if(File.Exists("snake_highscorelist.xml"))
    {
    XmlSerializer serializer = new XmlSerializer(typeof(List<SnakeHighscore>));
    using(Stream reader = new FileStream("snake_highscorelist.xml", FileMode.Open))
    {
        List<SnakeHighscore> tempList = (List<SnakeHighscore>)serializer.Deserialize(reader);
        this.HighscoreList.Clear();
        foreach(var item in tempList.OrderByDescending(x => x.Score))
        this.HighscoreList.Add(item);
    }
    }
}
Você precisa inserir namespaces adicionais para isso:
using System.IO;
using System.Xml.Serialization;
Be sure to call the LoadHighscoreList() method, e.g. in the constructor of the Window:
public SnakeWPFSample()
{
    InitializeComponent();
    gameTickTimer.Tick += GameTickTimer_Tick;
    LoadHighscoreList();
}
Próximo, implementamos o método SaveHighscoreList():
private void SaveHighscoreList()
{
    XmlSerializer serializer = new XmlSerializer(typeof(ObservableCollection<SnakeHighscore>));
    using(Stream writer = new FileStream("snake_highscorelist.xml", FileMode.Create))
    {
    serializer.Serialize(writer, this.HighscoreList);
    }
}
The Save method is most relevant to call when we add a new entry - this happens in the BtnAddToHighscoreList_Click() event handler, which should look like this:
private void BtnAddToHighscoreList_Click(object sender, RoutedEventArgs e)
{
    int newIndex = 0;
    // Where should the new entry be inserted?
    if((this.HighscoreList.Count > 0) && (currentScore < this.HighscoreList.Max(x => x.Score)))
    {
    SnakeHighscore justAbove = this.HighscoreList.OrderByDescending(x => x.Score).First(x => x.Score >= currentScore);
    if(justAbove != null)
        newIndex = this.HighscoreList.IndexOf(justAbove) + 1;
    }
    // Create & insert the new entry
    this.HighscoreList.Insert(newIndex, new SnakeHighscore()
    {
    PlayerName = txtPlayerName.Text,
    Score = currentScore
    });
    // Make sure that the amount of entries does not exceed the maximum
    while(this.HighscoreList.Count > MaxHighscoreListEntryCount)
    this.HighscoreList.RemoveAt(MaxHighscoreListEntryCount);

    SaveHighscoreList();

    bdrNewHighscore.Visibility = Visibility.Collapsed;
    bdrHighscoreList.Visibility = Visibility.Visible;
}
It's quite simple: We try to decide if the new entry should be added at the top of the list (a new best!) or if it belongs further down the list. Once we have the new index, we insert a new instance of the SnakeHighscore class, using the current score and the name entered by the player. We then remove any unwanted entries from the bottom of the list, if the list suddenly has more items than we want (MaxHighscoreListEntryCount). Then we save the list (SaveHighscoreList()) and hide the bdrNewHighscore container, switching the view to the bdrHighscoreList container.
But there are still a couple of things to do. First of all, these new screens (dead message, high score list etc.) needs to be hidden each time a new game is stared. So, the top of the StartNewGame() method, which we implemented in a previous article, should now look like this:
private void StartNewGame()
{
    bdrWelcomeMessage.Visibility = Visibility.Collapsed;
    bdrHighscoreList.Visibility = Visibility.Collapsed;
    bdrEndOfGame.Visibility = Visibility.Collapsed;
    ........
The next thing we need to do is to modify the EndGame() method. Instead of just displaying the MessageBox, we need to check if the user just made it into the high score list or not and then display the proper message container:
private void EndGame()
{
    bool isNewHighscore = false;
    if(currentScore > 0)
    {
    int lowestHighscore = (this.HighscoreList.Count > 0 ? this.HighscoreList.Min(x => x.Score) : 0);
    if((currentScore > lowestHighscore) || (this.HighscoreList.Count < MaxHighscoreListEntryCount))
    {
        bdrNewHighscore.Visibility = Visibility.Visible;
        txtPlayerName.Focus();
        isNewHighscore = true;
    }
    }
    if(!isNewHighscore)
    {
    tbFinalScore.Text = currentScore.ToString();
    bdrEndOfGame.Visibility = Visibility.Visible;
    }
    gameTickTimer.IsEnabled = false;
}
The method basically checks if there's still available spots in the high score list (we define a maximum of 5 entries) or if the user just beat one of the existing scores - if so, we allow the user to add their name by displaying the bdrNewHighscore container. If no new high score was accomplished, we display the bdrEndOfGame container instead. Be sure to define the MaxHighscoreListEntryCount constant:
const int MaxHighscoreListEntryCount = 5;I also modified the ContentRendered() method - now that we have a nice-looking welcome screen, we don't want the game to just start automatically. Instead, we urge the user to press Space to start the game or click a button to see the highscore list before the game begins, so we simply remove (or comment out) the call to StartNewGame():
private void Window_ContentRendered(object sender, EventArgs e)
{
    DrawGameArea();
    //StartNewGame();
}
With all that in place, start the game and do your best - as soon as the game ends, you should hopefully have made it into your brand new SnakeWPF high score list!
Resumo
In this article, we made a LOT of improvements to our SnakeWPF implementation. The most obvious one is of course the high score list, which did require quite a bit of extra markup/code, but it was totally worth it! On top of that, we made some nice usability improvements, while once again making our project look even more like a real game.