This article has been localized into Chinese by the community.
创建和使用用户控件
在WPF中由UserControl类表示,用户控件是将标记和代码分组到可重用容器中的概念,因此具有相同界面相同功能,可以在几个不同的位置使用,甚至可以在多个应用程序中使用。
用户控件的行为很像WPF窗口 - 您可以放置其他控件的区域,然后是可以与这些控件交互的代码后置文件。 包含用户控件的文件也以.xaml结尾,而代码后置以.xaml.cs结尾 - 就像一个Window。 起始标记虽然看起来有点不同:
<UserControl x:Class="WpfTutorialSamples.User_Controls.LimitedInputUserControl"
         xmlns="http://schemas.microsoft.com/winfx/2006/xaml/presentation"
         xmlns:x="http://schemas.microsoft.com/winfx/2006/xaml"
         xmlns:mc="http://schemas.openxmlformats.org/markup-compatibility/2006"
         xmlns:d="http://schemas.microsoft.com/expression/blend/2008"
         mc:Ignorable="d"
         d:DesignHeight="300" d:DesignWidth="300">
    <Grid>

    </Grid>
</UserControl>
没什么太奇怪的 - 一个根UserControl元素而不是Window元素,然后是DesignHeight和DesignWidth属性,它们在设计时控制用户控件的大小(在运行时,用户控件的大小将由容纳它的容器决定)。 你会在后置代码中注意到同样的事情,它继承UserControl而不是Window。
创建用户控件
通过右键单击要添加它的项目或文件夹名称,向项目添加用户控件,就像添加另一个Window一样,如此截图所示(可能看起来有点不同,具体取决于您正在使用的Visual Studio版本):

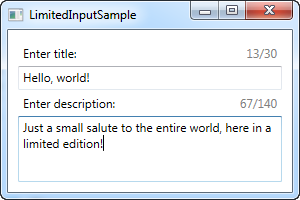
在这篇文章中,我们将创建一个有用的用户控件,能够将TextBox中的文本数量限制为特定数量的字符,同时向用户显示已使用的字符数以及可以使用的字符数。 这很简单,并且在许多Web应用程序(如Twitter)中使用。 将这个功能添加到常规窗口很容易,但由于它可能在应用程序的多个位置使用,因此将它包装在一个易于重用的UserControl中是有意义的。
在我们深入研究代码之前,让我们看一下我们的最终结果:

这是用户控件本身的代码:
<UserControl x:Class="WpfTutorialSamples.User_Controls.LimitedInputUserControl"
         xmlns="http://schemas.microsoft.com/winfx/2006/xaml/presentation"
         xmlns:x="http://schemas.microsoft.com/winfx/2006/xaml"
         xmlns:mc="http://schemas.openxmlformats.org/markup-compatibility/2006"
         xmlns:d="http://schemas.microsoft.com/expression/blend/2008"
         mc:Ignorable="d"
         d:DesignHeight="300" d:DesignWidth="300">
    <Grid>
    <Grid.RowDefinitions>
        <RowDefinition Height="Auto" />
        <RowDefinition Height="*" />
    </Grid.RowDefinitions>
    <Grid.ColumnDefinitions>
        <ColumnDefinition Width="*" />
        <ColumnDefinition Width="Auto" />
    </Grid.ColumnDefinitions>
    <Label Content="{Binding Title}" />
    <Label Grid.Column="1">
        <StackPanel Orientation="Horizontal">
        <TextBlock Text="{Binding ElementName=txtLimitedInput, Path=Text.Length}" />
        <TextBlock Text="/" />
        <TextBlock Text="{Binding MaxLength}" />
        </StackPanel>
    </Label>
    <TextBox MaxLength="{Binding MaxLength}" Grid.Row="1" Grid.ColumnSpan="2" Name="txtLimitedInput" ScrollViewer.VerticalScrollBarVisibility="Auto" TextWrapping="Wrap" />
    </Grid>
</UserControl>
using System;
using System.Windows.Controls;
namespace WpfTutorialSamples.User_Controls
{
public partial class LimitedInputUserControl : UserControl
{
public LimitedInputUserControl()
{
InitializeComponent();
this.DataContext = this;
}
public string Title { get; set; }
public int MaxLength { get; set; }
}
}标记非常简单:一个有两列两行的Grid。 Grid的上半部分包含两个标签,一个显示标题,另一个显示统计数据。 它们中的每一个都使用数据绑定来获取所需的所有信息 - Title和MaxLength来自后置代码的属性,我们已将其定义为常规类的常规属性。
当前字符计数是通过直接绑定到TextBox控件上的Text.Length属性获得的,该控件使用用户控件的下半部分。 结果可以在上面的截图中看到。 请注意,由于所有这些绑定,我们不需要任何C#代码来更新标签或在TextBox上设置MaxLength属性 - 相反,我们只是直接绑定到属性。
消费/使用用户控件
有了上面的代码,我们所需要的就是在Window中消费(使用)用户控件。 我们将通过在Window的XAML代码的顶部添加对UserControl所在的命名空间的引用来实现:
xmlns:uc="clr-namespace:WpfTutorialSamples.User_Controls"之后,我们可以使用uc前缀将控件添加到我们的Window,就像任何其他WPF控件一样:
<uc:LimitedInputUserControl Title="Enter title:" MaxLength="30" Height="50" />请注意我们如何直接在XAML中使用Title和MaxLength属性。 这是我们窗口的完整代码示例:
<Window x:Class="WpfTutorialSamples.User_Controls.LimitedInputSample"
    xmlns="http://schemas.microsoft.com/winfx/2006/xaml/presentation"
    xmlns:x="http://schemas.microsoft.com/winfx/2006/xaml"
    xmlns:uc="clr-namespace:WpfTutorialSamples.User_Controls"
    Title="LimitedInputSample" Height="200" Width="300">
    <Grid Margin="10">
    <Grid.RowDefinitions>
        <RowDefinition Height="Auto" />
        <RowDefinition Height="*" />
    </Grid.RowDefinitions>

    <uc:LimitedInputUserControl Title="Enter title:" MaxLength="30" Height="50" />
    <uc:LimitedInputUserControl Title="Enter description:" MaxLength="140" Grid.Row="1" />

    </Grid>
</Window>
有了它,我们可以在一行代码中重用这整个功能,如本例所示,我们有两个限制文本输入的控件。 如前所示,最终结果如下所示:

小结
强烈建议在用户控件中放置常用的界面和功能,正如您在上面的示例中所看到的,它们非常易于创建和使用。